Yes, there are a lot of guides out there explaining how to create a WordPress website.
But the more you read them, the more confused you’ll end up being.
Don’t worry, though.
We’ve compiled an easy-to-understand, step-by-step WordPress tutorial for beginners.
Just follow along, and your brand new WordPress website will be up and running before you even notice!
Learn how Tidio helped Endeksa boost their customer satisfaction
First off, let’s answer the basic questions—
How does WordPress work? And what is it exactly, anyway?
WordPress overview
WordPress is a content management system (CMS), which means it is a software application that lets users produce and manage digital content. You don’t have to be a programmer to be using WordPress proficiently, you just need some time to dive into it.
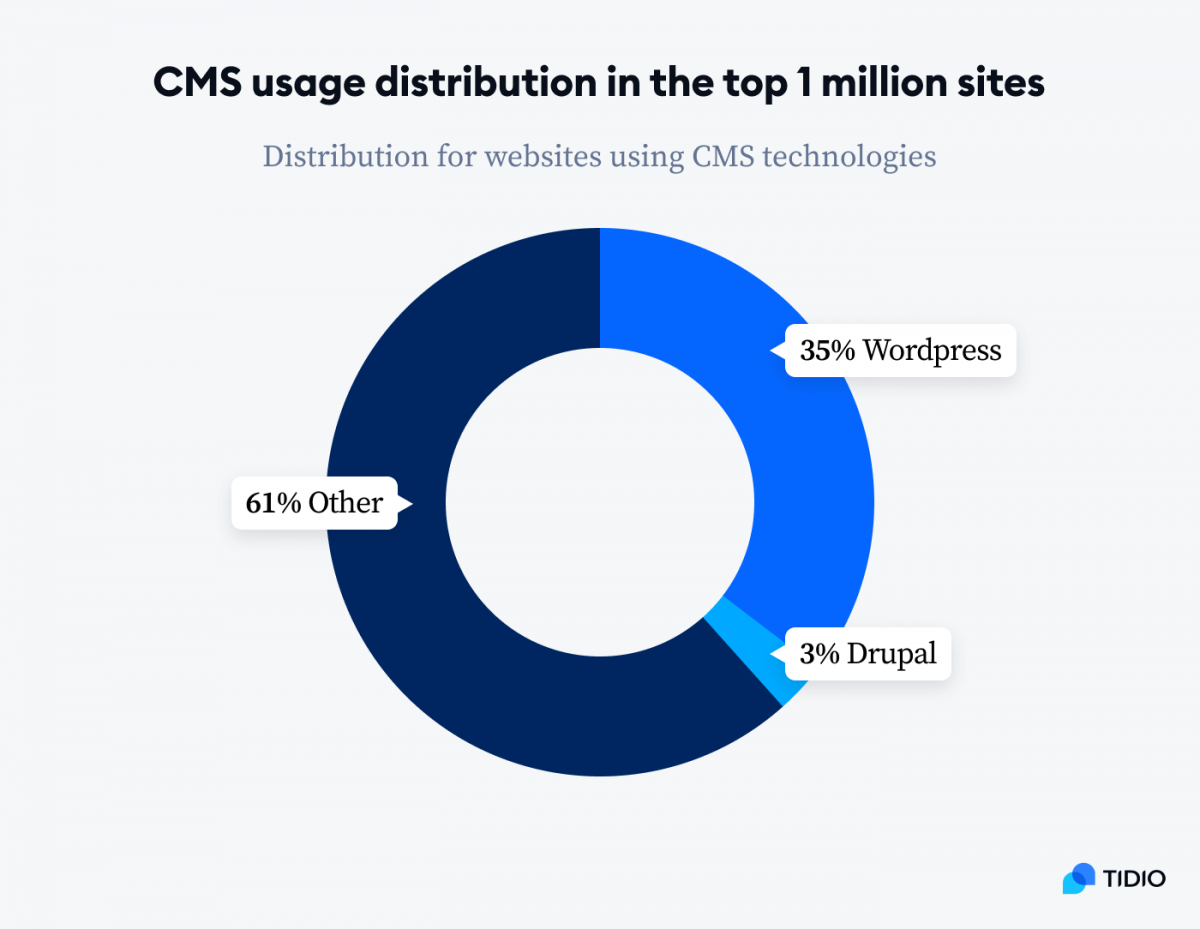
WordPress is the largest of its kind on the internet. A banging 35% of all websites on the web use it. As of the time of writing this, there were 66,490,408 downloads of the newest version of WordPress.
This number keeps growing by the hour, and there’s a good reason for it.
WordPress is very user-friendly and intuitive.
WordPress is a great tool to build your website easily. It has a wide range of themes, templates, and other elements you can click through to help you make your WordPress website. You can also use it to build your online store. With just a few plugins, it will be up and running in no time.
Steps to build WordPress website
WordPress is an excellent choice for anyone looking to build a flexible, customizable online presence. Whether you’re starting a blog, an online store, or a portfolio, WordPress offers the tools and versatility to bring your vision to life. But if you’re new to website building, the process can seem a bit overwhelming. Fortunately, breaking it down into clear, manageable steps makes it much easier. Let’s look into those.
One second—but which WordPress are we talking about?
1. Choose the right type of WordPress for your website
Here’s the thing:
WordPress comes in two varieties: WordPress.com and WordPress.org
And before you even start using WordPress, you must make up your mind as to which one you need.
Let’s look at the difference between the two.
WordPress.com vs. WordPress.org
The most significant difference between WordPress.com and WordPress.org is that the former is a hosting service, and the latter is system software.
Okay. But what does that mean? Let’s take them one by one.
What is WordPress.com?
It is a blog hosting provider. It is not directly related to WordPress.org, but it does use it at its core. It has a free basic platform and paid plans. WordPress.com gives you a domain name and is your hosting provider, so you get everything as a package.
WordPress.com doesn’t allow you as much customization as WordPress.org, and there are many limitations to it. But if you’re just playing around and starting up your blog, then it’s the right one for you. It’s also a good choice if you don’t want to worry about any initial costs.
What is WordPress.org, then?
WordPress.org is system software that allows you to build your website. It is free to use, but you need to have your own domain and hosting provider. You have complete control over how your website looks and functions. WordPress.org allows you to customize your site as much as you want, put ads, and plugins on it, so it best serves your desired purpose, so it best serves your desired purpose, whether you’re planning to launch an online store or a blog site.
It is the right place for anyone serious about creating their website or blog online. It also gives you more control over setting up a WordPress site because it has better options and possible personalization.
Look at the infographics below before you learn how to start a WordPress site. It’s a quick introduction to WordPress.org and WordPress.com.

n this tutorial, we will focus on how to use WordPress.org. Therefore, if you decide to choose WordPress.com, follow the instructions on their website for an easy setup.
So—
Before you start installing WordPress, you need to get a domain and hosting. So, let’s see which ones are the best choices for you.
2. Get your domain and hosting
Let’s get the definitions right:
The domain is your website’s name. It is the URL of your website. The domain is what people type into the browser to find you.
Web hosting service allows you to store your website on a web server. The hosting is how your website can be published and viewed.
Let’s say the domain is your online house address, and the web hosting server is the housing development.
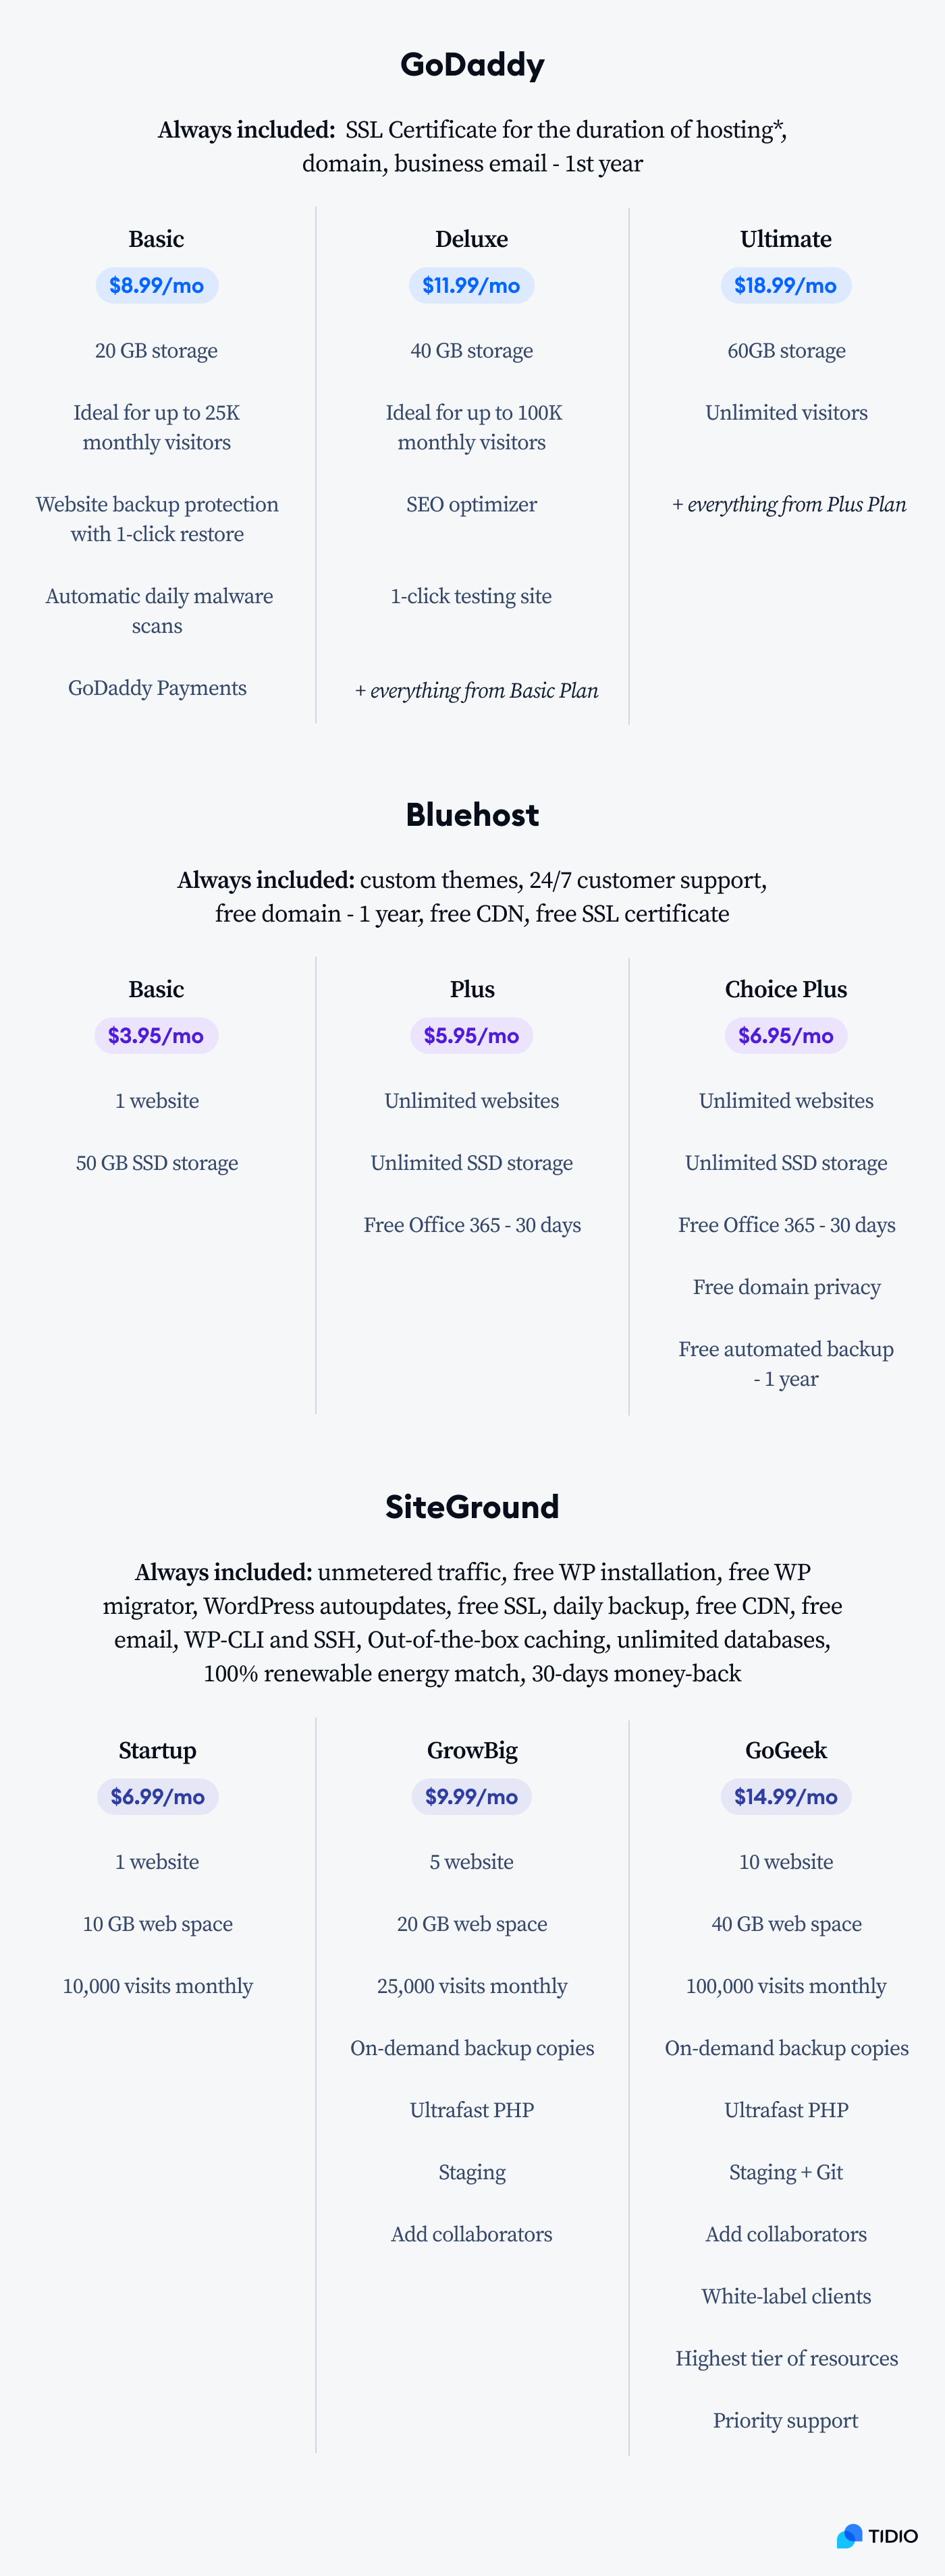
There are many web host providers out there, so you may feel a little overwhelmed. GoDaddy, Bluehost, NameHero, Kinsta, and SiteGround are the top players in the field. Each of them has a dedicated page where you can find more information on their WordPress solutions. Additionally, securing your hosting is crucial for protecting your website from potential threats. If you wish to explore all the ins and outs of these providers, check out this in-depth comparison between them.
For our purposes, we’ve prepared a nifty comparison table of the prices and features that each of the web hosts offers:
There are many more choices for you on the internet and if you want to explore a few of them then check out this list of the best web hosting options.
Bluehost is a recommended hosting provider by WordPress and hosts most of the WordPress websites. SiteGround is the top-rated hosting provider by WordPress users. And GoDaddy is the largest domain registrar in the world, it ranks right behind Google as the biggest hosting provider, and the setup is really simple.
This is the reason why, for this article, we’ll be using GoDaddy. But you should choose a hosting provider that best suits your needs.
How to use WordPress with GoDaddy?
So, if you decided on this web hosting then follow these three steps to sign up for it:
- Go to GoDaddy WordPress hosting
- Decide on the plan and duration. You will get a domain name included in your hosting plan
- Go to the Checkout page, complete the transaction, and you will have a hosting and a domain name ready
Follow this little domain checklist to help you choose your website’s name:
- Come up with more than one name for your website just in case the first one is taken. There were over 1.9 billion websites out there at the time of writing this article, and the number keeps on increasing, so you might need to get creative. If that’s not your strong suit, try using a tool to generate website naming ideas. This is particularly useful if you’re starting a brand from scratch and need a helping hand. It’s also a great way to iterate on an existing domain name or company title, without monopolizing your time.
- Consider possible misspellings your customers might make when typing in your domain name. Simplify your name if possible.
- Decide if you want your website to end with “.com” (used the most; for commercial and personal use), “.net” (suitable for internet infrastructure), or “.org” (mostly used for non-profit companies).
- Consider the length of your name. Some browsers don’t allow anything above 26-characters.
Check if your dream domain name is free with this tool.
If it is free, great! Let’s move on 🙂
If it’s not—try different variations or come up with synonyms until you find that perfect match.
Alternatively, you can try and find domains for sale. But beware! Sometimes the prices are very high.
Remember
If you decide to choose any provider we didn’t mention, check if their services comply with WordPress requirements before you pay for your plan:- PHP 7.4 or greater
- MySQL 5.6 or MariaDB 10.1 or greater
Time to start things up! Since you have your name and a place to put your website into, let’s move on to our WordPress.org tutorial.
3. Install WordPress
There are two ways to install WordPress. The first one is to go through your hosting account. The latter is to download and install WordPress directly from their website. Let’s explore both options more in-depth.
Through your hosting provider
If you decide to use your GoDaddy account to install WordPress, then follow this step-by-step video guide:
And if you decide on a different web host then check out these guides. They will lead you through the process of installing WordPress for beginners:
Directly through WordPress
This will take you no longer than 5 minutes. Just follow these simple steps:
- Download the latest version of WordPress
- Unzip the file
- Create MySQL and a database on your web server.
What is MySQL?
MySQL is a database system to store and restore your information. A complete guide on MySQL databases can be helpful to look into if you want to learn the details. You can also look into the MySQL company website for complete information on what they do. Most hosting providers give you free basic MySQL together with your hosting. GoDaddy hosting includes a MySQL database, and you can find it on your account.
You can now upload WordPress files to your desired location.
Remember to upload your files into the appropriate directory. The folder you upload them into depends on whether you want to have WordPress on your root domain or a subdomain.
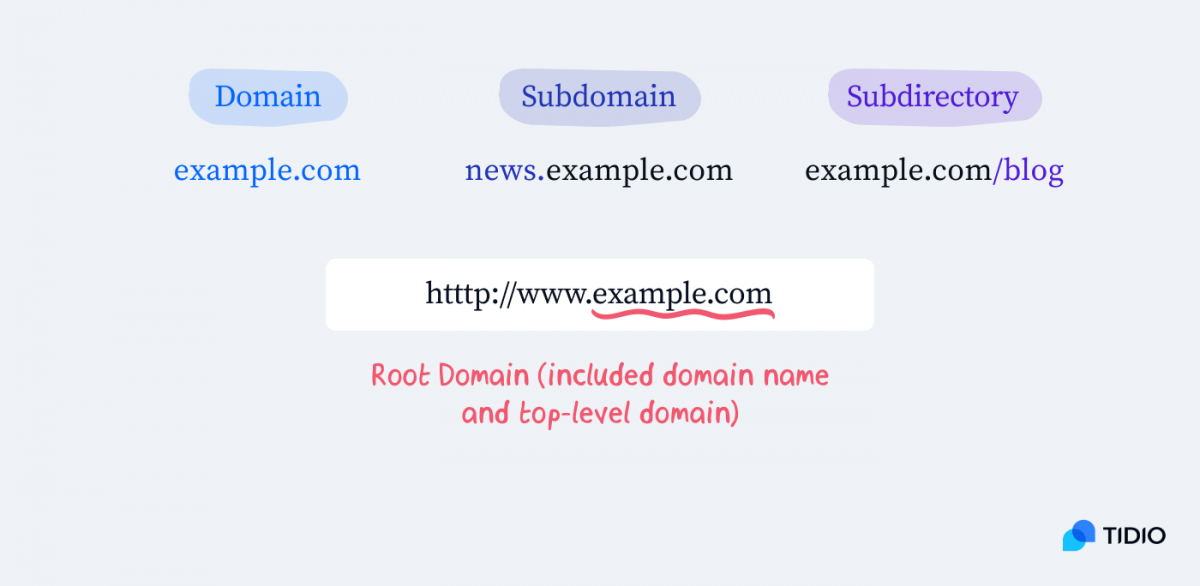
If it’s your main domain, then move or upload all the files from your unzipped WordPress directory into your site’s root directory.
If you choose to place it in a subdirectory of a website, just create one on your server, and upload your unzipped WordPress via FTP.
Okay—since you got it installed, let’s learn how to make your site live.
How to make your WordPress site live and public?
Once you complete all the previous steps, access the URL in a web browser to run the WordPress installation script.
To access your admin section add “/wp-admin” to the end of your URL. This should look like this:
Keep in mind that this is a default web address, but your hosting provider may change it. So if this URL doesn’t work, check with your web host provider for more information.
Create a WordPress account by signing in. To do this, enter your details and make up a password.
Once you fill it in, you’ll see a login page. This means your website is live and public, and you can start playing around with it.
So, let’s get to it and see how to make a website with WordPress.
4. Get to know your WordPress dashboard
Once you log in, the fun begins!
Fun? Is WordPress easy to use, then?
Not really. But we’ll show you everything you need to know to make the process as easy as possible. Let’s start with WordPress basics by going through your dashboard.
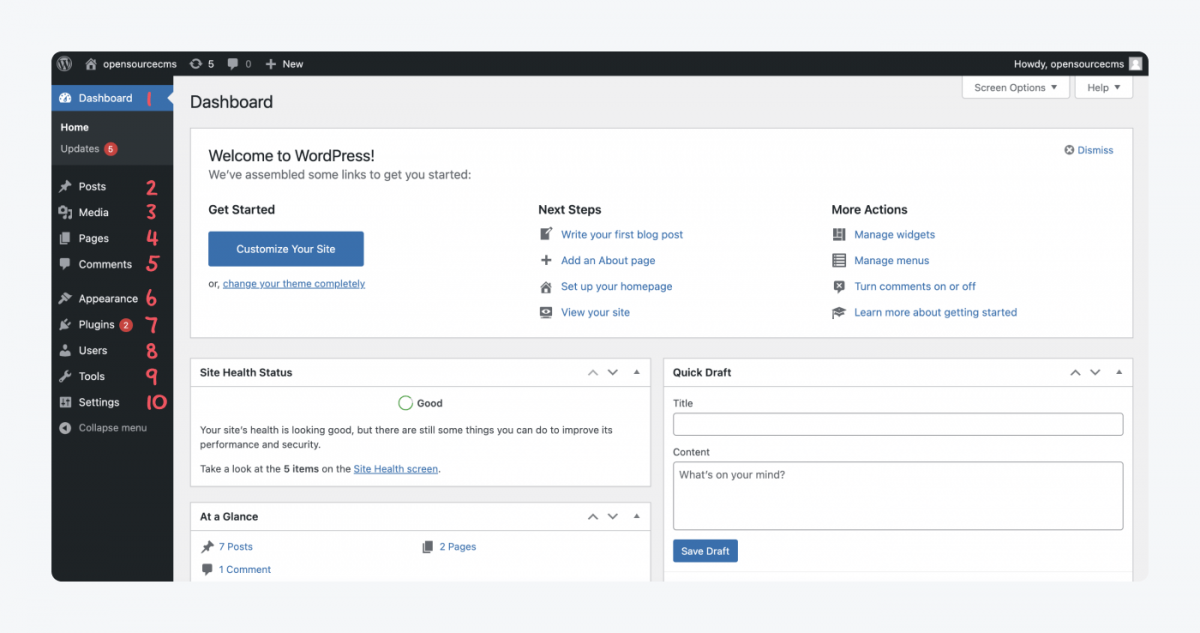
- Dashboard. Current status of your website (Health, Comments, Posts, Activity). You can also see what actions WordPress recommends to get you started on your website.
- Posts. Create, edit and manage blog posts
- Media. Upload, manage, remove images and other media.
- Pages. Create, edit, and manage web pages.
- Comments. Oversee comments.
- Appearance. Change design, customize how elements are displayed.
- Plugins. Install or uninstall plugins.
- Users. Manage user accounts.
- Tools. Check site health, import, and export posts or comments from other systems.
- Settings. Change settings for your website. This includes general settings, as well as reading, discussions, media size, permalink, and privacy.
If there is a section you’re particularly interested in, click it from the list, and teleport yourself there.
So, let’s get started with this website builder tutorial by first picking and installing your theme.
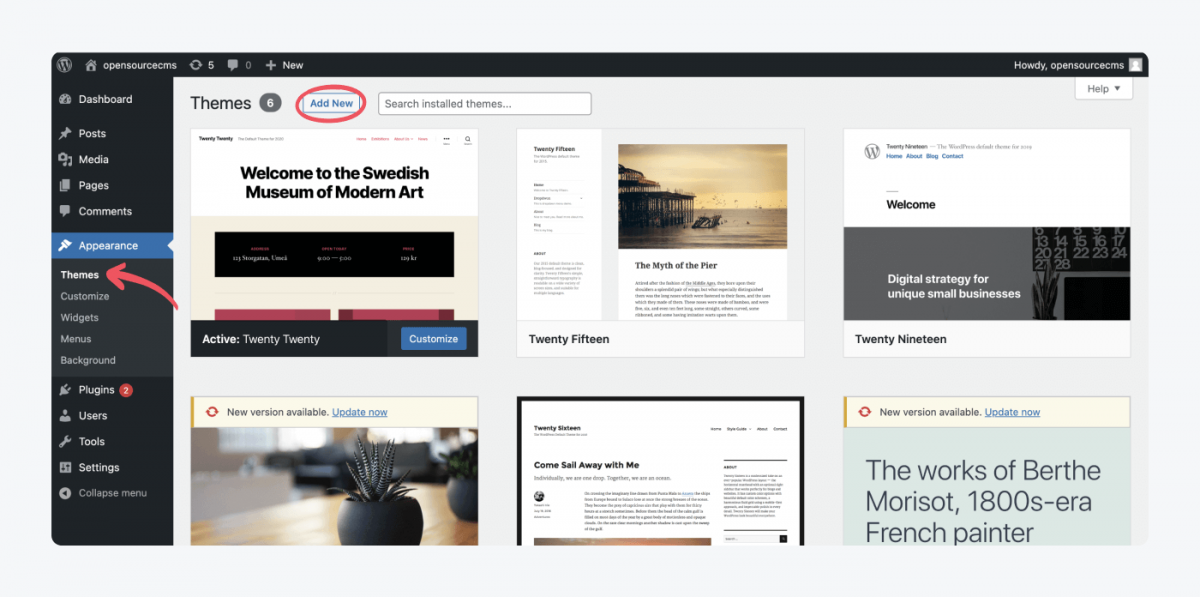
5. Choose your WordPress theme
WordPress themes define the look of your WordPress site.
You can find them under the Appearance tab on your dashboard. There are plenty of free themes and premium themes, so you can browse around until you find your perfect match.
After clicking through to this tab, you can search and browse all the available themes or add a new theme by clicking Add New.
Install your theme
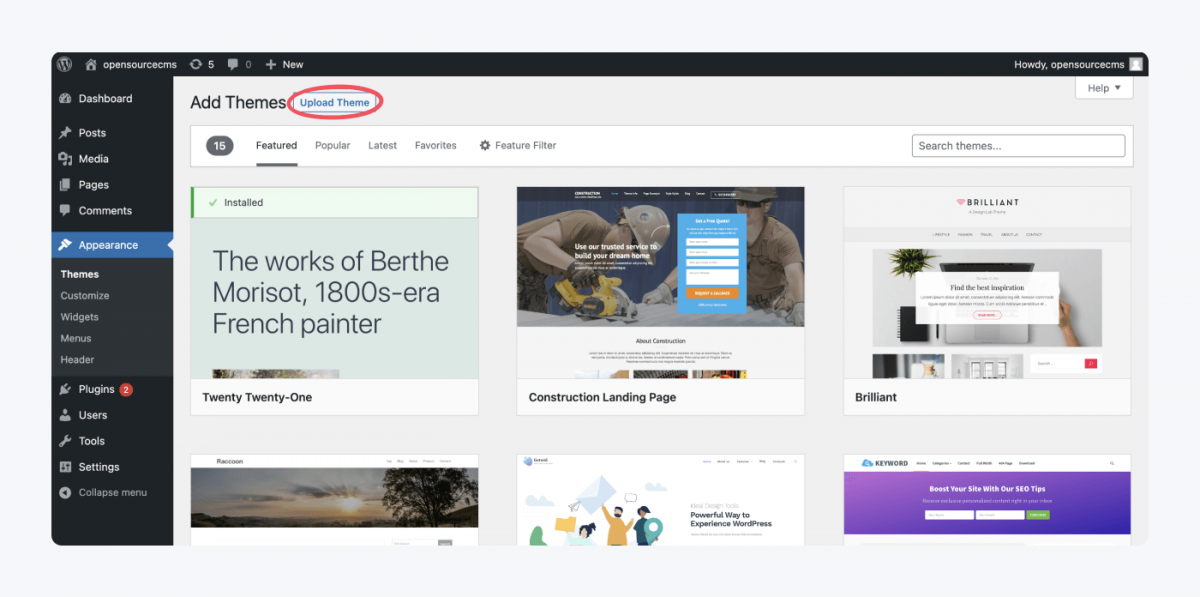
Once you find a theme that matches your type of website, install it with just one click on the… Install button. Yes, it’s this obvious.
But—
What if you don’t like any of the themes that WordPress has in stock? Go to themeforest.net, elegantthemes.com, or mythemeshop.com. You can browse through thousands of WordPress themes there and find the perfect fit for your site.
You can also add your own theme if you wish. To do this, go to the Themes tab and click on the Add new button, and then press Upload Theme.
Customize the WordPress theme
To start customizing and making changes to your theme, click on the pencil icon next to the element you want to edit.
This will take you to the relevant menu section.
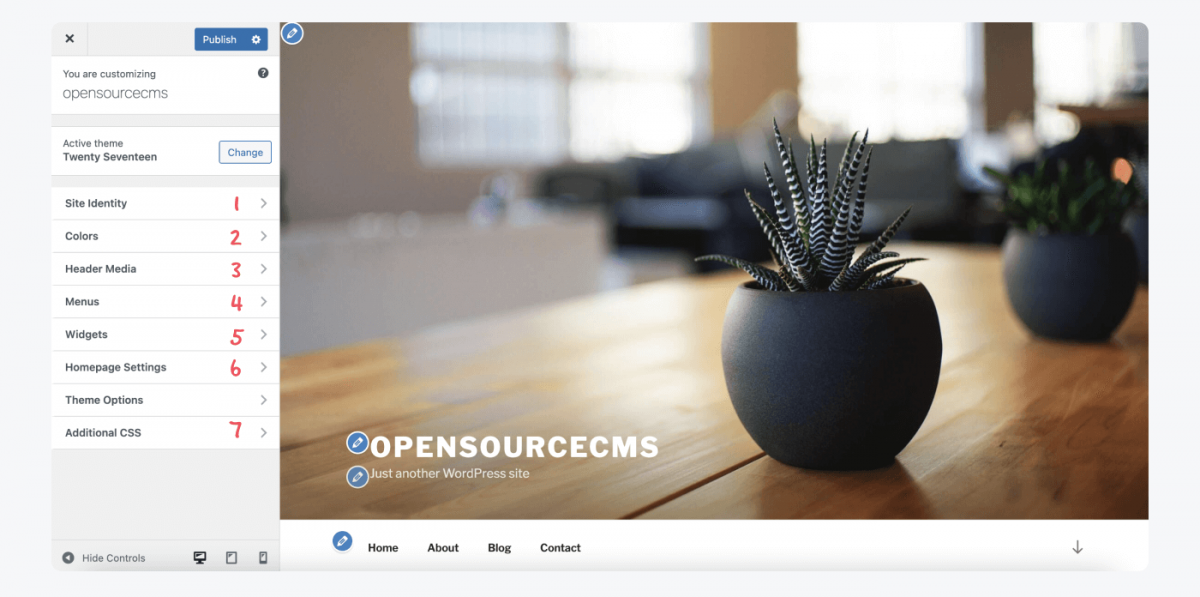
- Site Identity. Change your title and tagline.
- Colors. Change the color scheme of your site.
- Header media. Manage the image/ video people see right at the top of your page.
- Menus tab. Set up a Top Menu for your website and Social Links menu for social media linking. You can also choose where to display them.
- Widgets. Add widgets to your pages and decide where to put them.
- Homepage settings. Choose which page you want to use as your homepage.
- Additional CSS. Add your own CSS code to customize your site even more.
Edit the elements and make the website your own. Make sure to put a navigation menu bar for your site visitors to be able to click through to their desired destination.
And once you’re happy with the look of your site, let’s move on and have a look at the Widgets page.
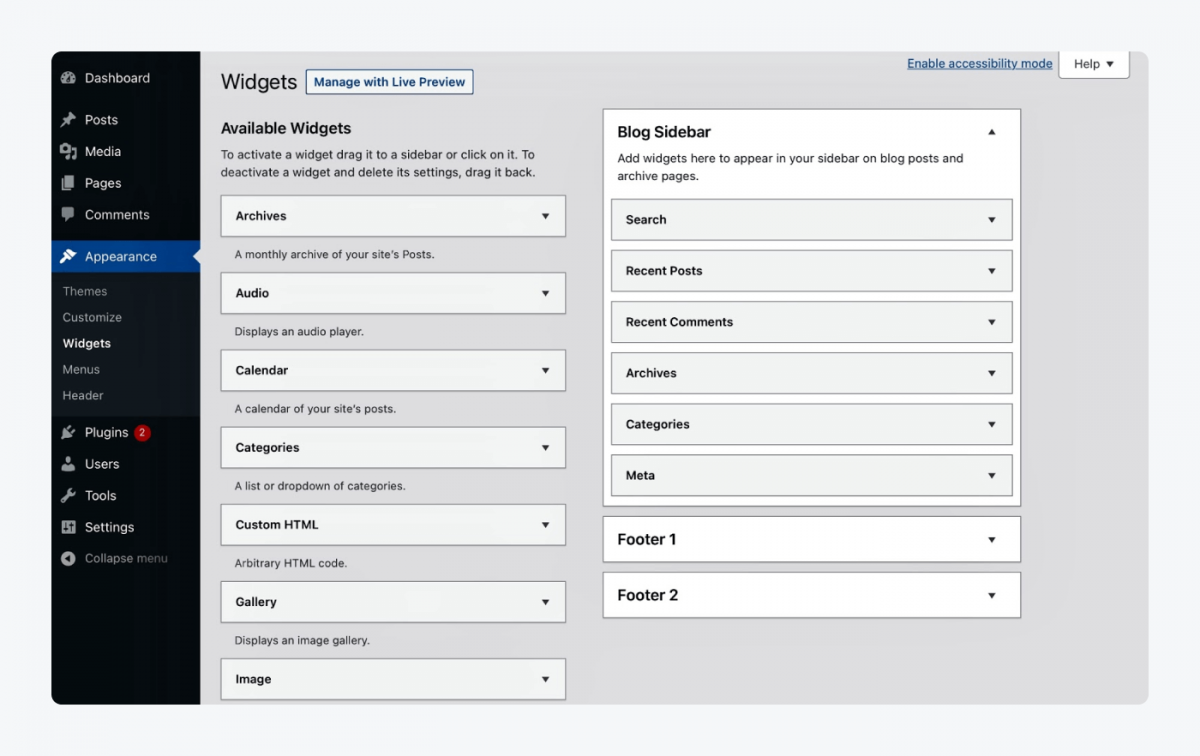
You can see the available widgets as well as your blog sidebar here.
What are the widgets on a WordPress website?
Do you know those little onscreen elements on your phone that show you a quick view of the app? Those are the widgets, and they work similarly on WordPress. They are like gadgets to add a function to your site. Find out more about WordPress widgets, how to install, display and use them.
You can add different widgets to your sidebar. The sidebar is placed alongside your article and contains additional information or features. Learn more about sidebar functions and how to register them.
Okay—since you have a background for your website, let’s learn how to fill it up with content.
6. Create content
There are two main types of content in WordPress: pages and posts.
The difference between pages and posts is that posts refer to your blog posts specifically. Pages refer to all the static pages on your site, such as the contact us, or home page.
To add content to your web pages:
- Go to the Pages tab
- Click on Add New
This will lead you to a blank sheet that you can make into the homepage, products page or even your contact form. It comes with a sidebar where you can change elements of your page and block settings. You can add more blocks by clicking on the plus sign.
Here’s what this looks like in practice:
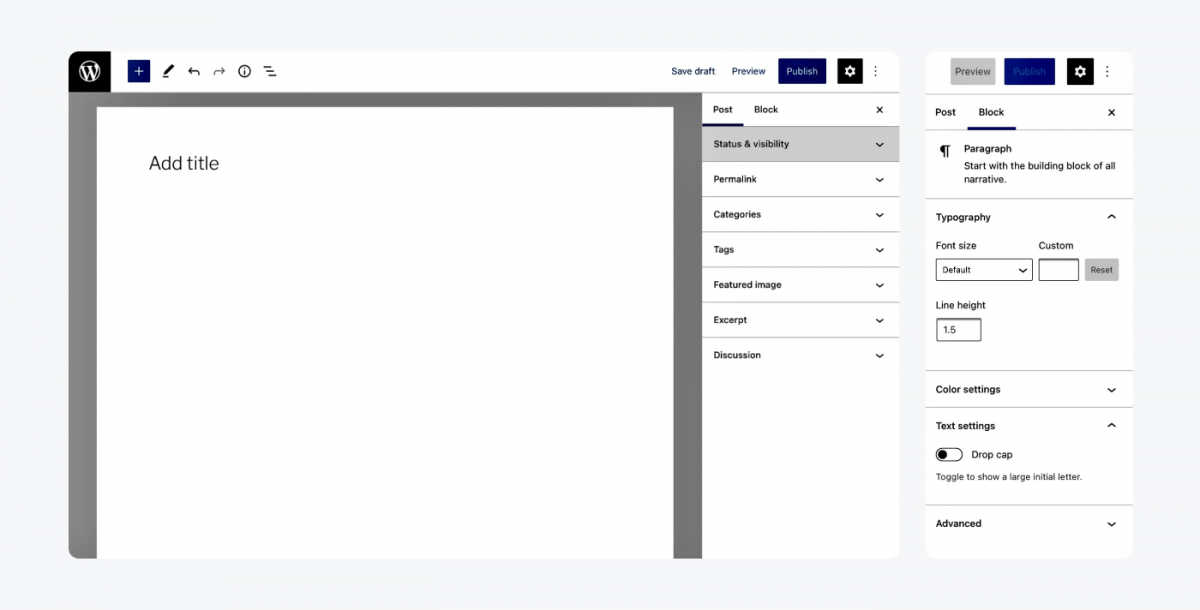
Blocks are elements on your site, such as text, media, or buttons.
From Page settings, you can choose if the page is public or private. You can also manage permalinks, images, and discussions. From Blocks, you have a choice of font, color scheme, and text.
When you click on the plus sign, you will see various blocks to add to your page. These include paragraphs, media lists, shortcodes, and many more.
Blocks on your page builder allow you to customize each part of your page easily. Blocks are categorized into:
- Text
- Media
- Design
- Widgets
- Embeds
You can move your blocks around the page after creating them. This gives you all the creative freedom to make your WordPress website just the way you want it.
While creating pages, consider putting the standard base pages on your website.
- Home page
- Product
- Blog
- About us
- Contact us
This is a standard menu layout for websites. People expect it, so you should stick to what they know. Don’t confuse your reader because confusing them often means losing them. Just like Donald Miller wrote in his book, Building a StoryBrand: “If you confuse, you’ll lose.”
How to create blog posts on WordPress?
The process of creating blog posts is very straightforward. Go to your Posts tab and follow the exact same instructions as with setting up pages. We’ll talk about setting up a WordPress blog a little further down.
Instructions to WordPress categories:
- A drop-down menu will show you the categories you currently have and an option to Add New Category
- After you click that option, choose a name and parent category
- Click Add New Category button, and there you have it!
Now you can separate and organize your blog posts into different categories for your reader’s convenience and your site’s clarity.
How to use shortcode in WordPress
A shortcode is a website version of a shortcut. It lets you easily add features to your website that normally would require coding skills.

To show you how to use shortcodes in WordPress, let’s go to a new page.
- Click on the plus sign and Browse all. This will show you block options you can choose from.
- Scroll down to Widgets and click on the Shortcode icon. This will open a box.
- In the Shortcode area, insert the element you want to incorporate into your page. This could be a gallery, slideshow, playlist, or in our case, a YouTube video.
- After you input the desired shortcode, click Preview.
- Choose Preview in the new tab from the drop-down menu. This presents how your shortcode will look to your readers.
Take a look at this list of shortcodes that you can use on WordPress.
When you input your shortcode to WordPress, it should look something like this:
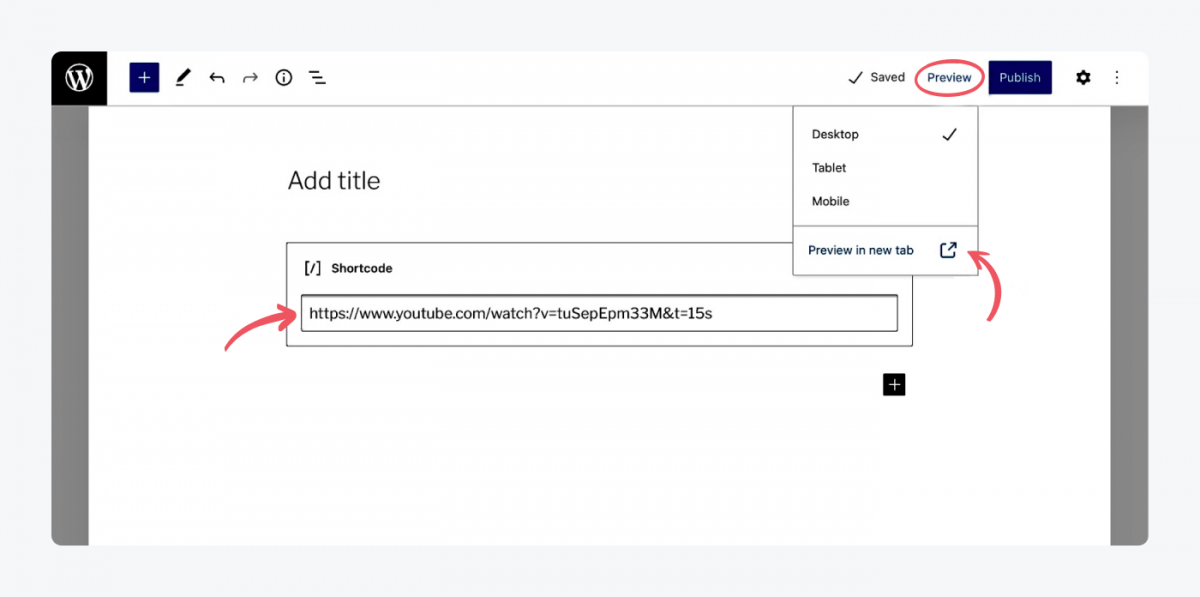
In the Shortcode area, insert the element you want to incorporate into your page. This could be a gallery, slideshow, playlist, or in our case, a YouTube video.
After you input the desired shortcode, click Preview. Then choose Preview in the new tab from the drop-down menu. This presents how your shortcode will look to your readers.
To make your site more engaging and interesting for your audience, add media to it. These include photos, videos, and other interactive elements. How to do that? Scroll down to find out.
7. Upload media
OK—
Let’s say you’ve written your copy, added the elements you wanted. Now, your page or blog post needs images (or other media).
Go to the Media tab. This tab will be empty for now. Once you start making a WordPress website and uploading images and videos, you’ll be able to view them all here.
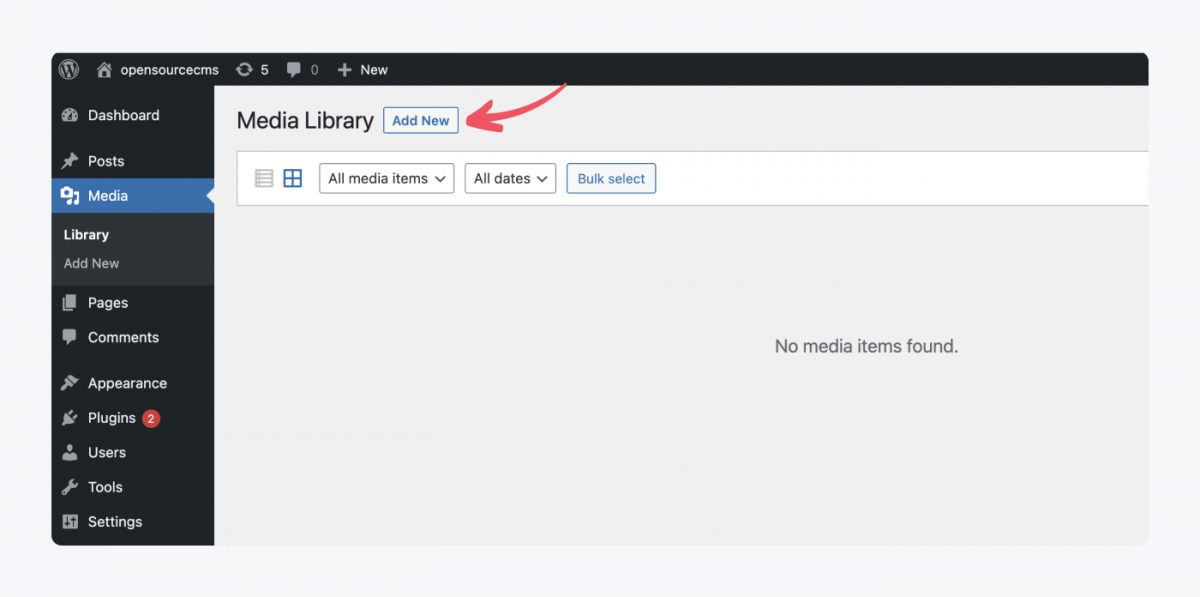
Let’s add your first media file:
- Click Add new.
- A box will open up. This is where you can drop files or select them from your device.
The theme is chosen. Visuals present. Content is here as well.
Coming up next: backstage of your site. Or, in other words: how to set up a WordPress website.
8. Customize your site
Right—
Let’s look behind the scenes of your website. The Settings section is where you can change how you see your website and what readers can do on it.
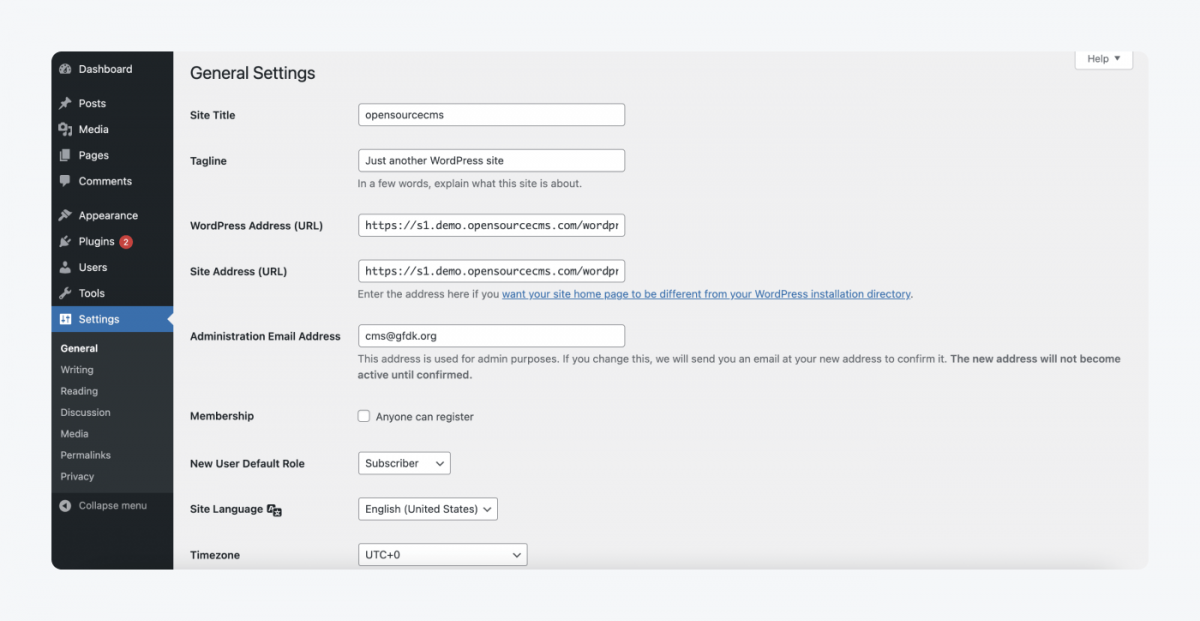
General settings
Here you can manage your site’s title, tagline, and URL. You can also view and change your email address as well as your role and language.
Set up a timezone in which you operate. Scroll down to the Timezone box and choose the right one.
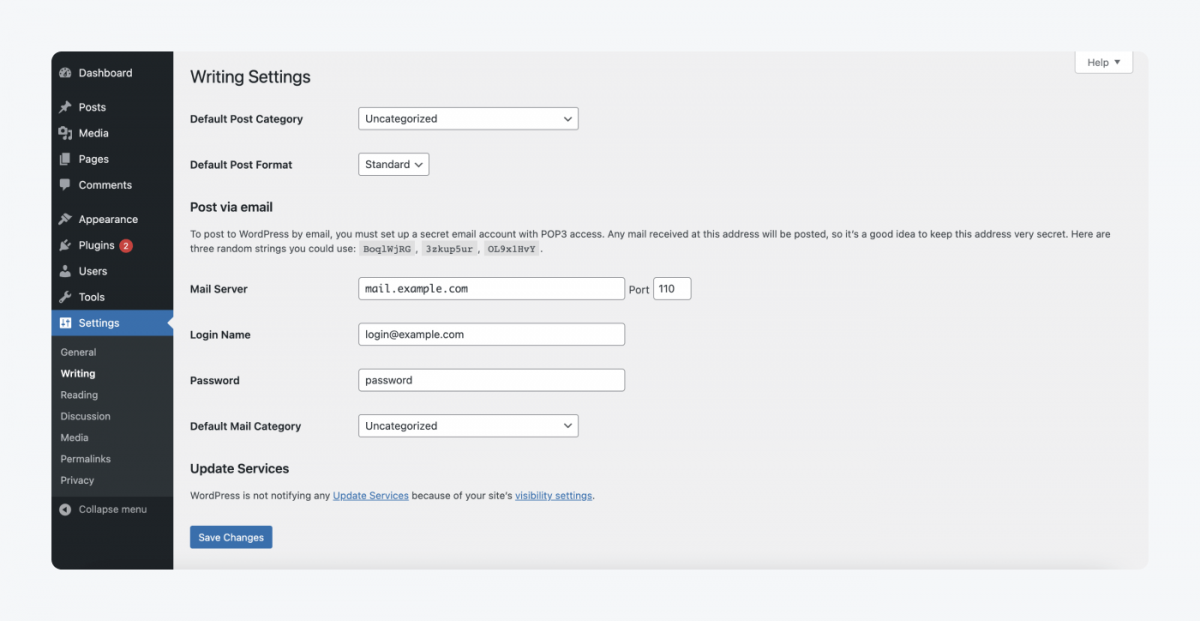
Writing settings
In the writing section, you can set your default post category and format. You can also post your blog entries by email. To do this, choose your mail server, login name, and password.
Before you’re able to put a Default Post Category, you’ll need to create it and we showed you how to do that in the section about creating content.
Reading settings
Look through the reading settings and make sure everything is how you want your readers to see your page. You can choose how many posts the blog page shows, what’s included in the feed, and how much of your text you want to include in a feed.
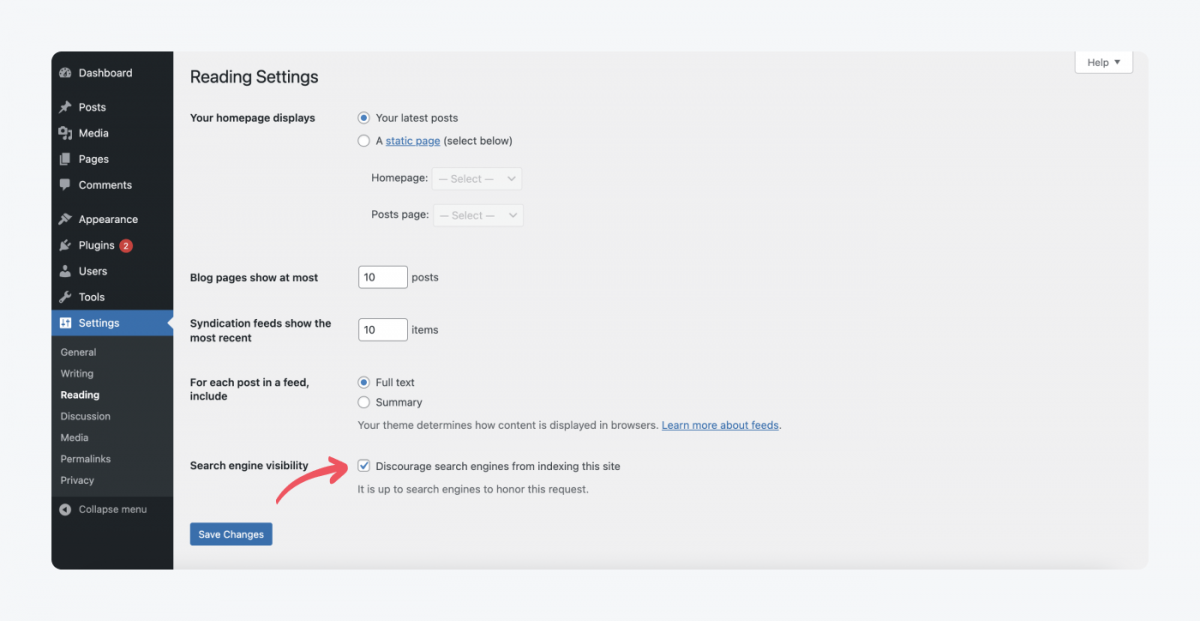
Pro tip
Tick the box next to Search engine visibility. This will prevent bots from indexing your page until you are ready for it to go live. This can help you with SEO later down the line. Remember to uncheck the box once your site is ready.Discussion
To change the default post and comment settings along with your email notifications, go to the Discussion tab.
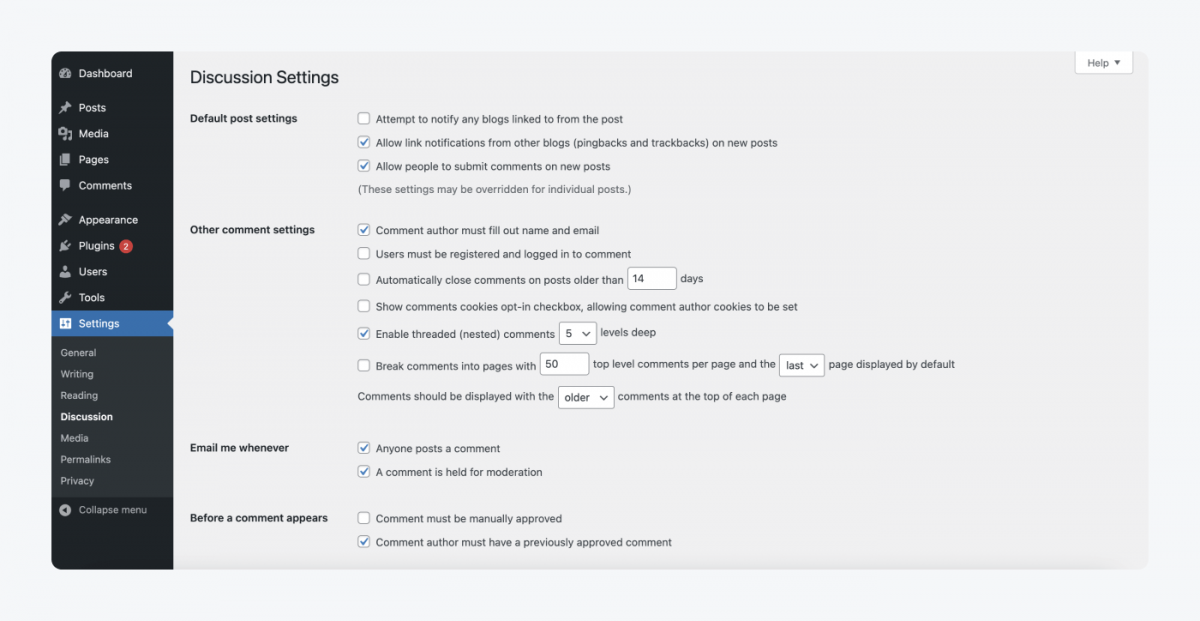
There, you can change what people need to do before they can comment on your site. For example, you can choose how many days after publishing a post people are able to leave comments. You can also decide whether you want to display older or newer comments first.
To moderate the comments your readers leave on your site, you’ll need to go to the Comments tab in the main menu. In there, you can filter them and mark them as spam.
The Discussion section is also where you can change your email notification preferences and other post settings.
Pingbacks and trackbacks are a way to alert other blogs when you link to them. You will also get a notification when other blogs link to you. This WordPress tutorial explains pingbacks and trackbacks more in detail if you’re interested in how it all works.
Media settings
This is the place to decide on the size of your images and how to organize your files.
Recommended image sizes for WordPress are:
- Blog posts: 1200 x 630px
- Hero images (full screen images): 2880 x 1500px
- Landscape feature image: 900 x 1200px
- Portrait feature image: 1200 x 900
- Fullscreen slideshow: 2800 x 1500px
- Gallery images: 1500px x auto width
Go to this WordPress guide for more information on Image size and quality.
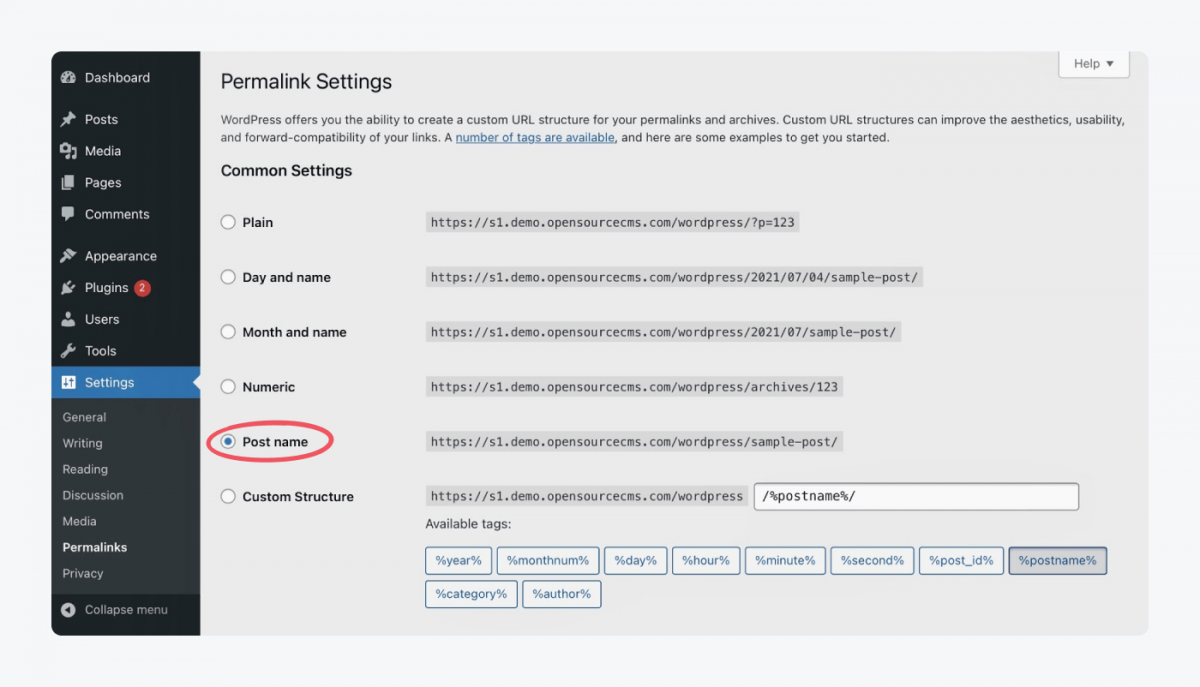
Set up the permalink
When you’re getting your first introduction to how to build a WordPress website, you need to think about everything. Just like when you go on your first date. The big elements, small details, and everything in between is important.
Permalink is one of the small elements that can make a big difference. It is the URL of the page, and you can choose how it will look. You can choose between a simple option, time-stamped option, or post name option. We recommend you choose the Post name for a more SEO-friendly structure and ease when updating.
Make your website mobile-friendly. In this day and age, most people use their mobile devices for browsing online. If you ignore that fact, you risk losing a lot of potential customers. You don’t want that! Choose the suitable theme, plugins, and media files wisely. Check out some of the most important mobile commerce statistics to know what to look out for.
How to make your website even better? Install some plugins that will add functionalities to your WordPress site. Let’s find out which ones and how to do that.
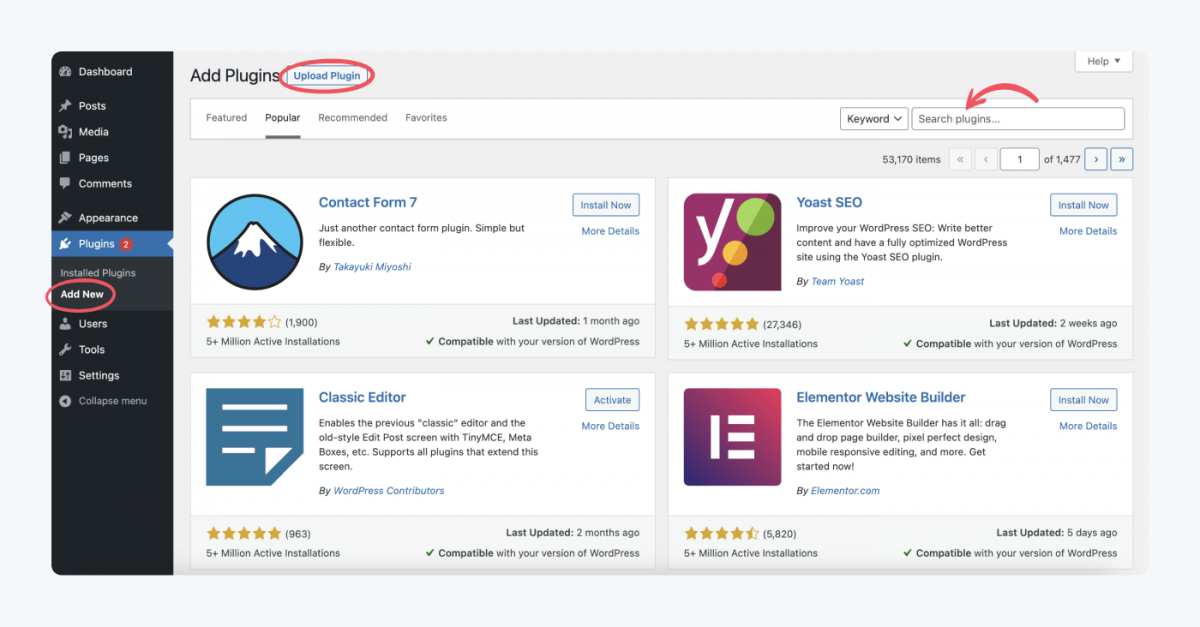
9. Get plugins for your WordPress website
To add additional features and get some help with running your website, consider getting plugins. You can access them by going to your Plugins tab from your site menu.
What are WordPress plugins?
Plugins are add-on software to customize your website. They can help you to improve security, optimize your SEO, integrate live chat, and many others.
We recommend you look at some plugins for security and website speed optimization. You should also consider Yoast SEO to improve the search engine optimization of your website.
One thing I would say is less is more. The beauty of WordPress is the ability to bolt on new functionality in the form of plugins. Oftentimes, people go overboard and download a million plugins. This slows down the site and makes it clunky. A few solid plugins like Beaver Builder, Gravity Forms, and others are all you really need.

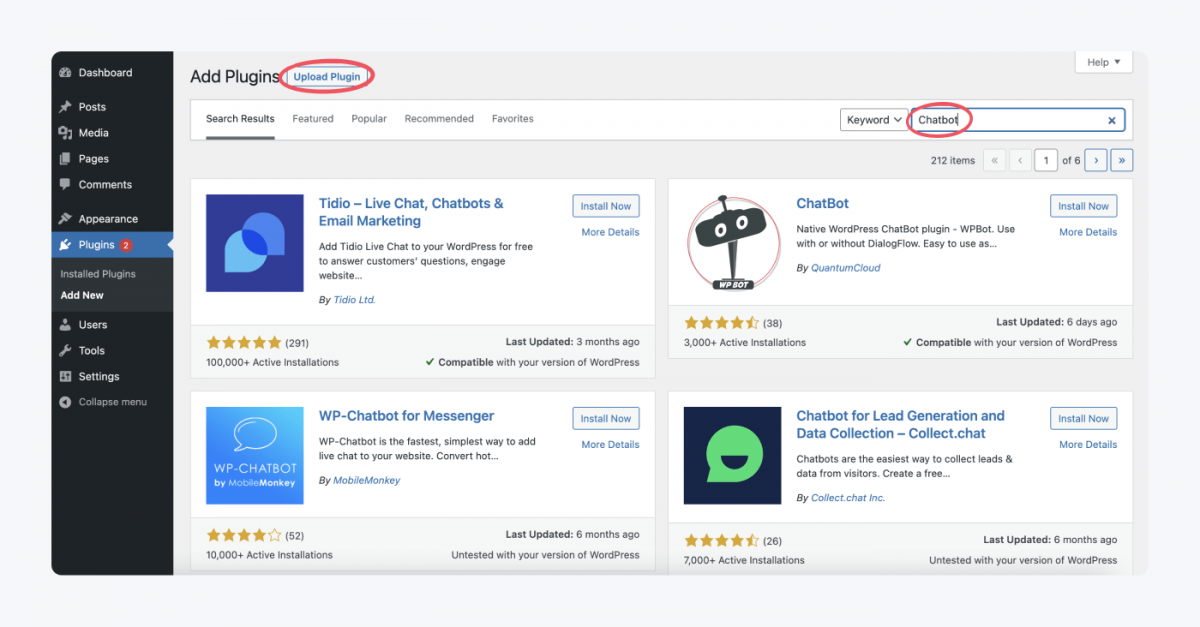
If your website is for business, you should add free plugins like WooCommerce to create an ecommerce website quicker. And then add some chatbot plugins and other ecommerce plugins. They can help you engage your customer more.
Suggested reading
Learn how to add Tidio chat to your WordPress website.
Learn how Tidio helped Endeksa boost their customer satisfaction
You can search for plugins by typing a keyword. This will give you all the options for this specific feature. The number of items you’ll find can sometimes be intimidating, but looking at reviews, a number of active installations and compatibility information will help you separate the wheat from the chaff.
You can also upload your own plugins by clicking Upload Plugin. Simply upload a ”.zip” file, and you’ll have your own plugin on your website.
You might need more information on plugins than we provided in this WordPress for beginners guide. If that’s the case, check out the WordPress Managing Plugins page.
Do you want to add more users, so other people can help you with the website? That’s quite a quick and easy task to do.
10. Add users
Are you going to be the only person using this website? If so, then skip this step.
If you want someone to help you with making a WordPress website and run it with you, then go to the Users tab. This is where you can manage who has access to your website.
By default, your site will only have your name on it. To add a new user, click Add New. You’ll be redirected to a site to add their details. You’re required to provide their username and email. The other boxes are optional.
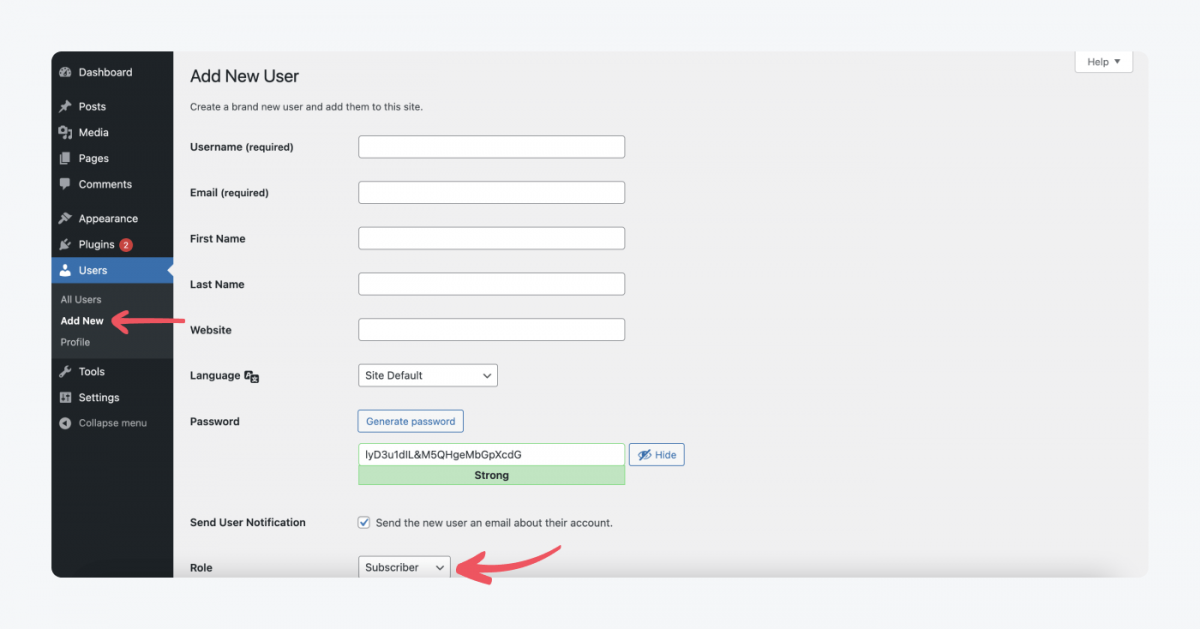
Remember to adjust the role that you’re giving them. You’ll have a choice between a subscriber, contributor, author, editor, and administrator. Check what all the roles mean to make the right decision.
Finished? Not quite. Let’s look at the tools at your disposal first.
11. Set up your Tools
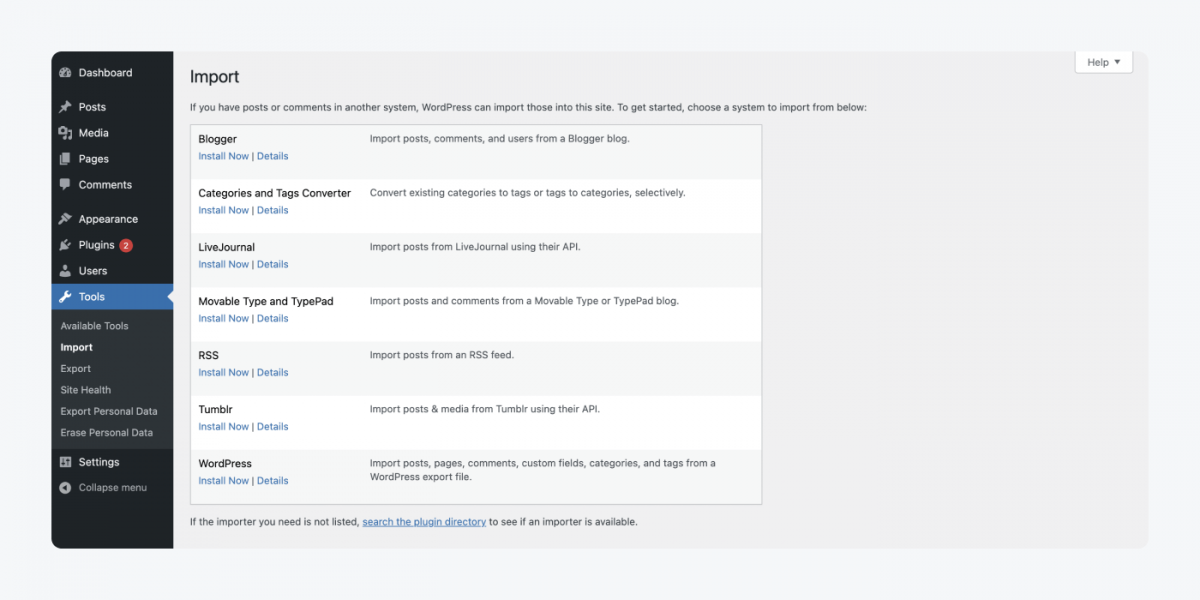
You can import/export posts and comments from another system into your WordPress website in the Tools tab.
Let’s say you have Blogger, Tumblr, or a different WordPress website, click the Install Now button underneath the platform. This will trigger a pop-up with the Connection Information. You need to fill in the Hostname, FTP/SSH Username, and FTP/SSH Password of your other web server for WordPress to be able to access it.
Check out this complete guide about importing content to your site if you’re interested in doing it.
When you want to export your content, click on Export. Choose what you want to export and click Download Export File. This will create an XML file to save on your computer. Once you save the file, you can import the content to a different site.
In the Tools tab, you can also check your Site Health and manage Personal Data.
In the Site Health section, you’ll find the site’s health status, as well as recommendations for improvement.
In the Export Personal Data section, you can send a request for a given user to export their known data in a “.zip” file. This can prove useful when you need to comply with local laws and regulations.
You can delete or anonymize known data for a given user in the Erase Personal Data tab. You need to provide a username or email address to send the request. This is also helpful to comply with local laws and regulations.
Okay—
We went through all the tabs, and you know everything you need to create your WordPress site. There’s one additional thing you might be interested in, though. Do you want to know how to use the WordPress blog? Let’s find out!
12. Start a WordPress blog
Running a blog is useful when you want to establish yourself as an expert. You can use a blog to help your customers with their struggles before they are ready to buy from you. This puts you in front of your competitors when the buyer is ready to purchase.
A blog can also improve your search engine visibility and ranking on the search engine results page.
However, if you’re creating a website for yourself rather than your business, you might not want to run a blog. That is perfectly fine. You can build a website on WordPress without starting a blog—if this is the case, make a beeline for the next section!
So, here’s how to start a WordPress blog:
- Go to the Posts tab. This is where you can view all your published blog posts
- To start a WordPress blog, create a new blog post. Click on the Add New button
- Start typing and creating
When you're starting a blog, publish on a consistent schedule—at least one post per week. Let your personality come through in your writing. Don't be a boring writer who sounds like everyone else! Finally, remember to add links to your old articles so readers can find more of your content.

Now, what we show you here are some technical basics. But blogging can be a serious business and can turn into your main source of customer acquisition. Have a look at these guides to learn more about the ins and outs of serious blogging:
- How To Start a Blog—Easy to Follow Guide for Beginners
- How to Write a Blog Post: The Definitive Guide
- How to outline a blog post super fast
How to build a website with WordPress: Tips and tricks
In a guide on how to build a WordPress site, we couldn’t forget about giving you something extra! So, let’s look at some tips and tricks you should keep in mind when building your WordPress website.
- Play around before starting the real thing
Before you start using WordPress seriously, play around with this demo. It lets you see how it all works in practice.
- Make your site visible for Google straight away
When you’re finished setting up your WordPress website, uncheck the search engine visibility box in the reading settings. Then go to Google Search Console to let Google know that it’s ready for indexing.
- Consider user experience
Make a WordPress website that passes the usability test. Good questions to ask yourself when looking through your website are: Is it consistent in color/ style/ tone and typography? Is it easy to navigate? Is it hierarchical? Don’t introduce the user to your history before presenting them with what you’re doing. Is it mobile responsive?
- Use Google Analytics
Use Google Analytics to keep track of your site’s performance. You can find bounce rate, number of visitors, and other useful metrics. Keep an eye on them month by month to see if your website performs well.
FAQs
You can use it for a variety of purposes. Whether you want to start a WordPress business website, an e-commerce website, or post your podcasts, you can customize your website to these specific needs.
When you’re already using WordPress and run into trouble, go to the WordPress support page. There, you can find many articles and documents with WordPress instructions. Those documents include free WordPress tutorials on basic usage and more specific areas such as Security or Advanced topics. Search the documents on the page to find what you’re looking for.
If you still cannot find the answer to your question, try the WordPress forum and see if people there can help. The WordPress community is great in size, and they like to support each other, so you’re in good hands.
That’s all from our guide. If you prefer video tutorials, we found this great step-by-step guide on how to build a WordPress website created by Tyler Moore. We think you might like it 🙂
Key takeaway
Creating a WordPress website may be a tad time-consuming, but it’s surely worth the effort!
You have your website ready for you to use now. We covered all the basics, and you have some extra material to refer to if needed. Here’s a brief reminder on how to make a WordPress website from scratch:
- Step 1: Choose the right WordPress for your website
- Step 2: Get your domain and hosting
- Step 3: Install WordPress
- Step 4: Get to know your dashboard
- Step 5: Choose your WordPress theme
- Step 6: Produce content
- Step 7: Upload media
- Step 8: Customize your site
- Step 9: Get plugins for your WordPress
- Step 10: Add users
- Step 11: Set up your tools
- Step 12: Start a WordPress blog
- Tips and tricks
If you missed something, click on the step you’d like to revisit.
Good luck and have fun using WordPress! It’s going to be an exciting journey for you and your business.
Learn how Tidio helped Endeksa boost their customer satisfaction