
Customers ask your website the same questions every day: shipping times, return rules, whether a product fits. An automated AI chatbot trained on your own content can answer them around the clock and hand the rest to your team.
This tutorial shows you how to create your own chatbot that learns from your website pages, PDFs and FAQs. You’ll have a working version in about an hour, most of it spent testing. Each step gives the exact menu path and a screenshot; the testing advice comes from Tidio’s support team.
Already have a Tidio account? Go to Lyro AI Agent > Knowledge > Data sources and start at step 3.
We’ll use Tidio’s AI agent, Lyro, for the screenshots. Other tools that train a chatbot on your content follow much the same order.
Step-by-step setup
Step 1: Gather the content your chatbot will learn from
An AI chatbot answers from what you give it, so the content is most of the work. By the end of this step you have a list of pages and files that answer your customers’ most common questions.
- Open your inbox or email and read your last 50 to 100 customer conversations.
- Write down the 20 questions that come up most, in the customer’s own words.
- For each question, find the page or document that answers it: FAQ, shipping and returns policy, pricing page, help-center articles, product manuals.
- Fix the gaps now. If an answer lives only in someone’s head, write it down as a short question-and-answer pair.
- Update anything outdated. The bot will repeat an old returns policy as confidently as a new one.
Result: a shortlist of URLs and files, plus a document of missing answers.
Note: the more questions you cover, the more the bot can resolve. Tidio’s help center estimates, from user data, that about 10 question-and-answer pairs automate up to 40% of conversations and 30 or more automate up to 70%. Axioma, a UK car repair company, loaded 370 articles into its knowledge base and reached an 89% AI resolution rate.
Step 2: Create a Tidio account and open the AI agent
- Go to tidio.com and click Start for free.
- Create your account with your work email.
- In the left sidebar of your dashboard, open Lyro AI Agent.
- Click Set up Lyro AI Agent.
Result: Lyro asks for the URL of your website, a subdomain or specific pages.
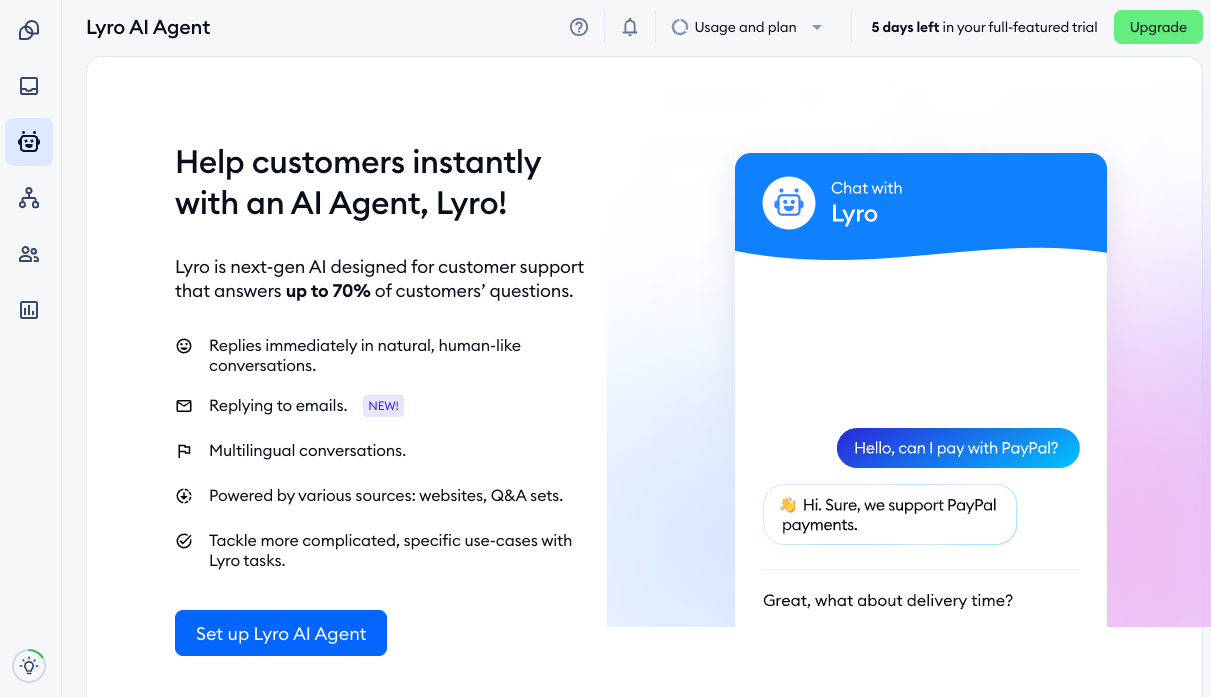
Plan note: every Tidio account gets 50 Lyro conversations free, one time. After that, a paid Lyro AI Agent package covers 50 to 1,000 conversations a month. Check current prices on the pricing page.
Step 3: Train the chatbot on your website and documents
Training here means giving the AI your sources. It reads them, turns them into question-and-answer pairs and answers from those pairs only. You don’t write intents or guess every way a customer might phrase a question.
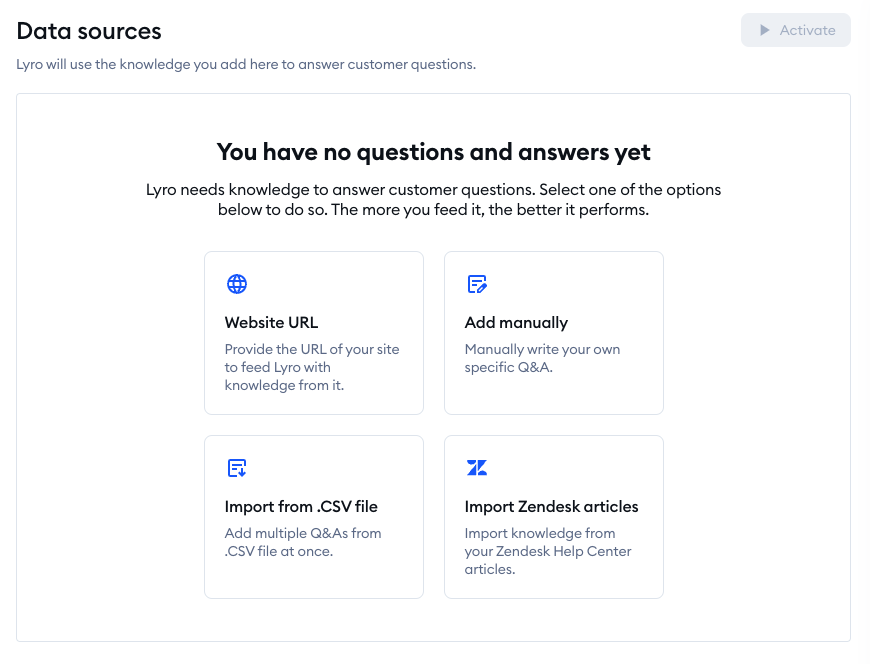
- Go to Lyro AI Agent > Knowledge > Data sources and click Add knowledge.
- Choose Website URL. Pick Scan priority pages to enter one top-level address and let Lyro scan up to 60 pages under it, or Scan single page to list URLs one by one.
- Click Add knowledge again and upload your files. Upload PDF takes any PDF as is. Upload CSV takes a two-column file (question, answer) of up to 500 rows; download the sample file to get the format right.
- Use Add manually for the missing answers you wrote down in step 1.
- Already run a public Zendesk help center? Pick the Zendesk option in the same window and paste the help center’s URL.
- Open each website folder in the list and read the question-and-answer pairs Lyro generated. Edit anything wrong, or switch off a pair with the Used by toggle.
Result: your Data sources list shows each website as a folder and each file as a set of Q&A pairs.
Note: you can add up to 500 URLs in total, and a single URL can’t point to a file (upload the PDF instead). If your site sits behind Cloudflare, its firewall can block the scan; Tidio’s Cloudflare guide shows how to allow it. Online stores can also sync their catalog from Shopify or WooCommerce under Products.
Read more: how to train a chatbot and what a knowledge base chatbot can do.
Step 4: Set its instructions and handoff
Now decide how the chatbot talks and when it passes a customer to a person.
- Go to Configure > General and read the Company description. Lyro fills it from your website; rewrite it in two or three plain sentences if it’s off.
- Go to Behavior > Guidance. Pick a tone (neutral, friendly or formal) or write a custom one, and add instructions for specific situations.
- Still in Guidance, switch emojis and “Read more” source links on or off.
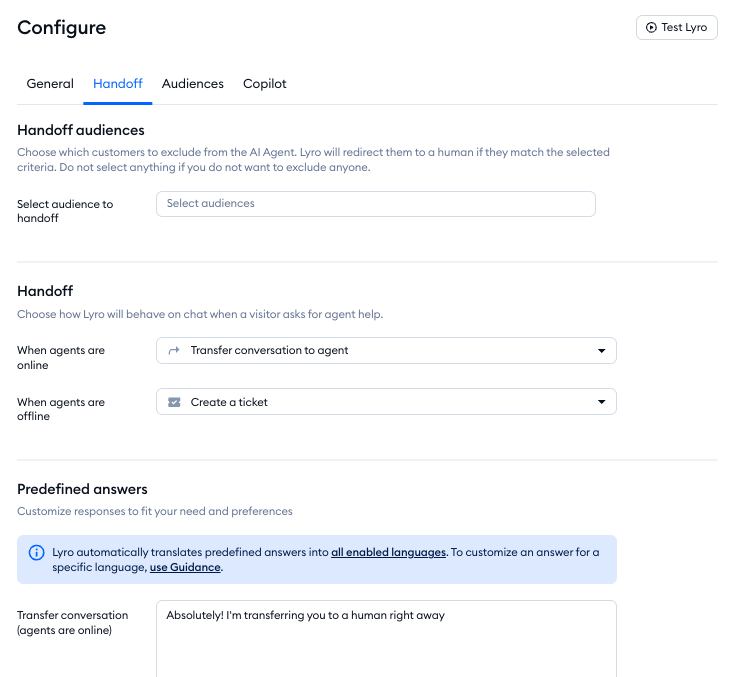
- Go to Configure > Handoff. For online hours and offline hours separately, choose what happens when a customer asks for a person or Lyro can’t answer: Transfer conversation to agent, keep the conversation, or create a ticket.
- Back in Configure > General, choose whether Lyro replies all the time or only when your team is offline.
Guidance instructions work best as short, specific rules. For example:
Ask for the order number before answering any question about a specific order. Never promise a delivery date. Share the shipping times from our shipping policy instead. If a customer mentions a refund over $200, transfer the conversation to an agent.
Result: the chatbot follows your rules and knows when to pass a customer to your team.
Read more: how to give your chatbot a personality.
Step 5: Test it in the Playground
Use the messy questions real customers send. The tidy versions you’d write yourself won’t show the gaps.
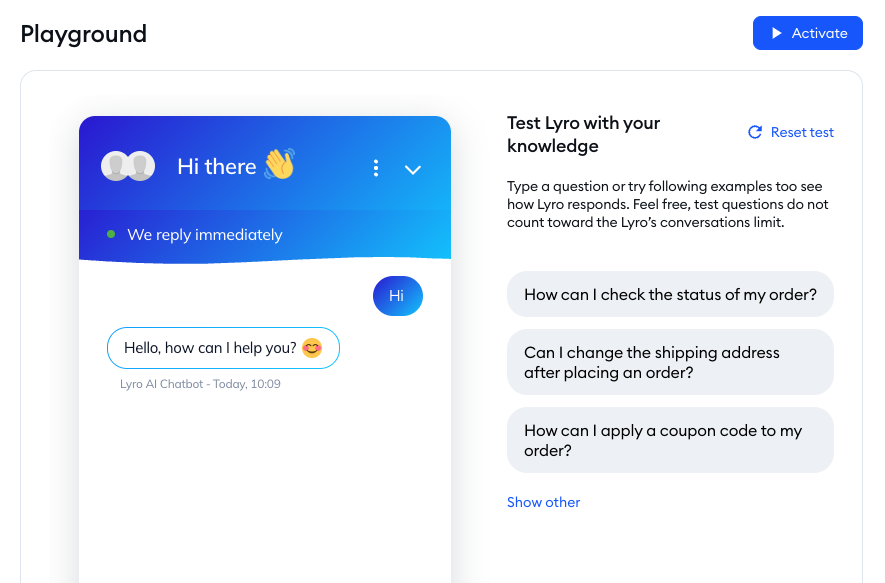
- Open Playground in the Lyro AI Agent section.
- Paste in the 20 questions from step 1, typos and all.
- When Lyro doesn’t know an answer, click Add answer in the test widget and save the new Q&A pair.
- Ask for a person, and ask something unrelated to your business. Check that the handoff message and the refusal both read well.
- If Lyro will answer emails too, switch to the Email tab and repeat.
Result: every common question gets a correct answer, and the rest go to a person.
Read more: chatbot testing checklist.
Step 6: Add the chatbot to your website and switch it on
Use the plugin if your platform has one; paste the code if it doesn’t.
| Your site runs on | Use | Where |
|---|---|---|
| WordPress | Tidio plugin | Tidio on WordPress.org |
| Shopify | Tidio app | Tidio in the Shopify App Store |
| Wix, Squarespace and other builders | Tidio app or the code | the platform’s app market |
| Custom HTML or any other CMS | JavaScript code | the steps below |
To install with code:
- Go to Settings > Live Chat > Installation and open the Manual install tab.
- Click Copy to clipboard.
- Open your site’s code or your platform’s code editor and find the file with the closing </body> tag, usually index.html, index.php or a shared footer template.
- Paste the code just above </body> and save.
<!-- Paste your own code from Settings > Live Chat > Installation -->
<script src="//code.tidio.co/YOUR_PUBLIC_KEY.js" async></script>
</body>- In Tidio, go to Lyro AI Agent > Configure > General and activate Lyro.
Result: the chat widget appears on every page of your site, and Lyro answers the first message.
Note: turning Lyro on switches off any existing flows that use the Visitor says trigger, so the two don’t answer at once. You can turn those flows back on afterwards. Platform guides: WordPress chatbot setup and Shopify chatbot setup.
How to make it a private chatbot for your company website
A private chatbot for a company website answers only from the company’s own content and keeps its data under the company’s control. Often it also shows some answers only to some people.
Answers come from your content only
Lyro uses only the data sources you add. When the answer isn’t there, it asks a follow-up question or hands off instead of guessing (the failure known as an AI hallucination). In the inbox, Review sources under any reply shows exactly which page or Q&A pair it came from.
Uploads are public unless you scope them
Any data source can end up in a reply to any visitor. Keep internal documents out: margins, HR policies, supplier terms, internal procedures. For answers meant for one group, such as customers in one country or on one channel, create an audience in Configure > Audiences and assign it to those data sources.
Customer data stays in that customer’s conversation
You choose which contact properties Lyro may read, such as an order number or plan type. Lyro uses them only in the conversation with the customer they belong to.
Where the data lives
Tidio stores data on servers in the European Economic Area and encrypts it in transit and at rest. Personal data is handled under GDPR and CCPA, and Tidio has completed a SOC 2 examination. Lyro runs on Claude, a large language model from Anthropic. Details are on Tidio’s security page.
On your side, tell visitors they’re talking to an AI (name the bot in its greeting) and mention the chat in your privacy policy.
Note: a chatbot only employees can reach, answering from internal documents, is a different build: an internal assistant behind a login. A website widget is visible to every visitor.
Check that it works
Open your site in an incognito window, so you see it as a first-time visitor, and send three questions from your list. If something is off, it’s usually one of these.
| Problem | Likely cause | Fix |
|---|---|---|
| The widget doesn’t appear | Code pasted in the wrong place, or the page is cached | Move the code directly above </body>, save, then clear your site’s cache plugin or CDN cache |
| The widget appears but Lyro doesn’t reply | Lyro isn’t activated, or it’s set to reply only when you’re offline | Check Configure > General |
| Lyro stopped replying after a while | The 50 free conversations are used up | Check Usage and plan in the top-right of the panel |
| A website scan finished with no content | A firewall blocked the scan, or the URL points to a file | Allow Lyro in Cloudflare, or upload the file as a PDF |
| An answer is wrong or out of date | The source page changed after the scan | Use Review sources, then edit the Q&A pair or re-sync the URL |
| Too many chats go to your team | The knowledge base has gaps | Open Knowledge > Suggestions and answer the questions Lyro missed |
Train an AI chatbot on your own website content
What to do next
- Answer the gaps every week. Knowledge > Suggestions lists the questions Lyro couldn’t answer and how often each came up; add answers to the top five.
- Connect it to your other systems with Lyro Actions, which call an API so the chatbot can look up an order instead of only describing the policy.
- Let Lyro start conversations with Proactive roles, which greet visitors based on what they do on the page. For fixed paths such as a quote request, build a flow instead.
- Check Lyro’s Analytics tab once it has answered real questions, and read up on what to track in chatbot analytics.
When to build an AI chatbot from scratch instead
Building an AI chatbot from scratch makes sense when it has to live behind a login inside your own product or run logic no platform supports. You’d need a large language model through an API, a retrieval layer that searches your documents and passes the relevant passages to the model (retrieval-augmented generation, or RAG), a chat interface, a handoff to your team, and logging plus security around all of it.
Each part needs a developer to build and maintain, and the documents still need the same care as in step 1. Compare chatbot development routes and what building a chatbot costs before you commit. If you’d rather design conversations without AI, a visual chatbot builder with rule-based flows is the simpler option.
FAQ
A first working version takes about 10 minutes: add your website URL, let the AI scan it, paste one line of code. Testing takes longer. Plan 30 to 60 minutes to run real questions through it and fill the gaps before you switch it on.
Yes. A free Tidio account includes 50 AI agent conversations, one time, which is enough to build and test the bot on your live site. Rule-based flows are included in the free plan for up to 100 visitors a month. For ongoing AI conversations you need a paid Lyro AI Agent package.
Yes. Upload PDFs as they are, or a CSV file with one column of questions and one of answers. You can also add web pages, write question-and-answer pairs by hand, and import a Zendesk help center. The chatbot answers only from those sources.
Use a platform that trains the chatbot on your content, like the one in this guide. You add sources through a form and install the widget with a plugin or by pasting one line of code. No programming is involved.
A rule-based chatbot follows paths you draw in advance, with buttons and fixed replies. An AI chatbot reads the customer’s message, finds the answer in your content and writes a reply in plain language. Many sites use both: AI for questions and a rule-based flow for fixed tasks like collecting a lead. More on the types of chatbots.
It is if you control what it knows. Upload only content you’d publish anyway and scope internal answers to audiences. Set a human handoff, then check where the vendor stores data and which rules it complies with. Tidio’s answers are in the private chatbot section above.
Create your AI chatbot for free