You have a company and a website.
And now you want to level up your business with an embedded live chat and slash your customer service response time from 17 hours to two minutes. But how to add one to your site?
You’re at the right place.
With us, you will learn how to add chat to a website in a few easy steps. This way, you can quickly start enjoying all its benefits.
Add live chat to your website in less than two minutes!
How to add live chat to website?
To get the most out of this guide, open your website and Tidio register page. This way, you can follow along with the steps in real time.
We’ll illustrate all the steps using our own free app. After all, users on G2 mention the ease of use and simplicity of the chat box installation as one of our perks that earned Tidio a 4.7/5 ⭐️ rating.
Okay—
Here’s how to add chat to a website in 11 easy steps.
Step 1. Pick the right live chat platform
The very first thing that is necessary for adding chat to website is to find the right platform that will suit your needs. As there are numerous tools available, picking the right one can seem tricky at first glance.

To choose the right option for your company, you should:
- Make a list of the top features your business needs from the software
- Look for providers that offer your main features
- Compare the pricing of different platforms
- Try out the systems on a free trial
- Decide which one offers the best value for the money
Or you can also read our article about the best live chat software where we did the whole job for you.
Step 2. Integrate chat into your website
You can do this in two ways. The first is to add a live chat code by pasting the code in the in your website’s HTML source. Second is to download a plugin or an app through your content management system (CMS), like WordPress or Shopify.
Let’s explore both ways in more detail.
Use code to add chat to your website
This step boils down to adding a JavaScript code snippet to an HTML website. And it’s not as complicated as it sounds. Promise.
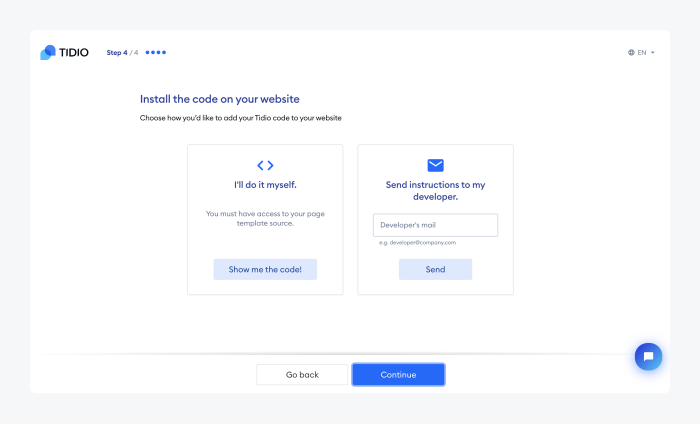
All you need to do is click Show me the code and copy it. Once you copy the code to your clipboard, open the main HTML file (usually index.html) on your website’s backend.
Find the file with the </body> tag and add the JavaScript code above the closing </body> tag of your website’s source code.
And if you want to add the code to your website later on, you can find it under your Settings in the Installation tab.

Remember to save the changes!
To check the result, go to your website and see if your Tidio chat widget is visible there.
But hey—
If you’re not ready to add the code yet, no worries.
You can embed the free live chat later because the code will always be available inside your dashboard. All you need to do is log in to Tidio whenever you need to view it (or contact support@tidio.net if you need any help).
Read more: Check out this detailed explanation on installing Tidio via JavaScript code on your website.
Add chat through your CMS
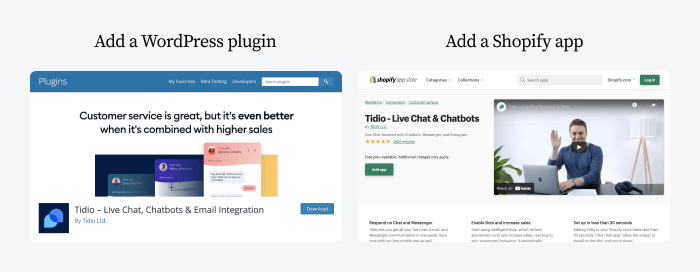
You can also choose to add chat to your website through the platform your site is built on.
If you’re using Shopify, you can add a free live chat to your website in a few clicks.
- Go onto your Shopify App store
- Search Tidio, or a more general query “live chat”
- Pick the right app
- Click Add to site
And there you have it! Now you can log into your account and start configuring your web chat window.
If you have a WordPress website, check out this short video tutorial:
Do you have one of the other content management systems or want to discover a more detailed tutorial? Then check out these to learn how to:
- Add Tidio to your WordPress site
- Add Tidio to your Shopify site
- Add Tidio to your Wix site
- Add Tidio to your BigCommerce site
- Add Tidio to your SquareSpace site
- Add Tidio to your Magento site
By now, you know how to add live chat to your website. The rest of the steps are optional, but they will ensure your chat is more personalized to your company’s needs, and you use more of the best live chat functionalities.
Step 3: Customize the look of your chat widget
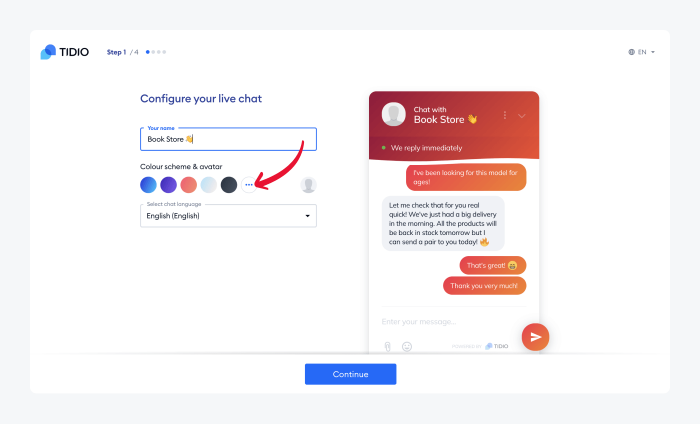
Once you log in to your free account, Tidio will walk you through a series of quick
customization steps.
This will ensure the live chat icon matches the style of your business website and the user experience is consistent.
First, choose a name and your live chat widget color. There are five colors on display, but you can select any color and shade you like by clicking on three dots to reveal the palette. You can also pick your website chat language on this page as there are over 140 languages to choose from.
Click Continue once you’re done.
Next, add the company info, choose your country and industry. Your answers will help the app make relevant suggestions for live chat options.
Then, choose if you want to set up the welcome message for your website visitors or give them a discount upon their first visit. It’s an automatic message that the live chat chatbot displays to new visitors. This will be the first message your potential customers see when they go to your website.
If you’re running an online store, consider using the discount message. Retail studies show that 67% of customers make purchases just because they found a discount. So, many customers visiting your business might also decide to take advantage of that.
Step 4. Set up operating hours
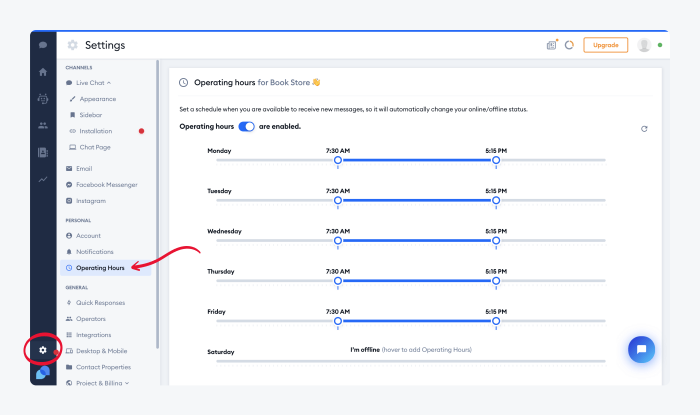
Your website visitors need to know when your support agents are available to answer buyers’ questions. To save them frustration and yourself a lost sale, you should set up operating hours for your live chat.
You can do it in just three clicks
- Go onto your Settings tab
- Choose Operating hours
- Click the toggle switch to enable operating hours
Since you know how to set up your opening hours, let’s check out how to answer your visitor’s messages quicker and more efficiently.
Step 5. Create canned responses
Canned responses are pre-written responses that support representatives can use when answering frequently asked questions. They can help you decrease the response time and cut down on the manual work your agents perform.
To set up these replies:
- Go to the Settings tab and click on Canned Responses section
- Choose Add a new Canned response
- Create your message
- Once you’re happy with it, click on the Save button
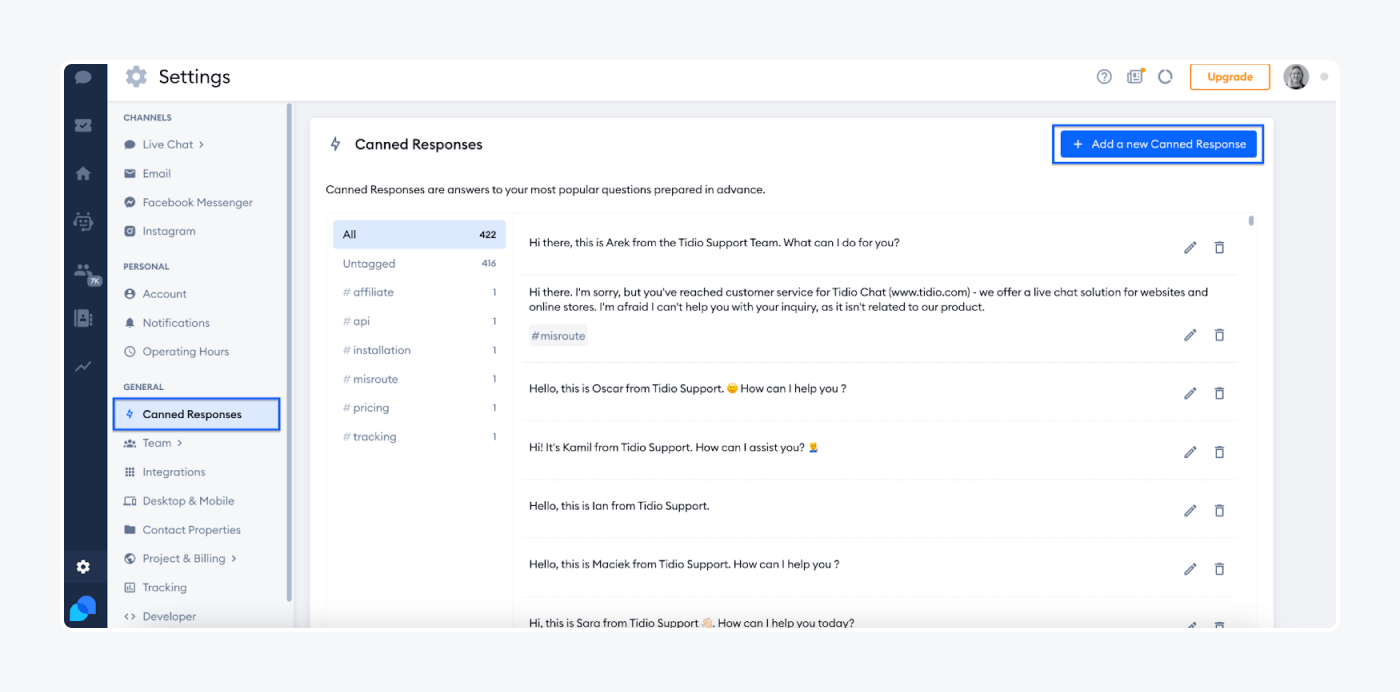
Keep in mind that you can always edit and delete your created messages.
And when it’s time to send a quick reply to the customer, type “/” (forward slash) symbol and pick from the list of your canned responses.

Now you can help clients efficiently and in a timely matter. But can you still be there for your customers when you’re not at your desk?
Yes, you can. All you need to do is get a mobile app!
Step 6. Install mobile app and desktop app
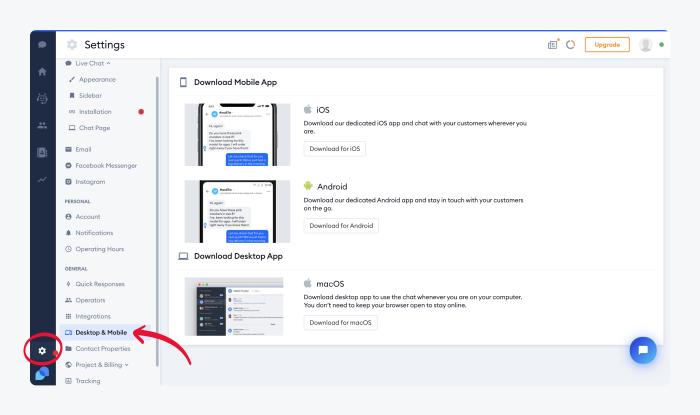
One of the handy live chat features is being able to answer inquiries on the go. That’s why, when you add chat to your website, you and your team members should also download the mobile and desktop app to make communication with clients easier.
You can answer customer questions, view visitors’ lists, and update their information straight from the mobile app. This way, you and your support team don’t need to be at a desk all day long to when a client requests support. To install the app, you need Android 4.1 and higher or iOS 9.0 and higher.
The desktop app is useful for when you don’t want to have the browser open, but you still want to give a helping hand to customers. You can get notifications from those who have questions about your products and services on your desktop with the browser closed. You can download the app on macOS and Windows computers.
Read more: Learn from our knowledge base how to download the Tidio mobile and desktop apps for your Windows and macOS devices.
Step 7. Integrate email, Messenger, and Instagram

It’s useful to take advantage of the integrations that your chat vendor provides.
Some of the most useful ones are email, Facebook Messenger, Instagram, and a CRM system. So, integrate these with your live chat for better customer support results and increased customer satisfaction.
Connecting your email can help you with your email marketing campaigns and keep track of all your leads. Integrating Messenger can enable your chat agents to communicate with clients on your Facebook page as well as on your website. And when you connect your Instagram you will be able to reply to your subscribers’ reactions to your Instagram stories.
Also, your support team can take care of all the customer communication from one dashboard. Isn’t it handy?
Yes, it is. And sending out chatbots to answer commonly asked questions is even better as it saves your time while improving the customer experience with real-time responses. Here’s a quick intro on how to add bots to your site.
Step 8. Integrate chatbots
You can create a chatbot for your website by dragging and dropping the building blocks in a visual editor or customizing the templates provided by the platform.
It’s easy. First, log in and go to the bot builder section. Then choose whether to make your chatbot from scratch or use a template. Then, decide on the triggers and the actions you want the bot to perform. And include any conditions under which you want it to work.
For example, if you want to collect more leads for your business, you can send out a chatbot that offers a promo code for your yoga mats in exchange for the person’s email address.
Choose the Visitor opens a specific page trigger and determine the page. Then, type in your message and give the potential customer options to choose from. After that, create actions for each of the answers with one of them being Ask a question for people who want the code. Toggle the Save the answer as a Contact Property in this block, so the chatbot remembers the visitor’s email.

But you’re missing one thing on your dashboard to start interacting with your leads. You need contacts there. Let’s learn how to import your existing contacts into this chat platform.
Step 9. Import contacts
Prepare the data before uploading it into your account. Organize the information by placing them in separate columns in Google Sheets with a proper header.
Some of the information you should include in your document:
- Name
- Surname
- Email address
- Country
- Phone number
Once you prepare your data, save it as a CSV file. You can upload this document in the Contacts section on the left-hand side of your admin page. Click on Import from file button and a new panel will pop up. There you can drag and drop the document into the window.
You will then have to match your data with the right attributes from the contact list. Click on the drop-down menu under the Contact attribute column and choose the right attribute from the list. Once you’re finished, confirm mapping under the columns.
To finalize the import, you will need to choose whether or not you want to update the existing contacts. Both options will import your new contacts into your contacts list.
Finally, you will need to confirm that all the new contacts have given you permission to contact them. After you’re done, your sales team will have a comprehensive list of leads.
Read more: Read a detailed guide on how to import new contacts into your Tidio account.
Step 10. Personalize the messages
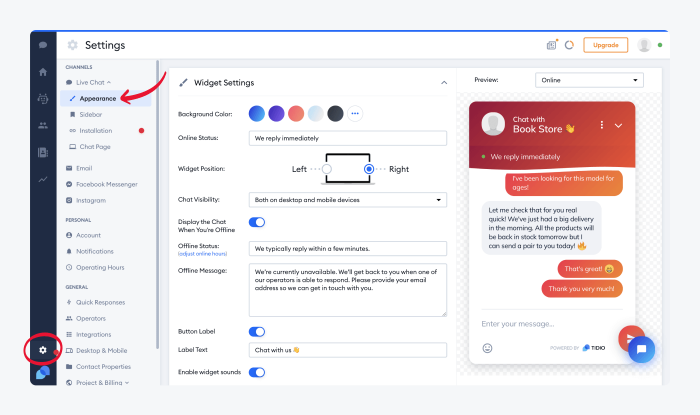
Last, but not least—you should customize the message your customers see before clicking on the chat bubble. Make it clear your support team is there to help the visitor out if they have any questions or other inquiries.
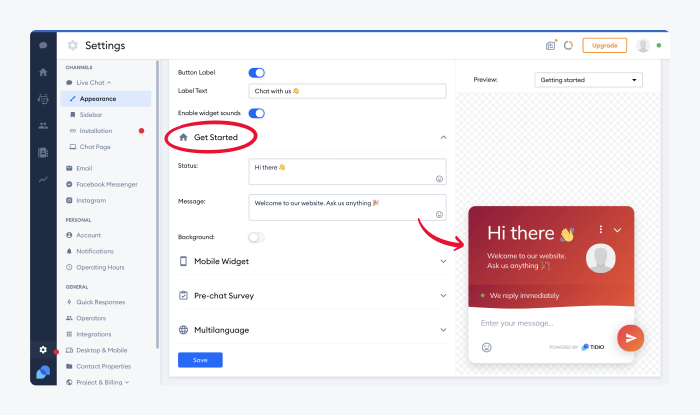
You can do this in Settings on the Appearance page. On top of that, you can also change the online and offline status and modify the offline message to the clients who visit your page after hours. You can personalize all of them and then scroll down.
Click on Get Started to reveal more fields.
Now that you know how to integrate live chat into your website and have the basics set up, you can start exploring your dashboard and the rest of the app’s functionalities.
The vertical dark stripe on the left is the main menu. Click around to explore all the live chat tools at your disposal. Get this: one of them will even show the site visitors on your web page in real-time, so you can try messaging them proactively!
Step 11. Monitor the performance metrics
It’s important to monitor your live chat agents’ and chatbots’ performance in order to learn and improve. You can do this by setting up post-chat surveys measuring customer satisfaction and their likelihood to refer your company to their friends.
Main metrics you should track include:
- Customer Satisfaction Score (CSAT)
- Customer Effort Score (CES)
- Net Promoter Score (NPS)
- Customer churn rate
- Average response time
- First Contact Resolution (FCR)
- Unresolved query backlog
Go to your Settings and pick the Customer Satisfaction tab. Here, you can enable and type the message to your visitors asking for feedback.

Read more: Check out the key customer service metrics you should track.
Ok, at this point, there’s only one thing left to say—
Congratulations!
You’ve joined the club of ecommerce businesses whose customer response times are super fast in comparison to email and social media. Now’s the time for that live chat support commitment to make a difference.
Why add live chat to your website?
Live chat brings many advantages to your business including saving time, cutting costs, improving customer experience, increasing your lead generation, and more. Here are the most important benefits of adding chat to your site:
- About 85% of customers are satisfied with live chat when communicating with businesses which can improve the overall customer experience
- A study shows that website visitors who chat with a business are about three times more likely to convert than those who don’t. This will help you increase your conversion rates. Also, they tend to spend around 10-15% more than customers who didn’t use live chat
- About 79% of businesses say that live chat has a positive effect on their revenue, sales, and customer loyalty
Choose the best live chat for your website
Here’s a comparison table of the top platforms available on the market:
| Platform | Pricing | Best feature |
| Tidio | Free version available Starter ($24.17/mo) Growth ($49.17/mo) Plus ($749/mo) Premium ($2999/mo) | AI agent and AI for email |
| HubSpot | Free plan available Starter ($20/mo) Professional ($100/mo/user) Enterprise ($150/mo/user) | Numerous integrations |
| LiveAgent | Free plan available Small ($15/mo/user) Medium ($29/mo/user) Large ($49/mo/user) Enterprise ($69/mo/user) | Multilingual software |
| Zoho desk | Free plan available Express ($9/mo/user) Standard ($20/mo/user) Professional ($25/mo/user) Enterprise ($50/mo/user) | Web chat screen sharing |
| Freshchat | Free plan for 100 user Growth ($19/mo/user) Pro ($49/mo/user) Enterprise ($75/mo/user) | Visitor-context tools |
So, how to choose your online chat for websites?
Well, if you have a small business or a startup, prioritize ease of use and affordability. Look for simple interfaces and basic CMS and social media integrations. Mid-sized businesses should focus on scalability and automations, as well as analytics to ensure the platform grows alongside the business. And for enterprises, robust APIs with advanced NLP chatbots, strong security, and deep integrations are essential.
Decide what your needs are and make sure to use the available free trial to test the software before committing to it.
Key takeaway
Live chat isn’t just a new thing in online business. It’s also a major competitive advantage you can put to use quickly. Yet, many websites and small businesses don’t know how to use this free customer communication tool. It means one thing: there’s a huge opportunity there!
Let’s review the 8 steps of adding chat to website really quickly:
- Step 1. Pick the right platform
- Step 2. Integrate chat into your website
- Step 3. Customize the look of your chat widget
- Step 4. Set up operating hours
- Step 5. Create canned responses
- Step 6. Install mobile and desktop apps
- Step 7. Integrate email, Messenger, and Instagram DMs
- Step 8. Integrate chatbots
- Step 9. Import contacts
- Step 10. Personalize the messages
- Step 11. Monitor the performance
Now you know how to add live chat to your website. Go ahead and personalize it, so it matches your brand better. You can also start setting up chatbots to automate chat services.
FAQs
Live chat pricing varies between $0 and thousands of dollars.
It depends on the chat platform and the plan you choose. You can sign up free of charge and add live chat to your website with providers who offer a free forever plan, like Tidio, or you can test other ones during a trial period.
No. You just need to pick a live chat provider that includes chatbots within their services.
When you embed live chat on your website, all you need to do to add bots is to set up decision trees and customize the messages to your clients.
You can add Messenger chat to your website with a chat plugin.
But first, you need to set up the plugin from the settings on your Facebook page.
– You can install it manually or follow the steps to add the chat extension to your chosen website builder.
– Then, paste a line of code on your website in order for the Messenger chat routing to work.
Once you set it up, your website visitors will be redirected to Facebook Messenger, where you can communicate with them.
Tidio is a customer experience platform that provides a helpdesk system, live chat, AI chatbots, and chat flows for a business website. You can add the chat to your site in mere minutes and start interacting with your customers right away.
Yes, Tidio provides live chat features. On top of that, it offers live visitors’ view, typing previews, canned responses, and much more to make the communication with your clients smooth.
Tidio aids with customer service by providing a live chat widget for real-time communication, chatbots for automating simple questions, and a shared inbox to unify all interactions in one place.