This isn’t the first Shopify guide you’re looking at, is it?
But it’s likely you won’t ever need any other one to learn how Shopify works.
Why?
Because we cover all the bases.
Discover how Tidio’s support team automated responses to customer queries
What is Shopify?
Starting from the basics. What does Shopify do?
Shopify is software that lets you create an online store. It is subscription-based after a 3-day free trial. Shopify is perfect for startups because it is very user-friendly. You can set up a website including your online store with ease.
Who is Shopify for? It is for anyone who wants to start an online business. Whether you’re a beginner or have a physical shop, you can use Shopify to sell your products and handle inventory.
Now you know what Shopify does, it’s time to learn how to set up your first Shopify store.
1. Start your trial
The best way to get your bearings and test how Shopify works is by starting a free trial period. You’ll get two weeks to get to know the ins and outs.
So—
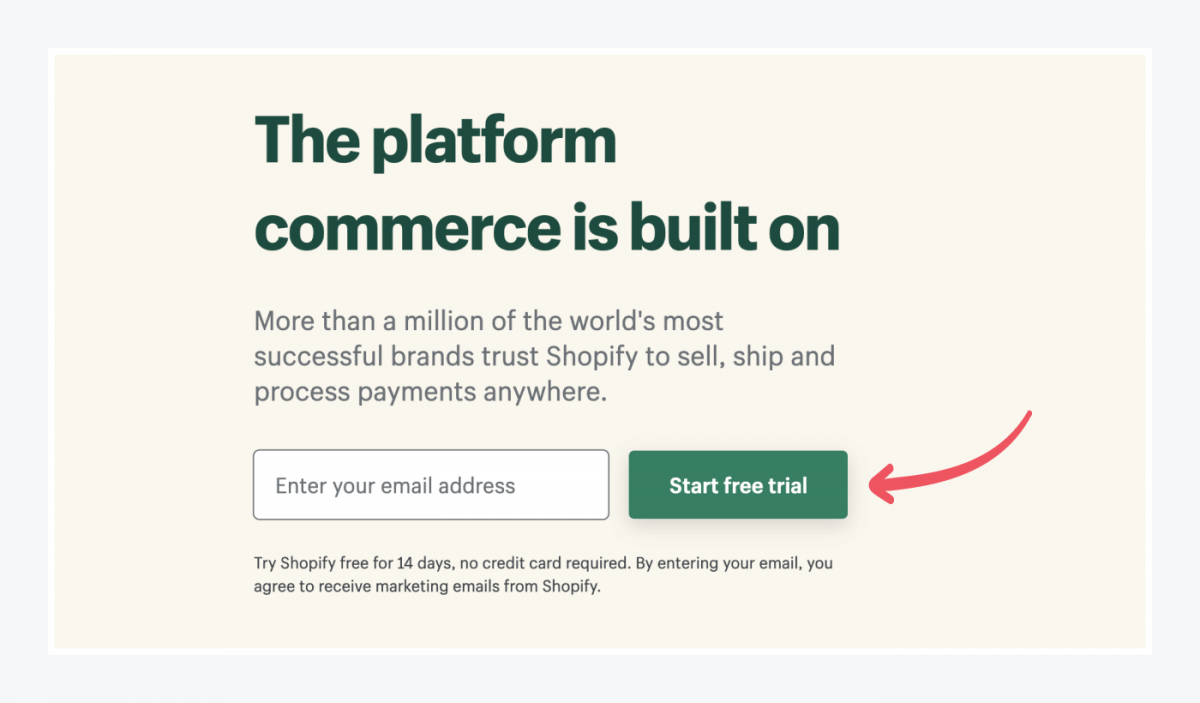
Click on “Start free trial,” and you’ll see this page:
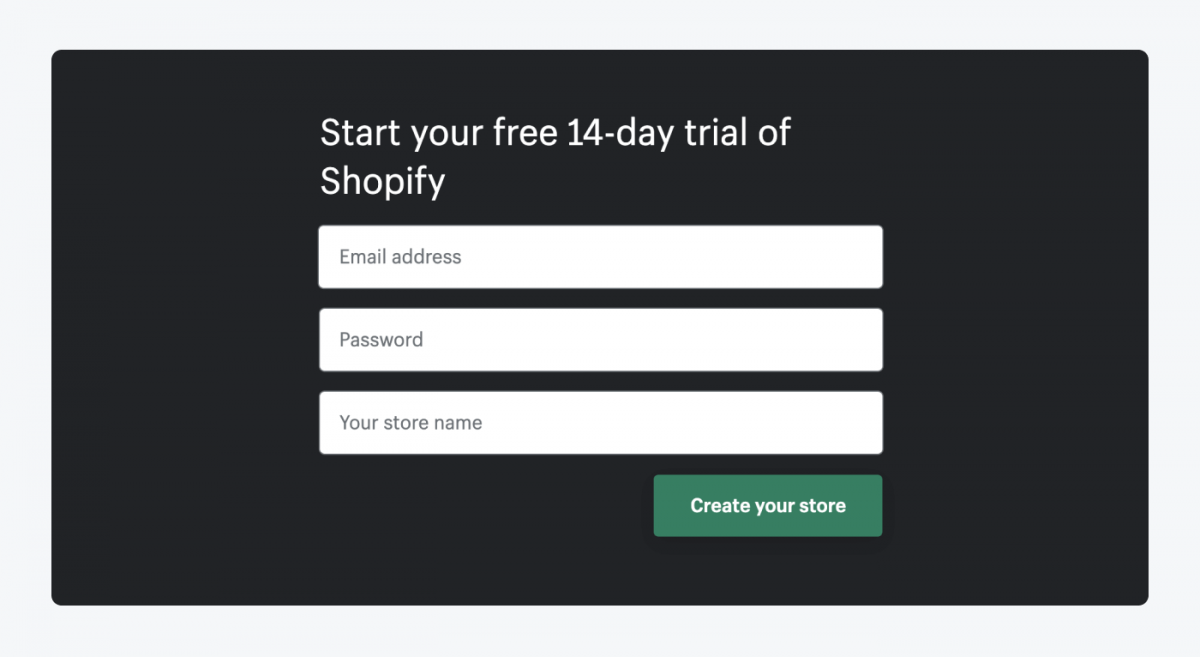
Fill in your email address, create a password, and type in your store name.
Tip If you can’t decide on the name of your business, you can try this business name generator.
Next, you’ll see two pages that will ask for your details:
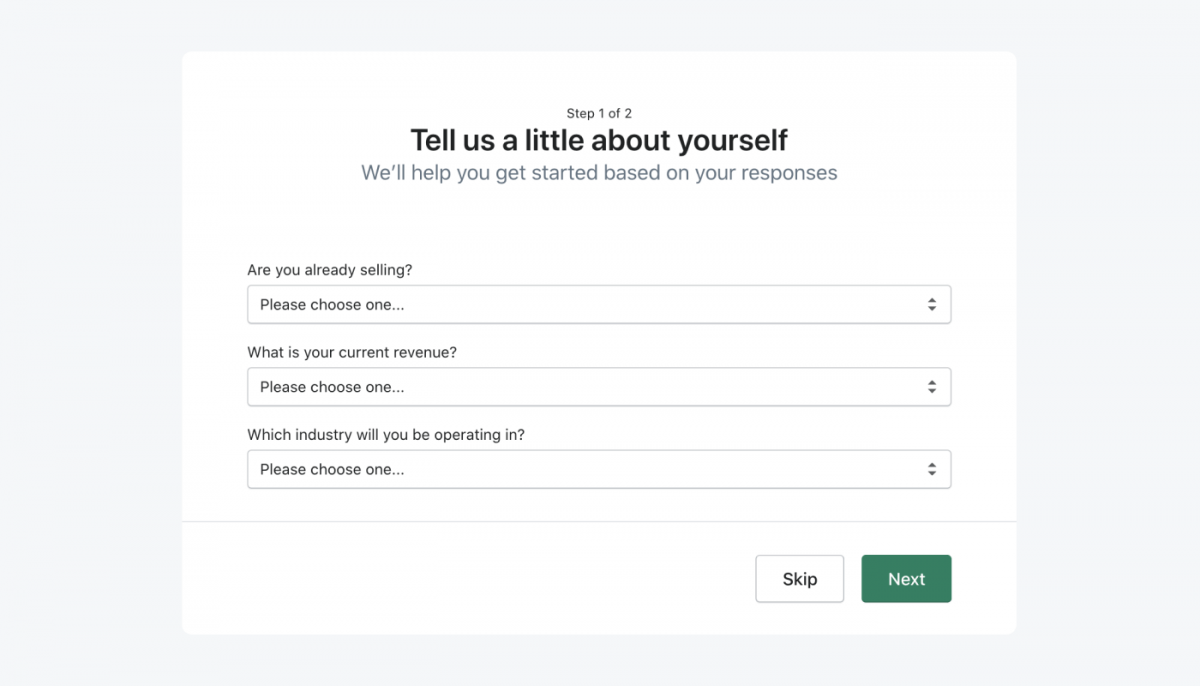
You can choose “I’m just playing around” if you are not sure yet what to put there, and change this later in your settings.
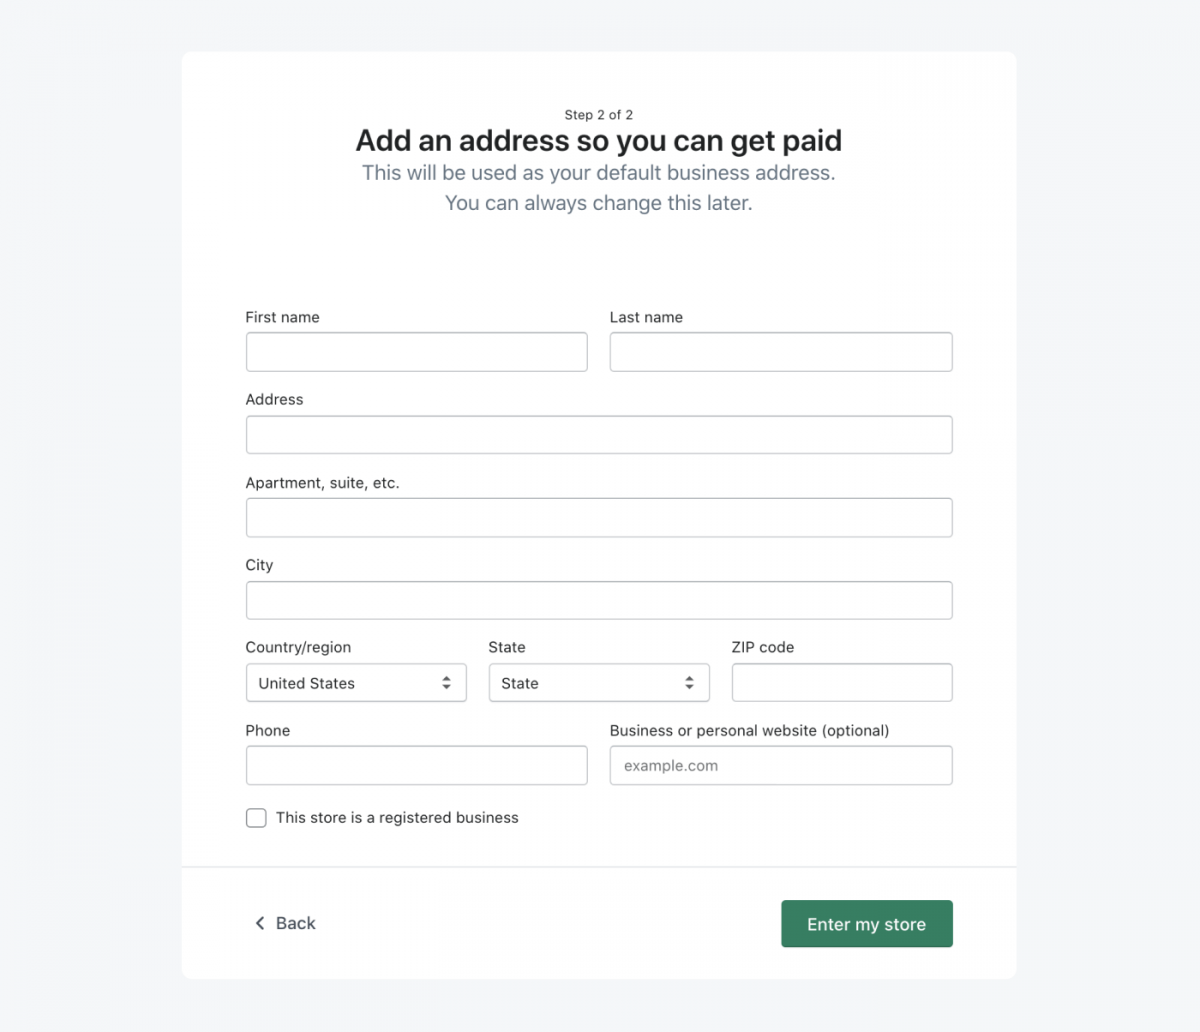
The second page will ask you for personal information: name, address, and contact details. As with the previous page, you can change all this information later. Simply access and edit them under “My Account” in the top right corner of your dashboard.
2. Get to know your dashboard
The first step toward using Shopify efficiently is getting to know your dashboard. The dashboard serves as a “control center” from which you can set everything up and see how well your shop performs.
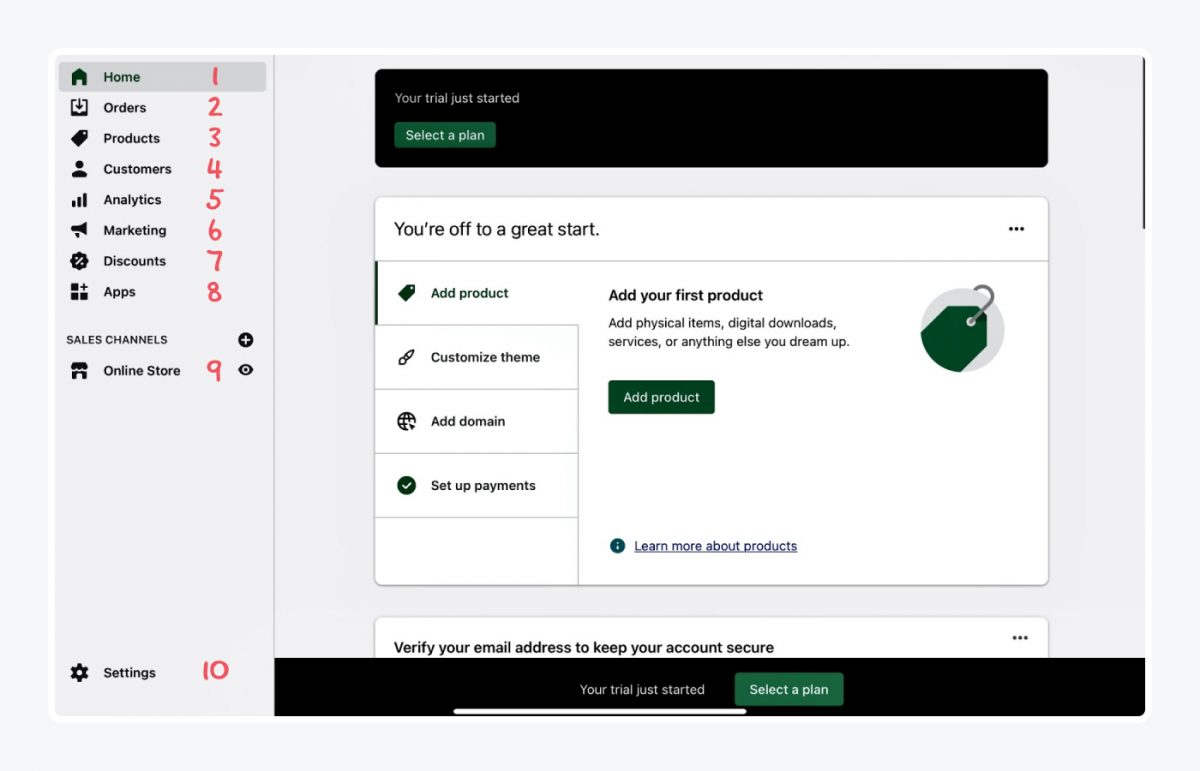
Here’s what you get:
- Home: Steps to follow to complete your setup, tips, and tricks on how to use Shopify.
- Orders: See your orders, create drafts of manual orders, and Shopify abandoned checkouts.
- Products: Manage your products, inventory, transfers, collections, and gift cards.
- Customers: Add customers, import them, and manage their details on this page. You can view their purchase history and other information which they shared with your Shopify store.
- Analytics: See your analytics reports, create custom reports, and see a live view of your store.
- Marketing: Create, and manage campaigns and automation.
- Discounts: Create a discount code.
- Apps: Download apps for extra features.
- Online Store: Customize your theme, manage your blog, set up navigation, create pages and buy a domain.
- Settings: Manage the backstage of your eCommerce business.
Let’s go through them one by one.
3. Manage orders
Let’s start with orders—arguably the most important thing about using Shopify.
Remember: This section will be empty until you open your store to customers and start receiving orders. Also, you need to buy a plan to start selling and accepting orders.

For now, you can create a draft order to see how this Shopify functionality works.
In “Drafts,” you can create orders and invoices manually. This is useful when you take orders over the phone or want to send invoices to customers.
Click on “Create draft order” to start crafting orders. It will ask you to add products and some notes. You will also need to find or create a customer that you want to make that order for.
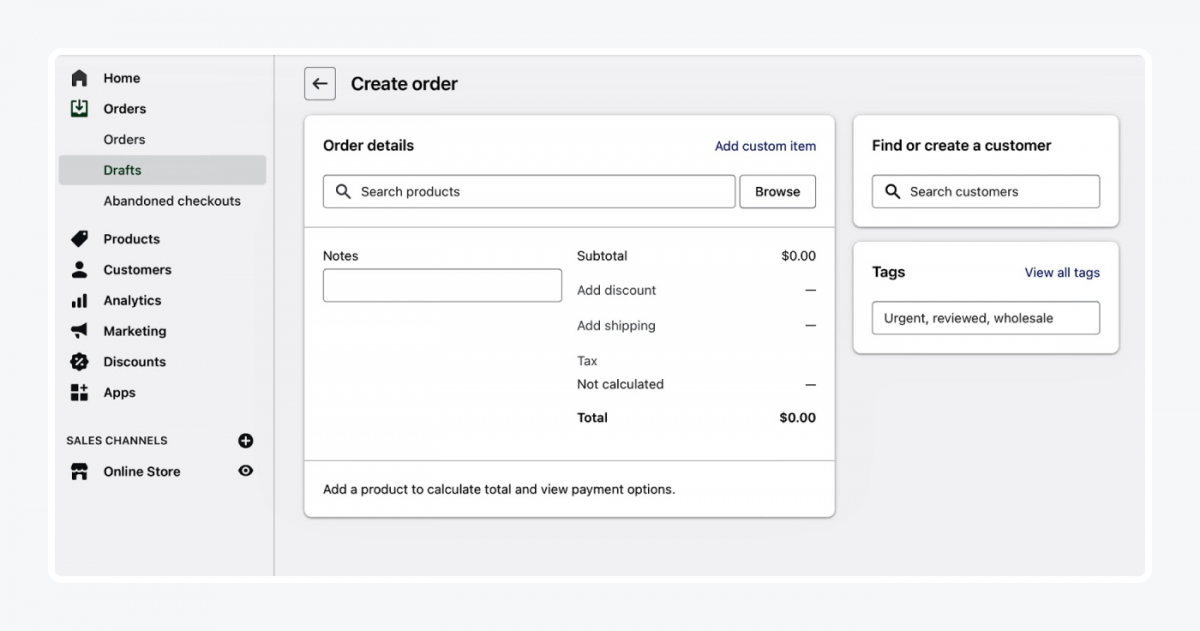
Play around with draft orders to get the feel of how Shopify works. Once you’re done, let’s move on to adding products to your shelves.
4. Add products to your online store
If you’re still unsure what to sell, check out our article with some ideas on things to sell online.
Decided? Good! Let the fun begin!
Click on the button “Add product,” and add items to your store.
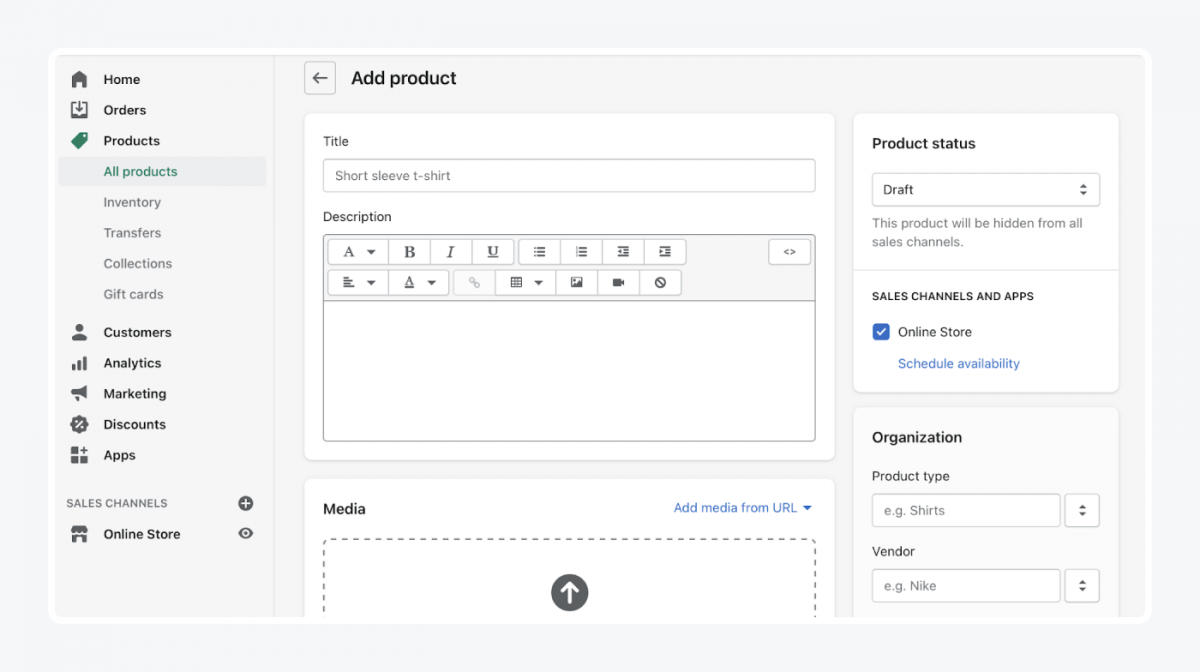
Start by filling in the title of your product. For example, is your product a “giant white teddy bear” or a “hand-drawn Beatles poster?” Adding the title is enough for you to be able to save your product.
Underneath the title, you’ll see a description box. You can insert any information you think is relevant to your product. Material, size, and any other details.
On the right-hand side, type in some details for a better organization.
- Select the product type, such as shirts, trousers, etc.
- Then select the vendor, input the brand of your product. If you’re making your products, select your store’s name.
- Choose which collection you want to add your product to.
- Lastly, choose a tag for easier recognition of your product.
You then need to upload an image or other media to present your product to your customer. Get creative with it! Grab your camera and set up your items in different locations and angles. Turn your area into a photo shoot location and your product into a star!
Here’s a video to help you shoot good looking product pictures:
When you have the right media showing your product, it’s time to start pricing it. How much do you want to sell it for?

“Compare at Price” comes in handy when you’re having a sale. It shows the previous price to see how big your discount or sale is.
“Cost per item” is how much this product costs you. These are your spendings to produce or resell this product.
Scroll down, and you’ll get to the “Inventory” section. Fill in the type of barcode and stock keeping unit. Also, put in the quantity of the available product.
Stock Keeping Unit is a code consisting of numbers and letters. It helps to keep track of your products. SKU is entirely optional, so you don’t have to fill in the block.
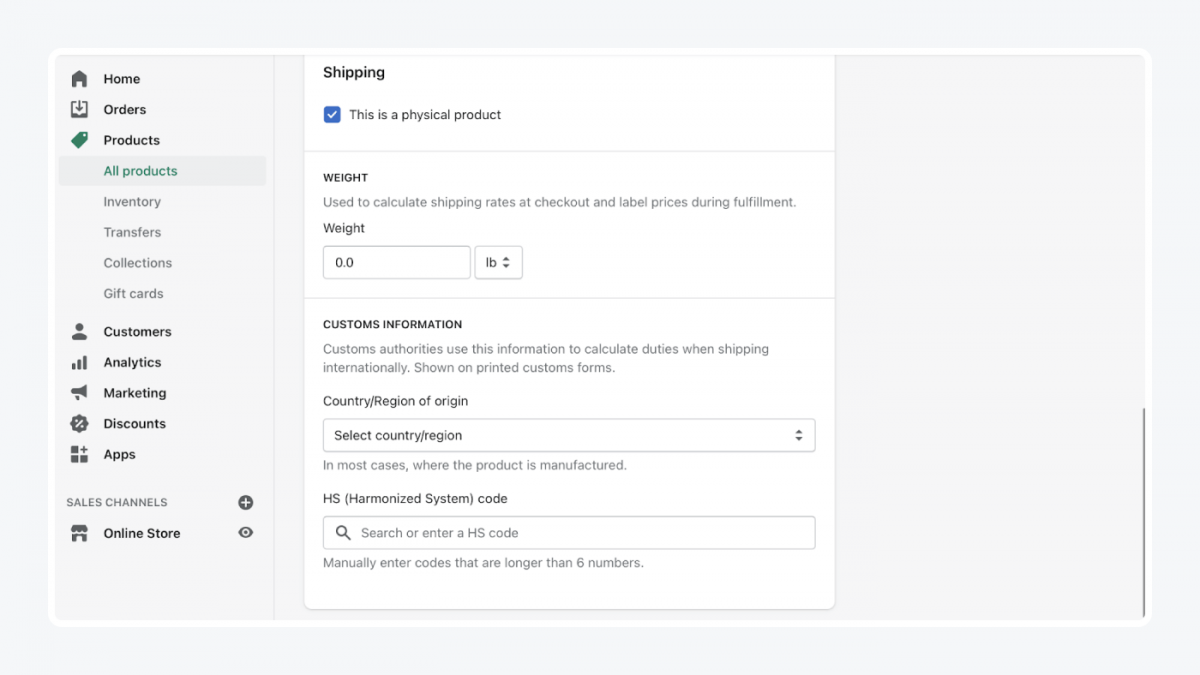
Is your product a physical item? Then you need to add weight and customs information. Select which country you’re manufacturing your product in.
Harmonized System (HS) Code is a method of classifying goods. It’s used for custom authorities to identify products when assessing duties and taxes. The Trade Administration website has all the information on that topic you’ll need.
Next, there will be a question about variants of your product. Those are different sizes, colors, patterns, etc. Add all the options or leave the box unticked if your product doesn’t have variants.
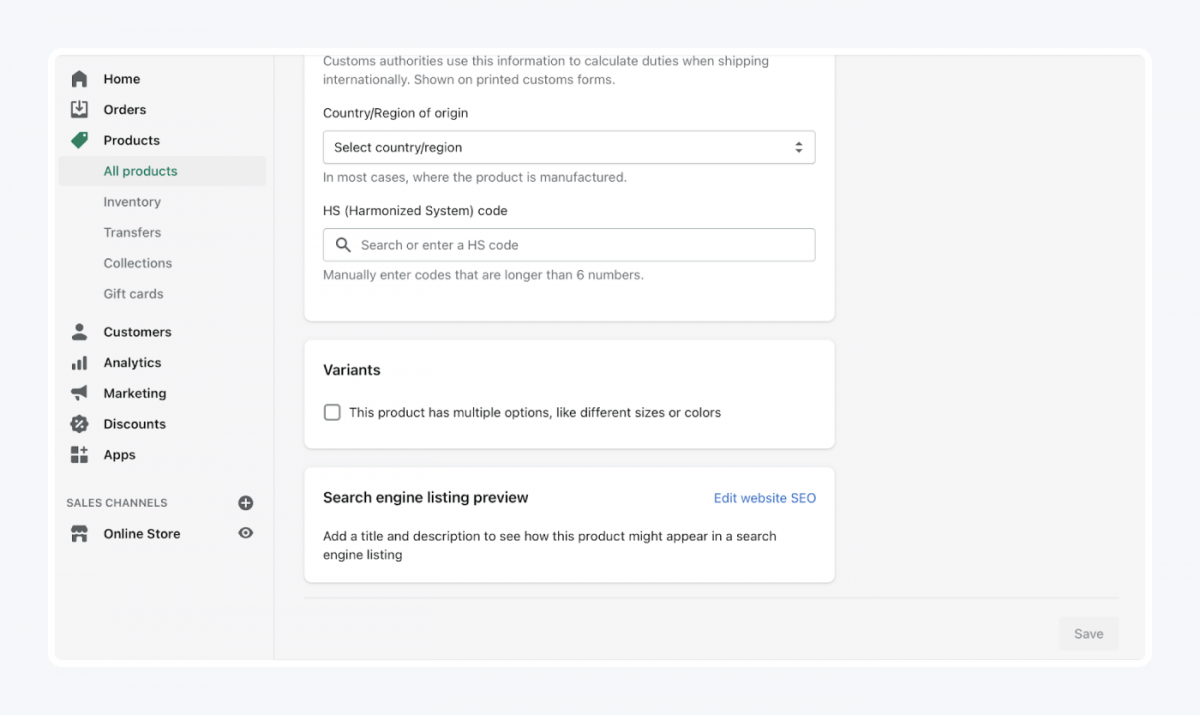
When you input all the information on your product, hit the “Save” button. That’s your first product on the shelf. 🎉
Next, let’s go through to the “Inventory” tab.
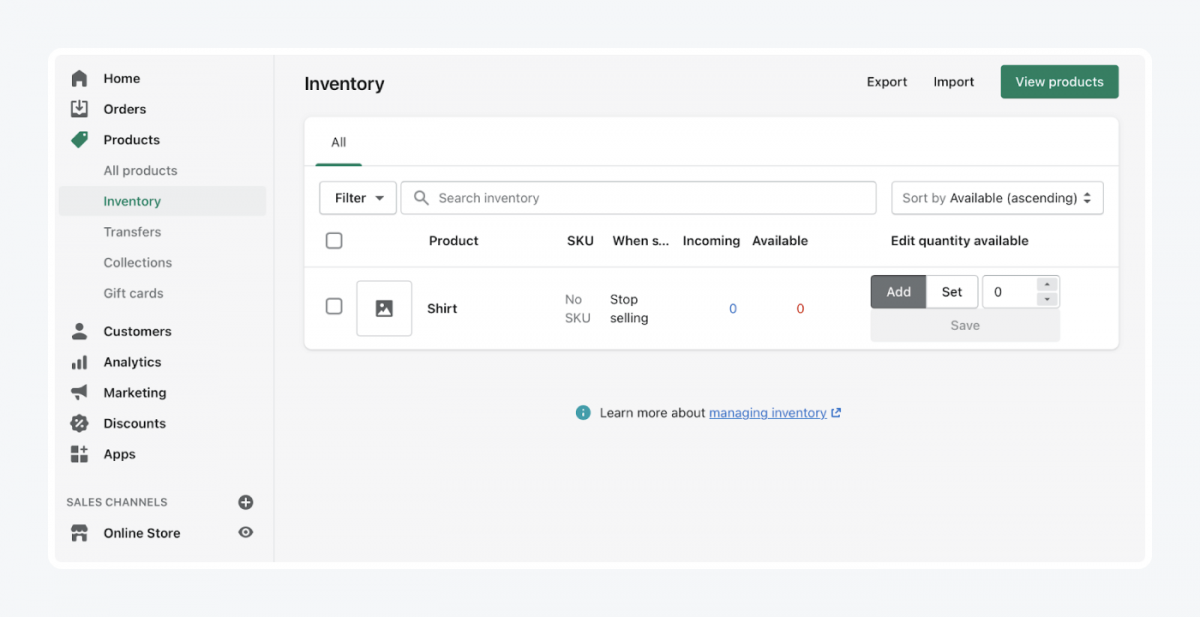
Here, you can check how many items of each product you have. You can also change the number of products if you ordered more or sold some in person.
This tab helps you keep track of the number of products available in your store. It comes in handy when restocking or checking which products are most popular.
On the transfers page, you can manage your incoming inventory. You can track and receive products from your suppliers.
When you click “Add Transfer,” you’ll see this page:
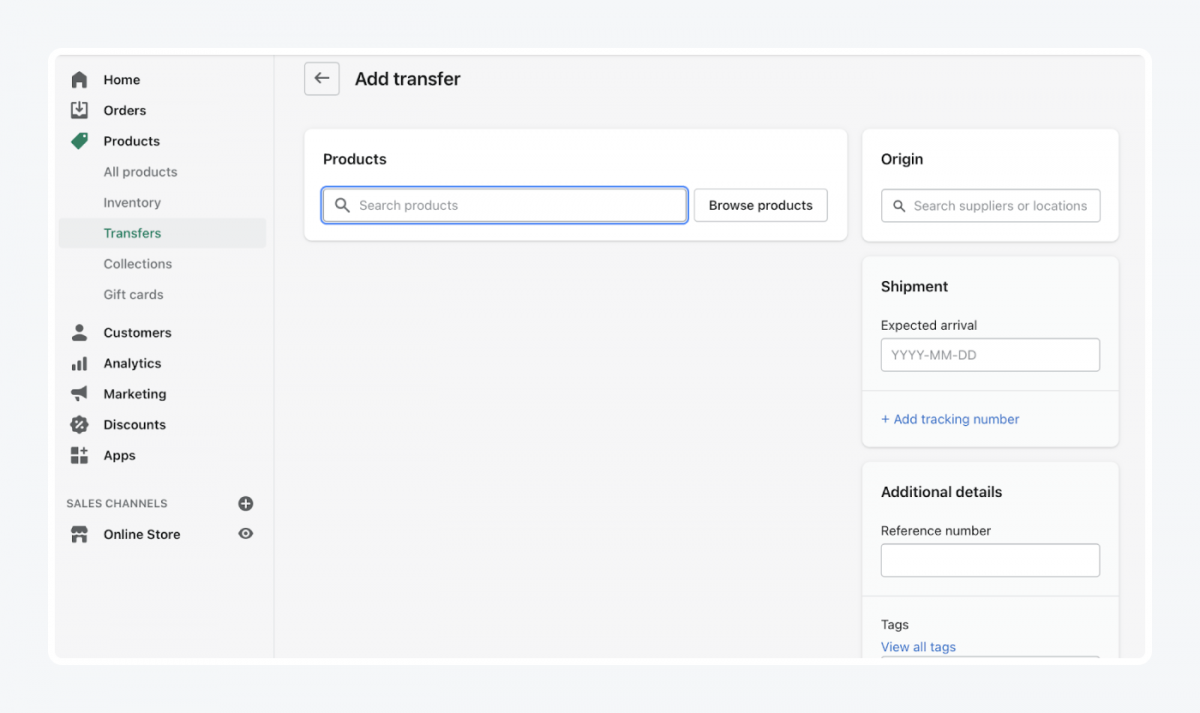
Here you can browse your products, add suppliers, and set expected shipment arrival. This, again, helps you organize products in your Shopify store and keep track of them.
Let’s move on to your collections.
In “Collections,” you can sort your products into different categories. Those could be your summer collection or new arrivals.
Click “Create Collection” in the top right corner of your page.
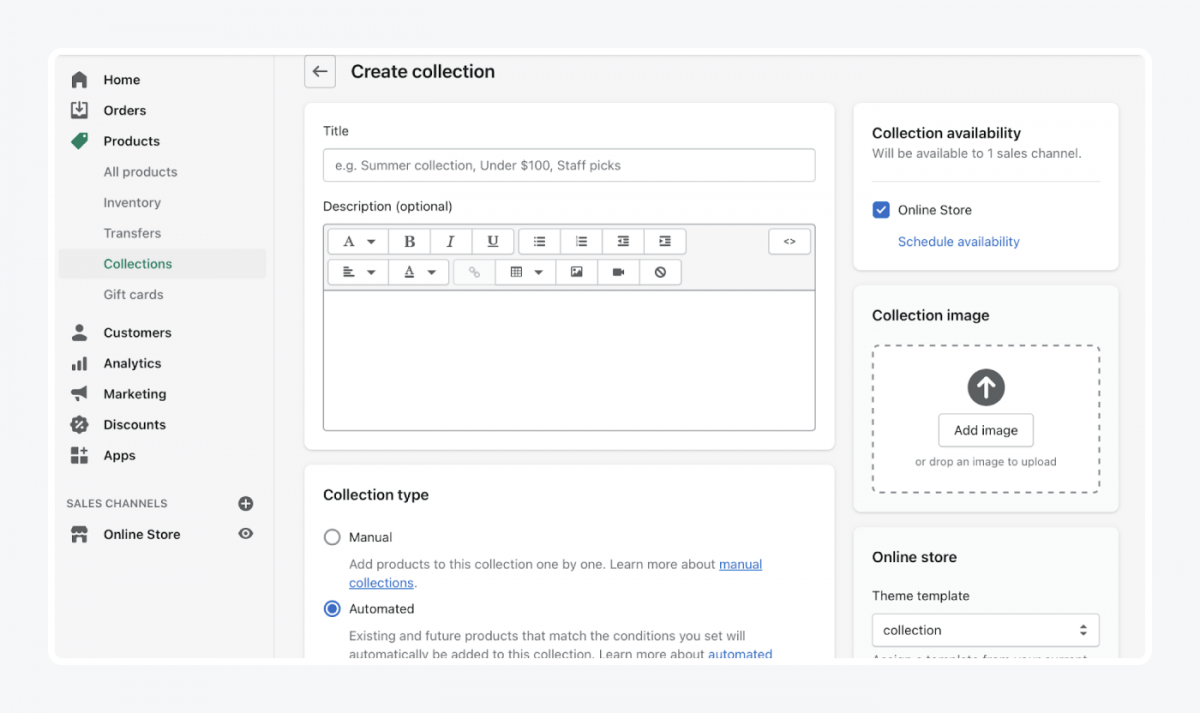
- Fill in the title for your collection, add details, and the collection type.
- You can schedule the availability of your collection if you want it to go live on a specific day like Black Friday or the first day of summer.
- Add an image for an easier view of your collection.
- When you’re finished with setting up your collection, click “Save.”
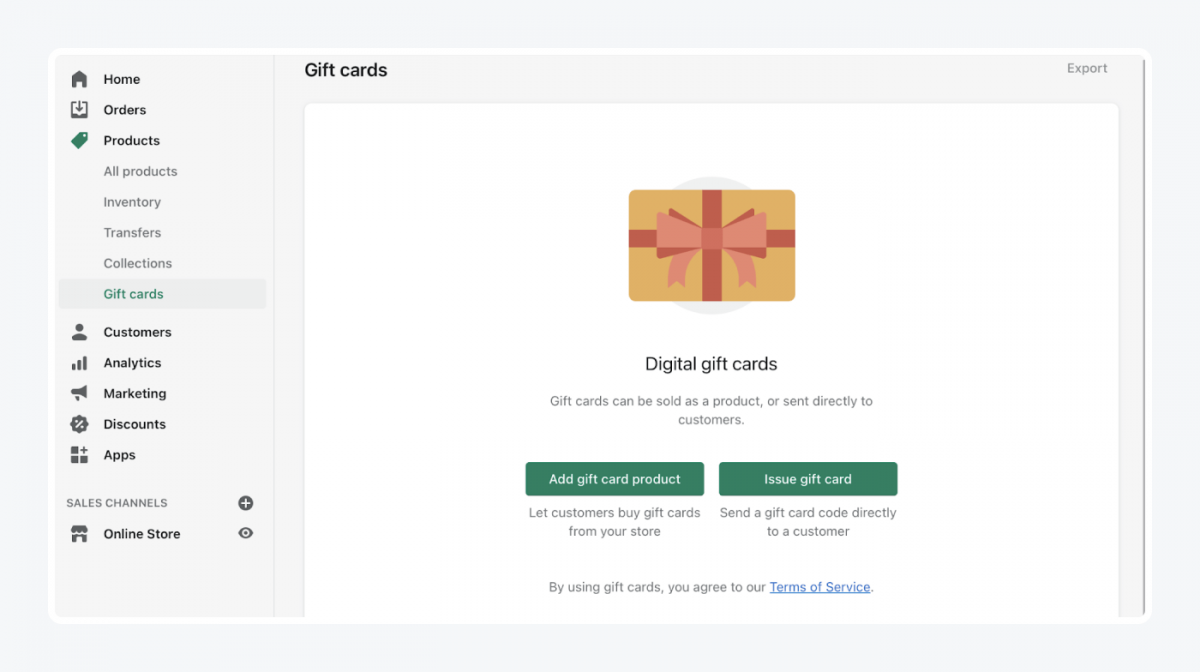
You can add gift cards as one of your products to sell or issue directly to a customer when they ask for it. This lets your customers buy gift cards from your store when they aren’t sure what to get for their friend’s birthday.
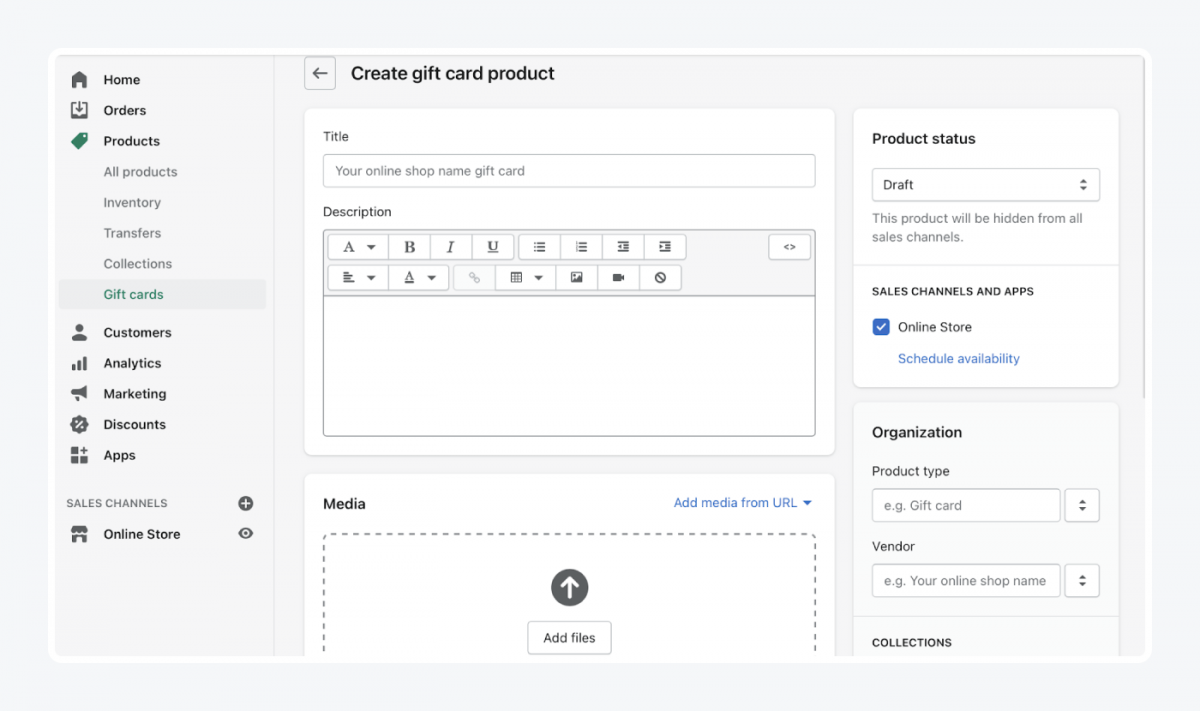
When you click “Add gift card product,” you’ll see a page to create a gift card.
- Choose a title for your gift card, add a description, and add media.
- Decide how much your customers can spend via the gift card, and change the product status to “Active.”
- For better organization, pick a product type, vendor, collection you want this gift card to be a part of and its tag.
- Pick a template for your gift card and once you check all the boxes, click to “Save gift card product.”
When you save your gift card, it will appear as one of the products in your “All Products” tab. This is how Shopify gift cards work for you. Your clients can gift it to their friends and, at the same time, introduce them to your shop. Isn’t that a wonderful way of gaining new customers 😉
5. Manage customers
In this tab, you can add new customers. You can also import your list of customers if you have one already.
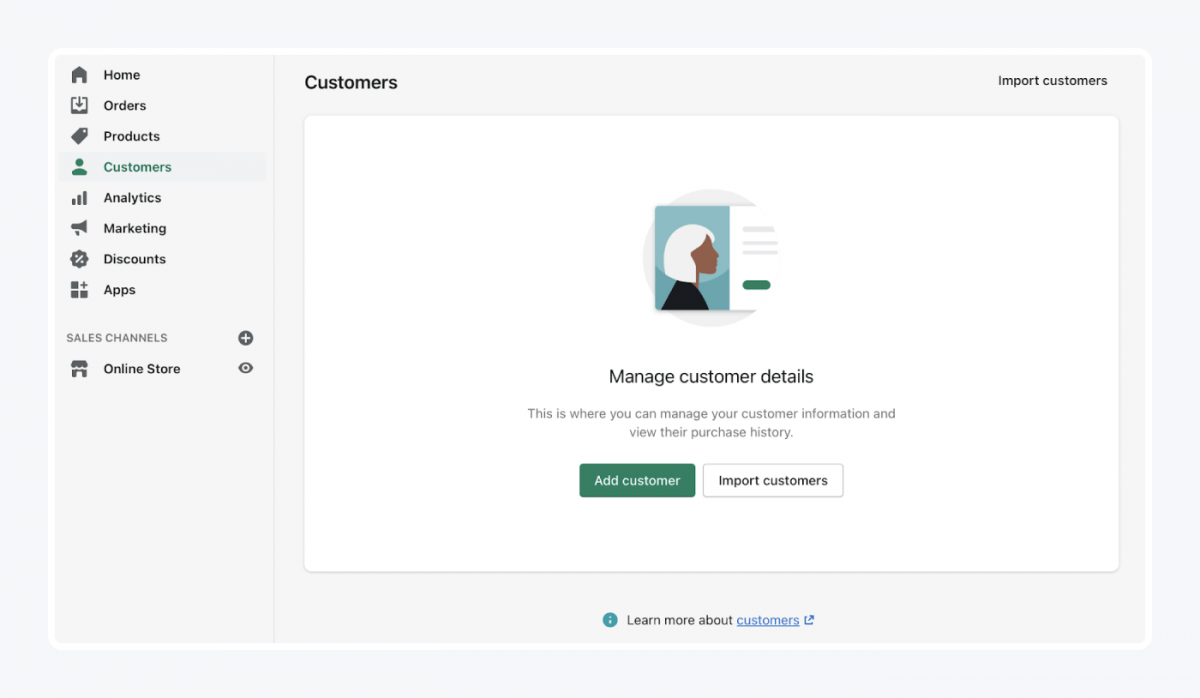
To add new customers to your store, click on Add customer. You’ll go to a page asking for your customers’ details. Those include their name, email address, phone number, home address, and whether they are exempt from paying taxes.
For your organization, you can add notes and tags to your customers. This way, you can personalize their experience in your online store.
6. Discover analytics of your online store
To make sure your Shopify store works like clockwork, you must get familiar with the analytics section.
In the “Analytics” tab, you can see how much your Shopify eCommerce made in total sales, its conversion rate, the number of store sessions, and many more.
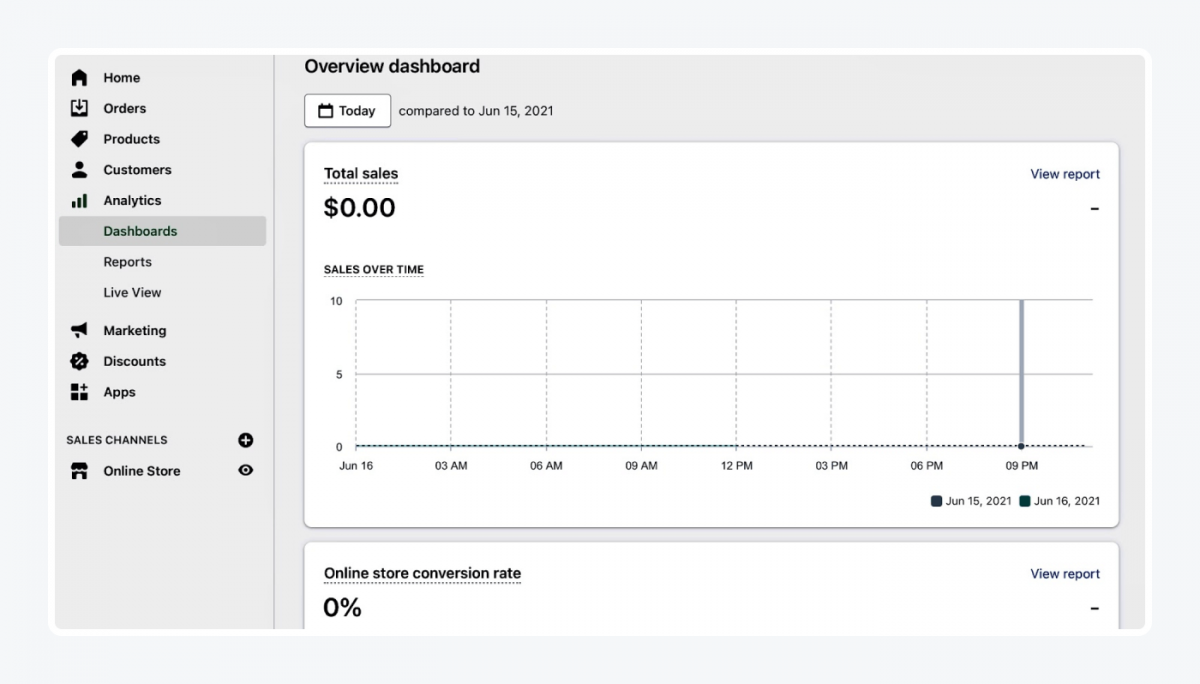
Naturally, those graphs will be flat at the beginning. But with time, as visitors and sales to your Shopify store increase, so will the numbers on those graphs.
You can track what customers are doing on your site, where they’re coming from, and what your top products are. This could give you an insight into what you should change or do more of.
You can change the dates for which you see the reports. You can also click on each graph and view the full report. Believe it or not. You will be spending more time in this section than you realize.
There is also a page for “Live View.” This section shows you what is happening in your store in real-time. It shows you how many customers are on your site, their behavior, and total orders.
If you wish to set up Google Analytics on Shopify, give this video tutorial a watch:
7. Think about your marketing campaigns
It is too early to start any campaigns yet! But it’s never too early to start thinking about your future marketing campaigns.
In your Marketing section, you can check how your campaigns are doing. You can also create new campaigns and automate your marketing.
In the overview, you can see online store sessions and orders from marketing. You can also find sales resulting from marketing and how much it cost you.
On this page, you will also find all the marketing apps you can use and learn more about marketing from videos provided by Shopify.
You can create a new campaign by going to the “Marketing campaigns” tab. Click on the “Create campaign” button.
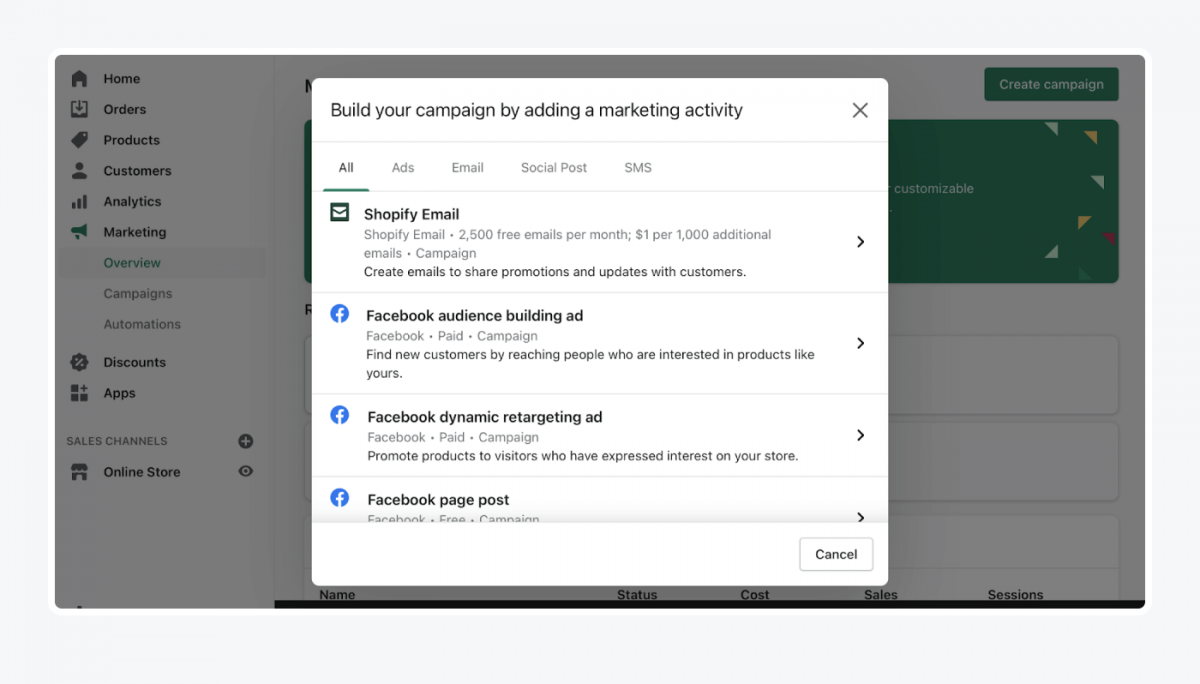
You have options for what kind of campaign you want to start. First, think if you want it to be an email campaign or a social media campaign.
When you click on “Email campaign,” you’ll be redirected to a page with email campaign templates. Choose the one that looks most appealing to you and customize it.
Get inspired. Check out:
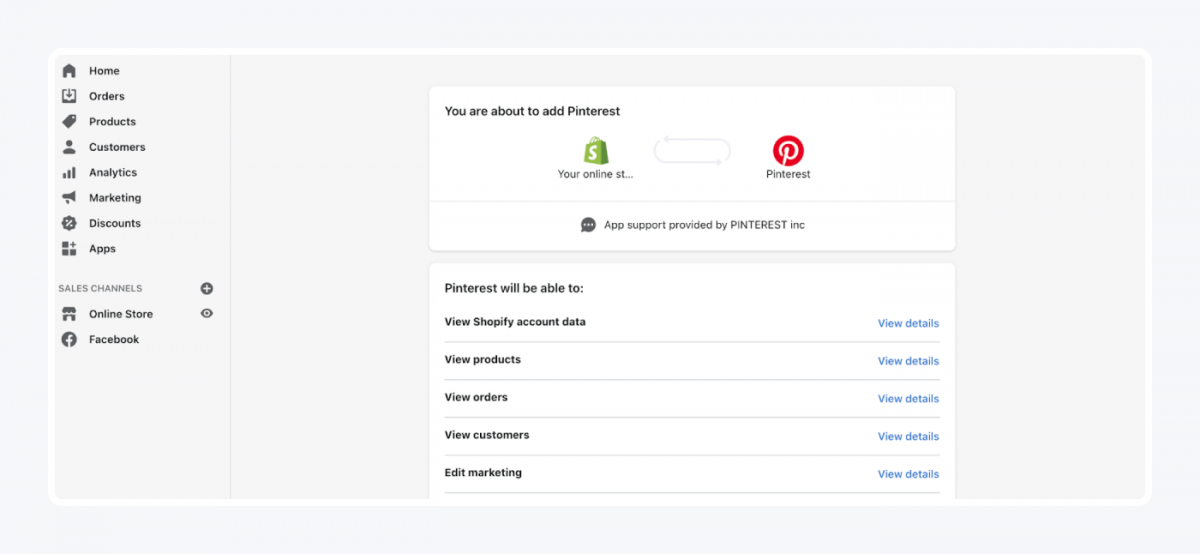
If you choose any social media campaigns, you’ll have to set them up first. This will direct you to a page where you can update the sales channel of your Shopify.
Shopify can connect your social media account to your eCommerce store. View all the details of permissions and see if you agree to them.

→
8. Create discounts
Once you finish setting up your campaign (or want to leave it for later), let’s move on to the “Discounts” tab.
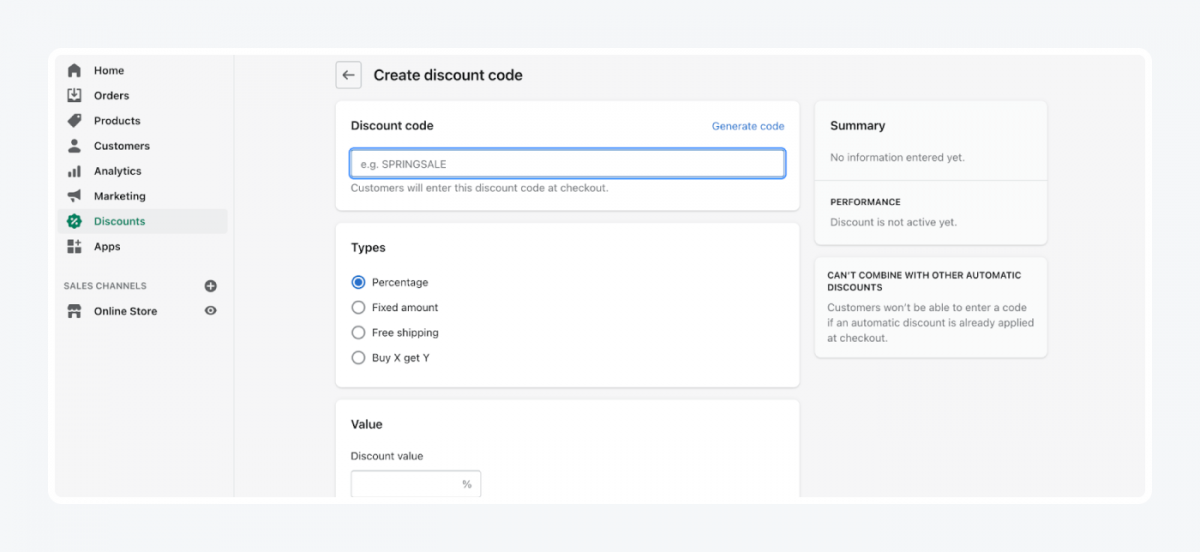
This is where you can create discount codes. Those will be useful for any of your campaigns and promotions.
The process is super easy. All you need to do is create a discount code and set its type value. You’ve got several options to choose from.
Now that you have your products, know your Shopify analytics, and how to create discount codes, let’s add extra features to your store.
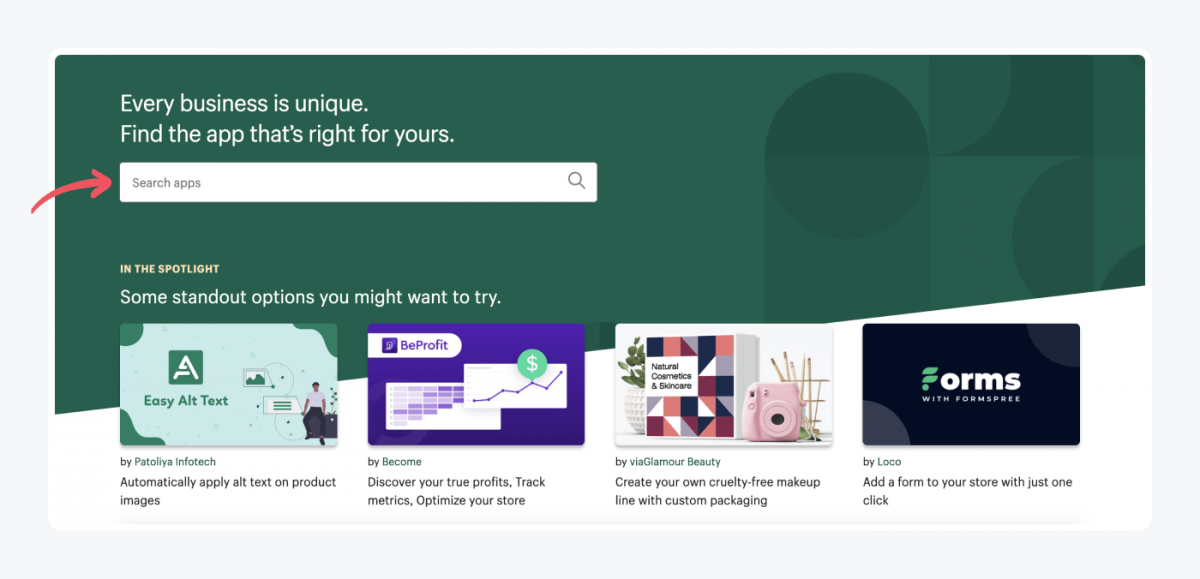
9. Add apps to your online store.
Shopify has an extensive collection of apps and Shopify plugins in its store. Let’s learn how to use Shopify App Store.
When you go to your “Apps” section, you’ll see the preinstalled apps. You can also view the most popular apps with Shopify merchants. Go to the category that interests you most and see what’s there.
You can browse more apps when you click on the “Shop for apps” button in the top right corner of your site. This will open a separate tab in your browser.
Go on it, and you’ll see the Shopify app store. Here you can search for specific apps and browse through Shopify’s collection. Insert a word that best describes what you’re looking for. Then you’ll get a page full of apps to choose from.
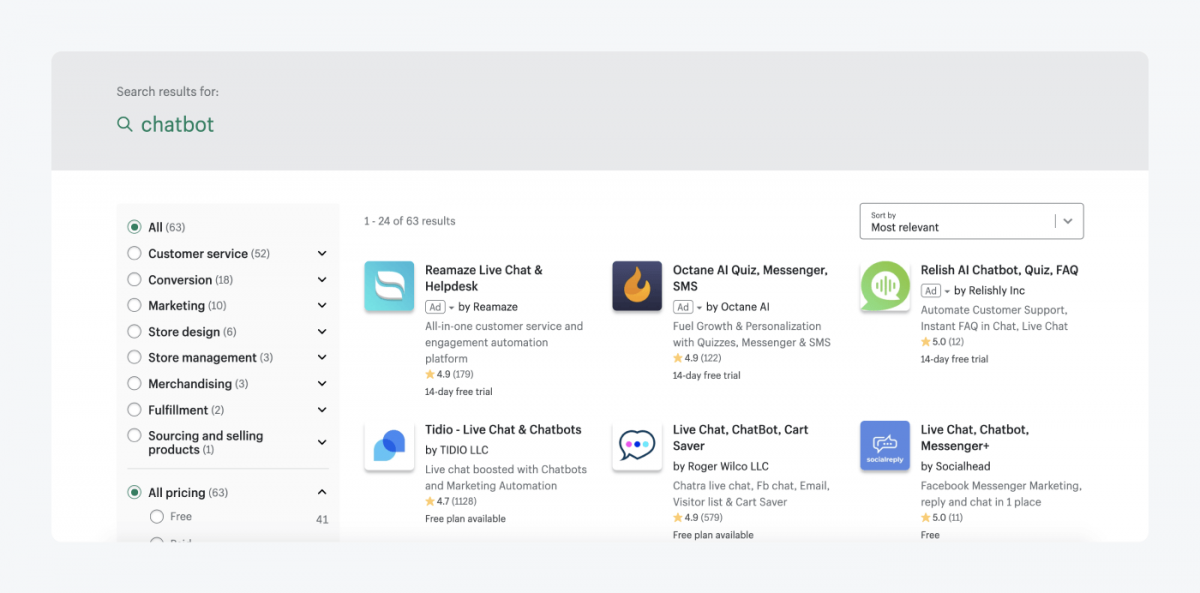
Remember to look at the ratings and reviews to get the best app for your needs. The first app doesn’t necessarily need to be the best one.
If you’re looking for some inspiration, check out these articles:
- Best Shopify Apps—where we review 14 apps to kickstart your store
- Shopify Bots—in which we explain what Shopify bots are out there with relevant examples
- Add Shopify Live Chat to Your Store—where we show you how to install live chat to your Shopify store in 4 easy steps
- 10 Best Shopify Chatbot Apps—where we rank the best chatbot apps for Shopify
- Shopify AI agent—where we talk about how to add it to your ecommerce store
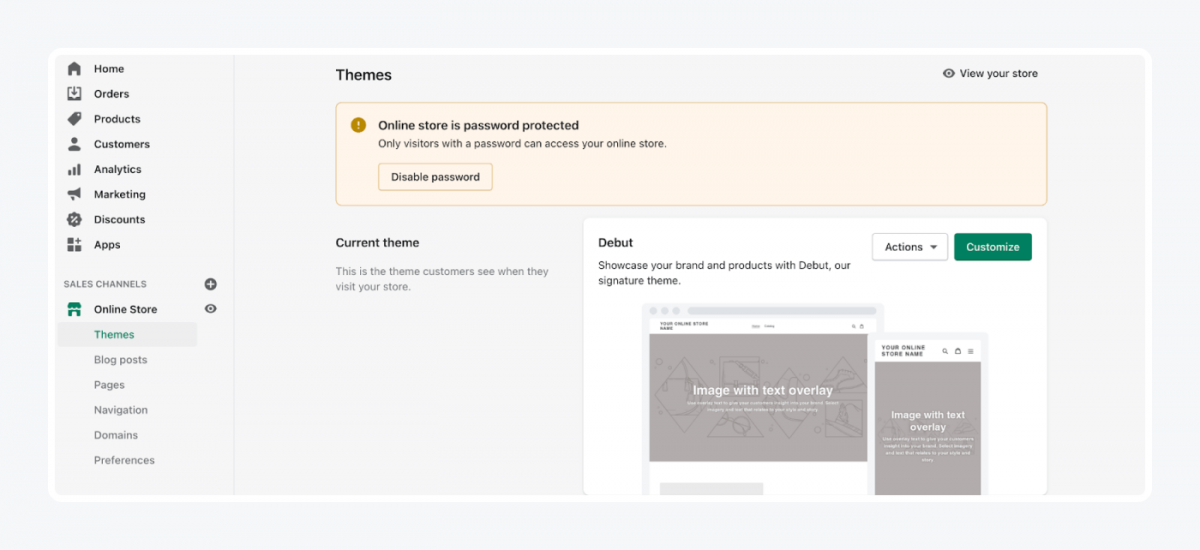
10. Customize your online store
In this section, you will learn how to set up a Shopify store. The one that your customers see. In the “Online Store” you can customize your theme, add blog posts and pages, as well as menu and domains.
Pick a theme you like
Click on the “Themes” section.
- The first one you see is the “Current Theme” that Spotify chose for you.
- Scroll down, and you’ll see “Theme library.”
- You have a choice of 9 free themes which you can customize. There is also a theme store where you can purchase themes.
Check which theme would work well for your type of business by going to Shopify’s themes and play around with the filters.
You can browse free and paid Shopify themes here or upload your own theme.
To add your theme to Shopify, go to your “Themes” section. Then scroll down to Theme library. Next, click on the “Upload Theme” button and add a file with your theme in it.
You can also browse themes to explore which one is right for you. Once you find THE ONE, click on the theme, and add it to your theme library. Then choose the “Customize” button next to the name of your theme.
This will lead you to “Theme Editor,” where you can change and add anything you want to your site.
Each theme has slightly different sections when you’re customizing it. You are free to choose any theme you like the design of. In our guide, we’re sticking to the Debut theme since it is the theme Shopify chooses for you when you first sign up.
You can always change your theme if you decide it doesn’t fit your vision anymore. This does not influence your content.

Here’s a list of theme elements you can personalize:
- Header: Select logo, logo alignment, and width. Choose the header menu and type in your text for the announcement bar.
- Image with text overlay: Select an image for your homepage, choose the image’s alignment and its layout. Type in the section Heading and text that appears underneath. Choose the size of the text and any button links under the text.
- Image with text: this is the section under your main image. You can select an image, its alignment and heading. You can also write up a description and add a button link.
- Text columns with images: Add three or more columns with photos and text underneath them. You can click on individual columns to customize them separately.
- Featured collection: Choose a heading, select collection, and how many products you want to place per row. This is the place to show off your collections.
- Image with text overlay: The second image with text on it to break your page. Select your image, type up your text and link up a button.
- Testimonials: Type up your customer’s reviews.
- Gallery: Select images, choose alignment, paste a link, and pick a caption for your pictures.
Let’s not pretend it’s easy. It takes a lot of thinking, and you’ll probably change the look of your online store many times in the future. But at least you have your first version of the home page ready.
You can customize the rest of your pages by going through our list again. If you want to customize all your pages now, click on the Home page drop-down menu at the top of the page. Then, choose which page you wish to tweak, and get creative with it. 🎨
If you would like to watch this part to better visualize it we found a Debut Theme Design Tutorial for you:
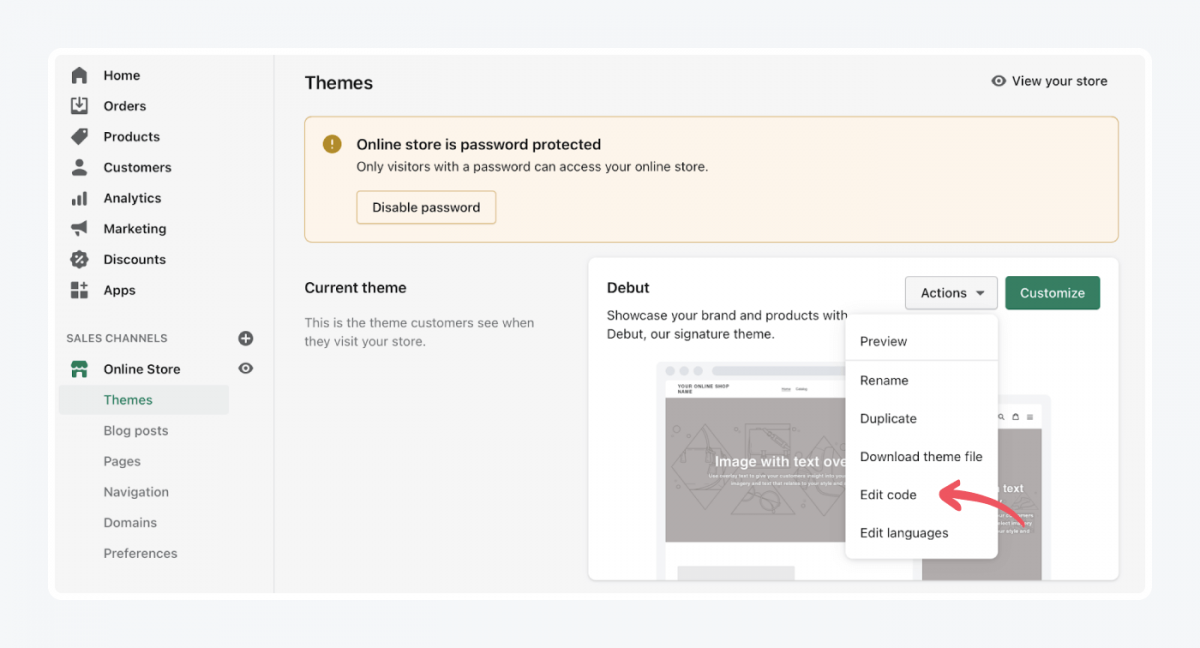
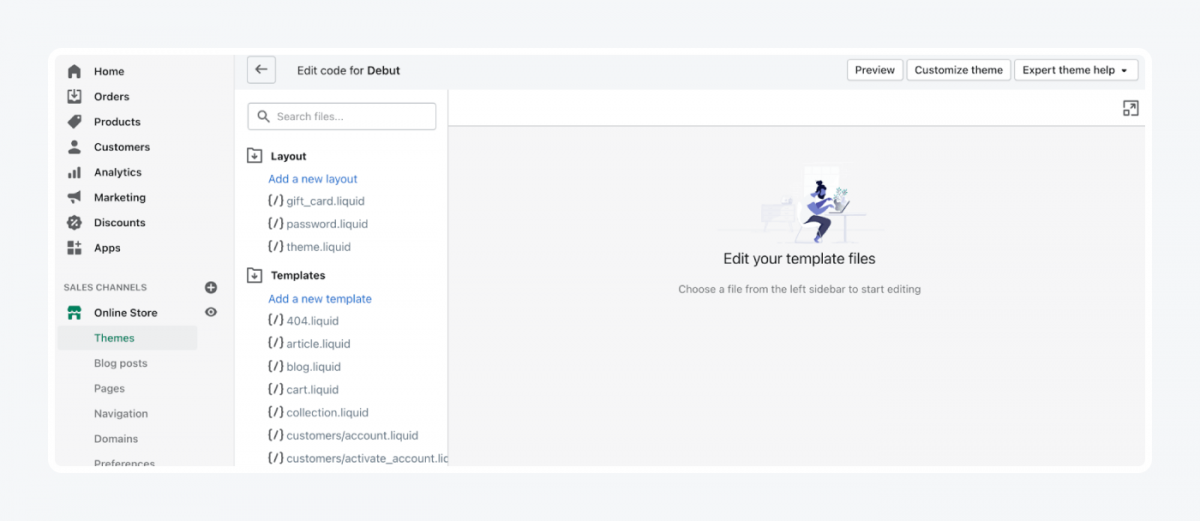
Edit code on Shopify
You can edit your theme code by going to your Online Store. Click “Actions” and choose “Edit code.”
→
Before you start, make sure to duplicate your theme to have a backup copy. It’s always a safer option, just in case something happens and you need to start fresh.
You need to know a bit of coding to change any of the code already put in there. You can always search for the code that you think would benefit your site. If you’re a beginner, avoid playing around with the Shopify code too much.
Set up a Shopify blog
Writing a blog is a big section of your store. If you decide to do it, you need to be prepared to spend a lot of your time there. You can get some help from this article on how to start a blog. Plan it well, and it can massively improve your store’s performance.
Are you ready? Do you know what you want to write about? It needs to be relevant to your industry, and you should become an expert at it! Do your research and follow some of those tips and tricks on how to write a blog post.
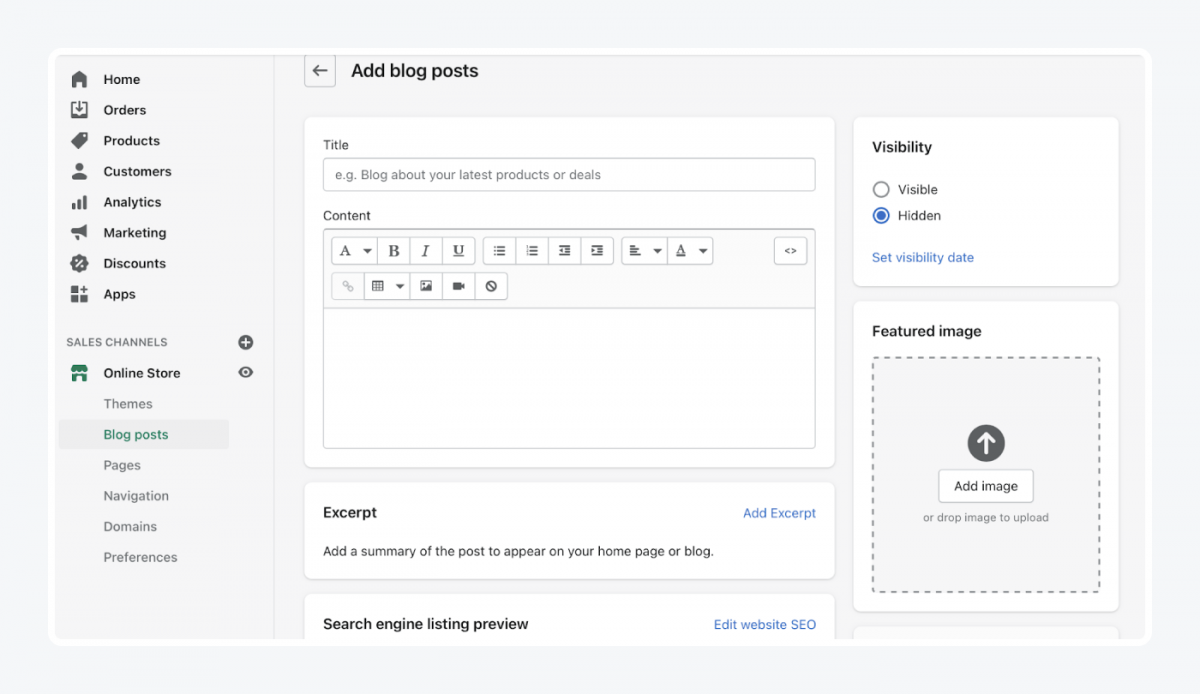
To create your first blog post on Shopify, click “Create a blog post.”
- First, add a title to your blog post. Make it catchy and relevant to what you’re going to be writing about.
- Then write the content of your blog. It can be a recipe, a story, or a tutorial. Write whatever you want. Just make sure it’s relevant to your store.
- After you finish with your content, write up a short summary so that people know what to expect from that blog post.
Now let’s look at the boxes on the right-hand side.
- Choose for your blog post to be visible.
- Choose an image on your blog landing page. To do that, click on “Upload image” and select the photo you want to appear on your blog landing page.
- Select who is writing this Shopify blog post from a dropdown menu.
- Then, create a new blog in the drop-down menu.
- After you have a blog established, you can save the next posts to the existing blog.
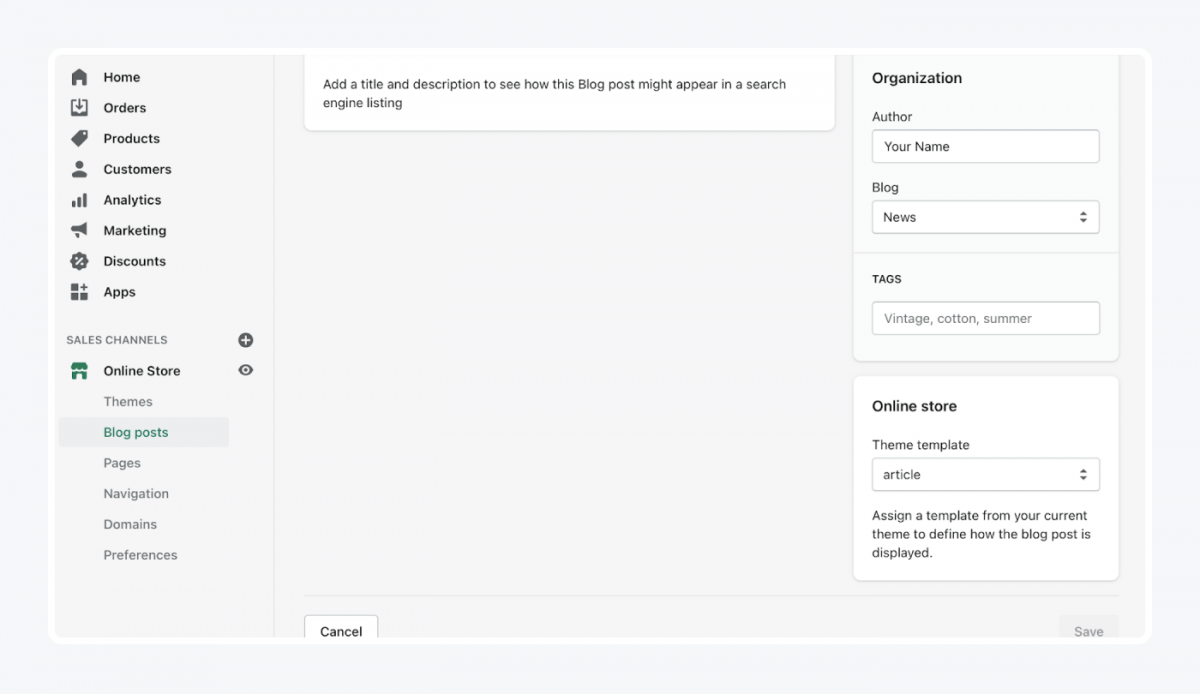
Add tags to your blog posts to categorize them. Tags make it easier for your audience to navigate. You can do this by adding tags in the Tags field. Don’t make them too long. The limit on tags is 255 characters.
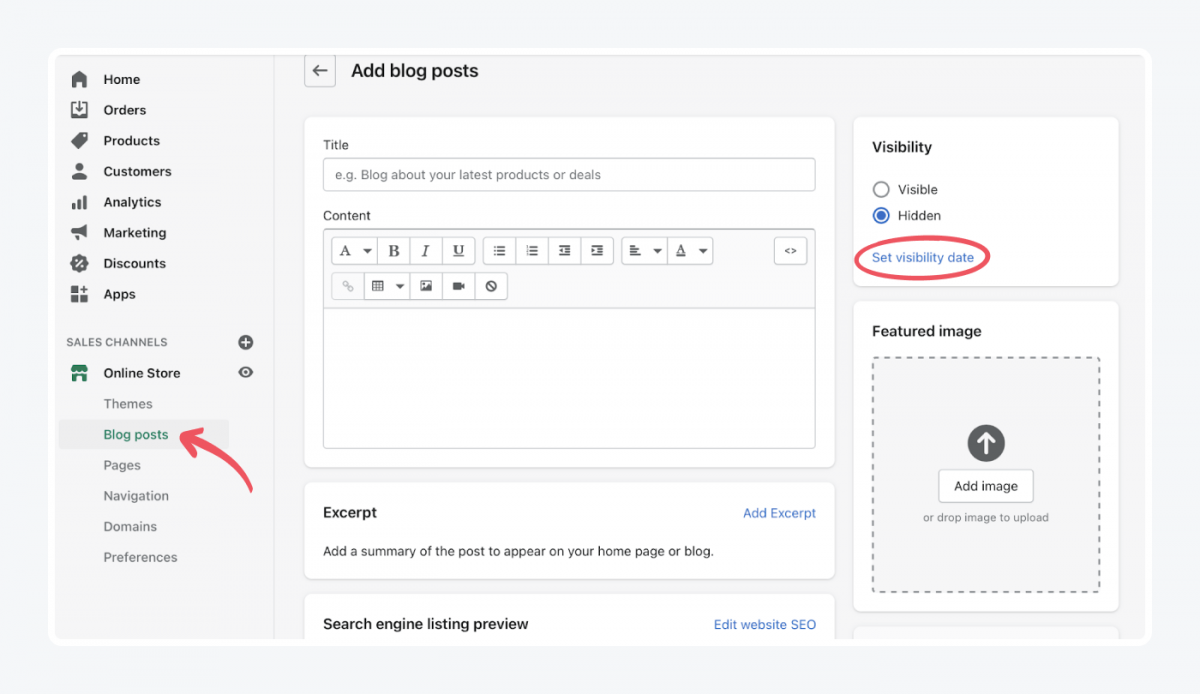
When you are ready to publish the post, select “Visible” in the visibility section. You can also set a publishing date for the post by clicking “Set Visibility Date.” This will allow you to set the time and date you want your post to become visible to readers. You can edit and delete a published blog post at any time.
Remember, your blog posts will not appear on your online store until you make them visible.
When you finish creating your first blog post, click “Save.” And there you have it! You’re an entrepreneur and a blogger now!
You can get additional tips on adding blog posts from the Spotify help center.
Alternative: Create blogs with Bloggle’s drag-and-drop editor
Shopify’s built-in blog editor works for simple posts, but many merchants find it limiting when it comes to design, SEO, and optimization. That’s where Bloggle comes in.
Bloggle is a drag-and-drop blog builder for Shopify stores. It allows you to create engaging, SEO-optimized blog posts without coding. You can easily drag and drop your products, call-to-action blocks, image galleries, or even Klaviyo forms, going far beyond Shopify’s native editor.
What makes Bloggle especially useful is its built-in SEO and UX scoring. While you’re writing, Bloggle gives you real-time feedback to help your posts rank higher on Google and keep readers engaged. Once ready, publish directly to Shopify.
Tip: Pricing starts as low as $25 per month, but you can take a 14-day free trial and cancel at any time.
Moving on—
Let’s learn how to create Shopify pages for your store.
Create and edit Shopify pages
You have your blog now. What else can you do for your Shopify store to work great?
Add relevant pages.
Things like “About Us,” etc. will let your store visitors know you better.
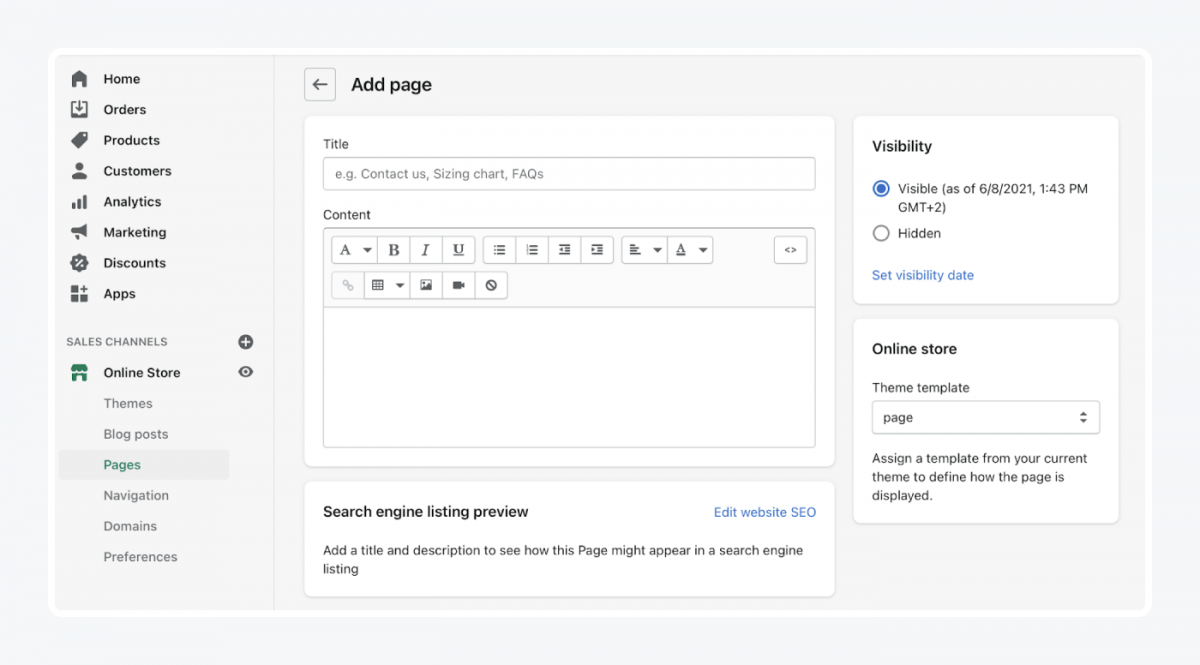
To add more pages or change the existing ones, choose “Pages” from the Online Store drop-down menu. Your template gives you some standard pages, but you can add additional pages manually.
When you click “Add page,” you’ll notice that the process of creating pages is very similar to that of creating Blog posts.
- First, add the title of your page.
- Then contents you want to put on your page.
- Change visibility settings to when you want your page to go live.
That’s it! You got your first page ready for your customers.
Add menu
One of the things that can make your Shopify store work smooth as butter is a simple but well-thought-out menu. It will help your customers move around easily.
To create a navigation menu, choose the “Navigation” tab. This is where you can find all the menus that are already on your page. You can choose to keep them or add a new menu.
Let’s go ahead and click on the “Add menu” button. This is what you’ll see:
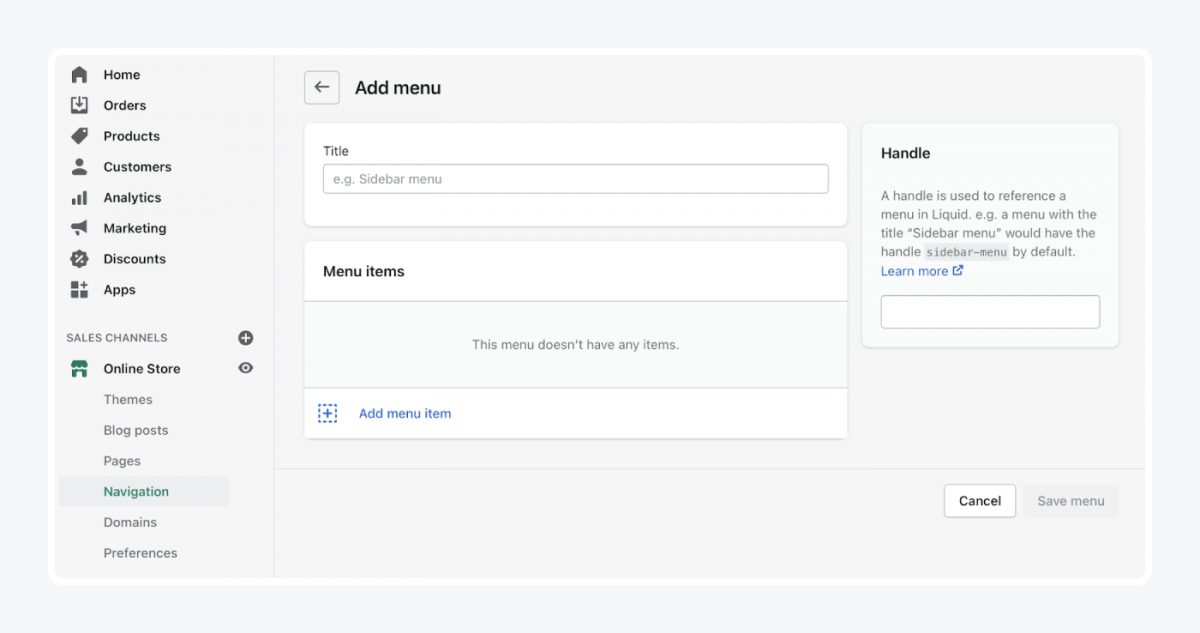
Add a menu title and items you want.
Finished? Perfect! Let’s go on to getting you a domain name for your online business.
Get a domain name
Your Shopify store won’t work without an address. The domain name serves as the address that people will type into their web browsers to get to your store.
This is how you set the domain name:
- Go to the Domains tab. This is where you can see your primary domain name, and it’s also the place you can buy a domain name.
- Before doing anything else, check this page to discover more about domains and check the availability of the name you’re thinking of.
- When you click on “Add domain,” you’ll be redirected to the “Domains” page.
- You can either connect/transfer an existing domain or buy a new one.
You can buy your domain on Shopify or from a different domain provider, such as:
Choose your Preferences
In “Preferences,” you can change your title and meta description, integrate Google Analytics, and adjust Customer Privacy.
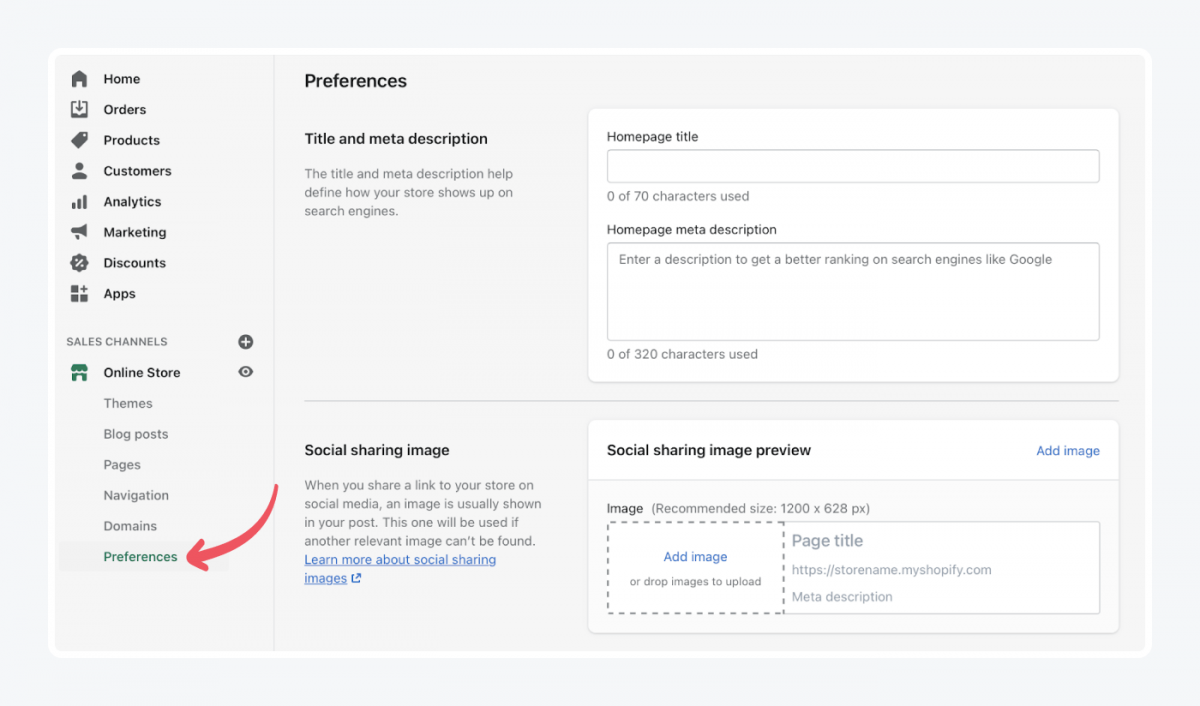
You can also add an image to use when you share a link to your store on social media.
Have a look at the page password protection. You get an option to enable passwords to restrict access to your store. Only customers who have that password will be able to shop on your site. When setting up a password, you can add a welcome message for the visitors. They will see this message after entering the password. It is a nice welcome touch 😉
In “Preferences,” you can manage your spam protection settings. These settings protect your store from spam and abuse. Spotify turns them on by default and we recommend leaving them just like this.
Last but not least, you can enable domain redirection. This is useful for automatically redirecting your customers to the correct localized store. You probably experienced it when going to big brand’s stores. They will usually redirect you to the store that supports your country or region. You can do the same if it makes sense for you.
11. Set up the back end of your Shopify store
To make sure Shopify works just the way you want it to, make sure to get acquainted with the settings. You will find them at the very bottom of the menu.
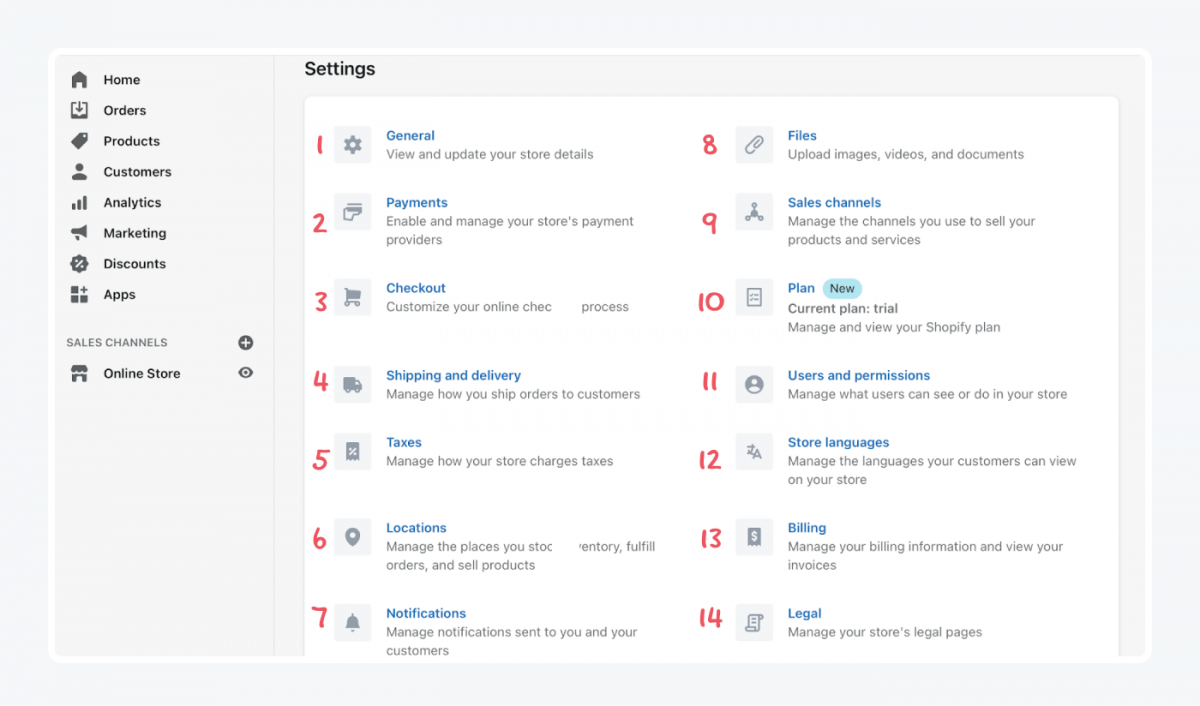
Here’s a short overview of what settings you can play around with:
- General: See your store details, such as store name, email, and industry. You can also edit your store address, phone number, time zone, and store currency.
- Payment: Check and change your payment methods, providers, and payment capture. Payment needs to be captured to process the sale, you can choose to do this manually or automatically.
- Checkout: Choose if you want customers to create an account and the contact methods they can use when they check out. You can also decide if your customers are required to provide extra information. Include the option for customers to add a tip. Change how your store responds to checkout and order events. This is also where you can change checkout language and if you want to let customers set up for email marketing.
- Shipping and delivery: Manage delivery, packages, and how customers receive their orders. This is where you set shipping rates and add free Shopify shipping to your store. You can also edit a printed list of items in a shipment.
- Taxes: Manage how your store charges and calculates sales tax.
- Location: Edit, delete and add places you stock inventory, fulfill orders, and sell products.
- Navigations: Edit all notifications sent to your customers, third-party service, and yourself.
- Files: Find, upload and delete files from your online store in this tab.
- Sales channels: Manage channels that you use to sell your products.
- Plan: View and manage your Shopify plan.
- Users and permissions: Manage what users can see and do in your store. You can also add staff members, collaborator accounts, and login services.
- Store language: Change the default, translated, and account language. These are the languages your online store visitors see. You can also choose what language you will see behind the stages of your Shopify business.
- Billing: Manage how you pay your bills in Shopify and see your billing cycle. You can also manage your tax registration information and see an overview of your billing and payouts.
- Legal: Create your legal pages here. Those include refund policy, privacy policy, shipping policy, terms of service, and legal notice.
Remember to check if you need a business license to start a business in your country.
Close your Shopify store
Now you know how to sell on Shopify but what if you tried it and discovered it’s not for you. Let’s go through how to shut down a Shopify store?
You can close your store at any time, or you can try selling your store on the Exchange Marketplace.
To close your online business, go to “Settings.”
- Click on “Plan and permissions.”
- Choose the “Store Status” section and then “Sell or close store.”
- Pick “Close store.”
- Lastly, select a reason for closing the store from the drop-down menu and click “Close store.”
You can reopen your store or view your past bills for 90 days after closing your store.
If you want to sell your Shopify store, go to “Listing eligibility” and make sure you review it. Then follow the guidelines listed below the conditions.
You can also pause your store if you need a break from it.
If you’re the owner and you were on a paid plan for at least 60 days, you are eligible for Shopify Pause Plans. You can do it to continue working on it or to step away for a while. There are different Pause Plans you can choose from. Check all of them out before deciding on any one of them.
To pause your store go to “Settings.” Click “Plan and permissions” and go to “Store status.” Then, choose “Pause,” check the terms, and click “Pause” again. Enter a message for your store’s visitors and select “Submit.”
Additional help
If you need additional help, Shopify customer service has three options for you. You can contact support, consult forums, or contact the help center. You can also hire a Shopify expert to help you with the extra settings of your online store.
How many Shopify stores can you have?
You can have one Shopify store on one account. If you have multiple product ideas, you can put them in different categories in your online shop.
You can have multiple accounts with different stores on them. But it can become difficult to keep track of orders, analytics, and other sections of your business.
As of writing this, 2,297,962 live websites are using Shopify. One more if you decide to continue with your journey.
Is Shopify safe?
Yes, Shopify is safe because it is PCI compliant, has a legal team, and includes PayPal Protection in your eCommerce store. Let’s look at those different areas for more clarity.
1. Is Shopify safe for buyers? Are their credit card details safe? Yes because Shopify is PCI compliant.
PCI DSS (Payment Card Industry Data Security Standard) is a security standard for organizations that handle card information.
This means that Shopify maintains a secured network and information security policy. It protects cardholder’s data and implements strong access control measures.
Shopify Payments does not keep card information. So, if you are a shopper, you don’t have to worry about the safety of your card details entered on Shopify.
If you were unlucky with the seller, you could report them to Shopify, and their legal team will take it from there.
2. Is Shopify safe for sellers? Yes and you have resources to help you with security, such as PayPal Protection. They provide additional security from chargeback and reversals if your customers use PayPal.
You can see how Shopify security works and all the additional measures on their security page. Additionally, if you think there is a security risk, you should report it to their HackerOne. They’ll take it from there and look straight into the issue.
What Shopify plans are there?
Shopify offers three main plans:
- Basic Shopify ($29/mo)
- Shopify ($79/mo)
- Advanced Shopify ($299/mo)
Also, there are two additional plans: Shopify Lite ($9/mo) and Shopify Plus (for enterprises). For more information and a detailed breakdown of each plan visit our article on Shopify pricing.
What is Shopify dropshipping?
Shopify allows you to sell products without stocking them yourself, which is known as dropshipping.
You can purchase a product from a third party and ship it to your customer. It is a lower-risk business because you are not holding any stock that could be left unpurchased. Thus, you become the middle-man between customer and manufacturer.
For more information read our detailed guide on how to start dropshipping on Shopify.
Summary
This is how Shopify works and what you need to do to set up your own store:
- Step 1: Start your trial
- Step 2: Get familiar with your dashboard
- Step 3: Set up draft orders
- Step 4: Put the first products on your shelves
- Step 5: Sign up your first customer
- Step 6: Discover how Shopify analytics work
- Step 7: Get creative with thinking about marketing campaigns
- Step 8: Create discounts for the first customers through your eCommerce doors
- Step 9: Add apps for a bigger personalization of your store
- Step 10: Set up your eCommerce shop, choose a theme, and add contents
- Step 11: Change the settings to mirror how you want to see your shop
There you have it. You now know what Shopify is and how it works. You have the background for your store. It’s time to start stacking up your shelves and welcoming your customers.
One last thing: If you prefer a video tutorial on how to use Shopify, you can find a complete guide here:
Good luck!
Discover how Tidio’s support team automated responses to customer queries