
Everyone knows what instant messaging is and how to use it, right?
But if you try using Facebook Messenger for business, it turns out to be a whole different story. It may feel like being warped into another dimension where everything you took for granted doesn’t hold true any longer.
Do Facebook chat features for your business pages work like private messages? Can you integrate a live chat powered by Facebook into your regular website too? How to do it, and what are some of the pros and cons of Facebook Messenger live chat solutions?
Turn Facebook Messenger into your next sales channel with live chat integration
Live chat, Facebook Messenger, or both?
Live chat is a tool that allows customers to message businesses in real-time through a chat widget.
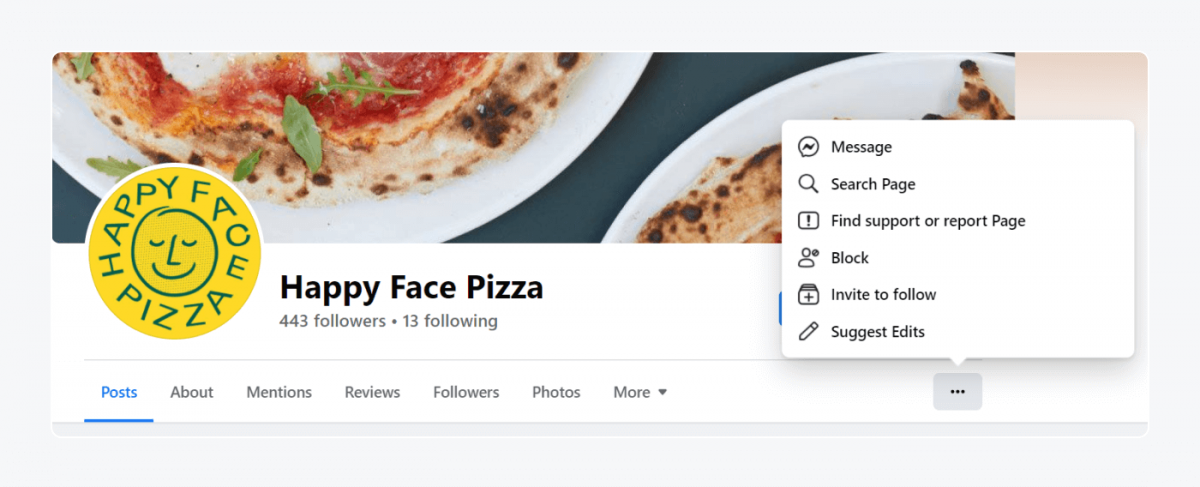
If you don’t have a live chat on your website, customers can probably visit your Facebook page instead and chat with you via their Facebook Messenger.
But what are the differences between chats and other messaging channels?
Here are the most important terms that we should understand:
- Live chat. Any kind of a widget that allows you to chat with customers.
- Facebook Chat. The general chat functionality available to desktop and mobile users of Facebook.
- Facebook Messenger. A mobile app (but you can also download a desktop version if you really want to) for instant messaging powered by Facebook.
Now—
Things get tricky. You can use a live chat app and integrate it with your Facebook account. Or you can use Facebook Bussiness Suite and integrate Messenger into your website.
Additionally, Messenger that you use on a regular basis as a private user can be a little bit different than Messenger for business. First of all, you need to set it up via Facebook Bussiness Suite instead of simply using the Messenger app on your mobile.
Here is an explanation of the differences between the two options:
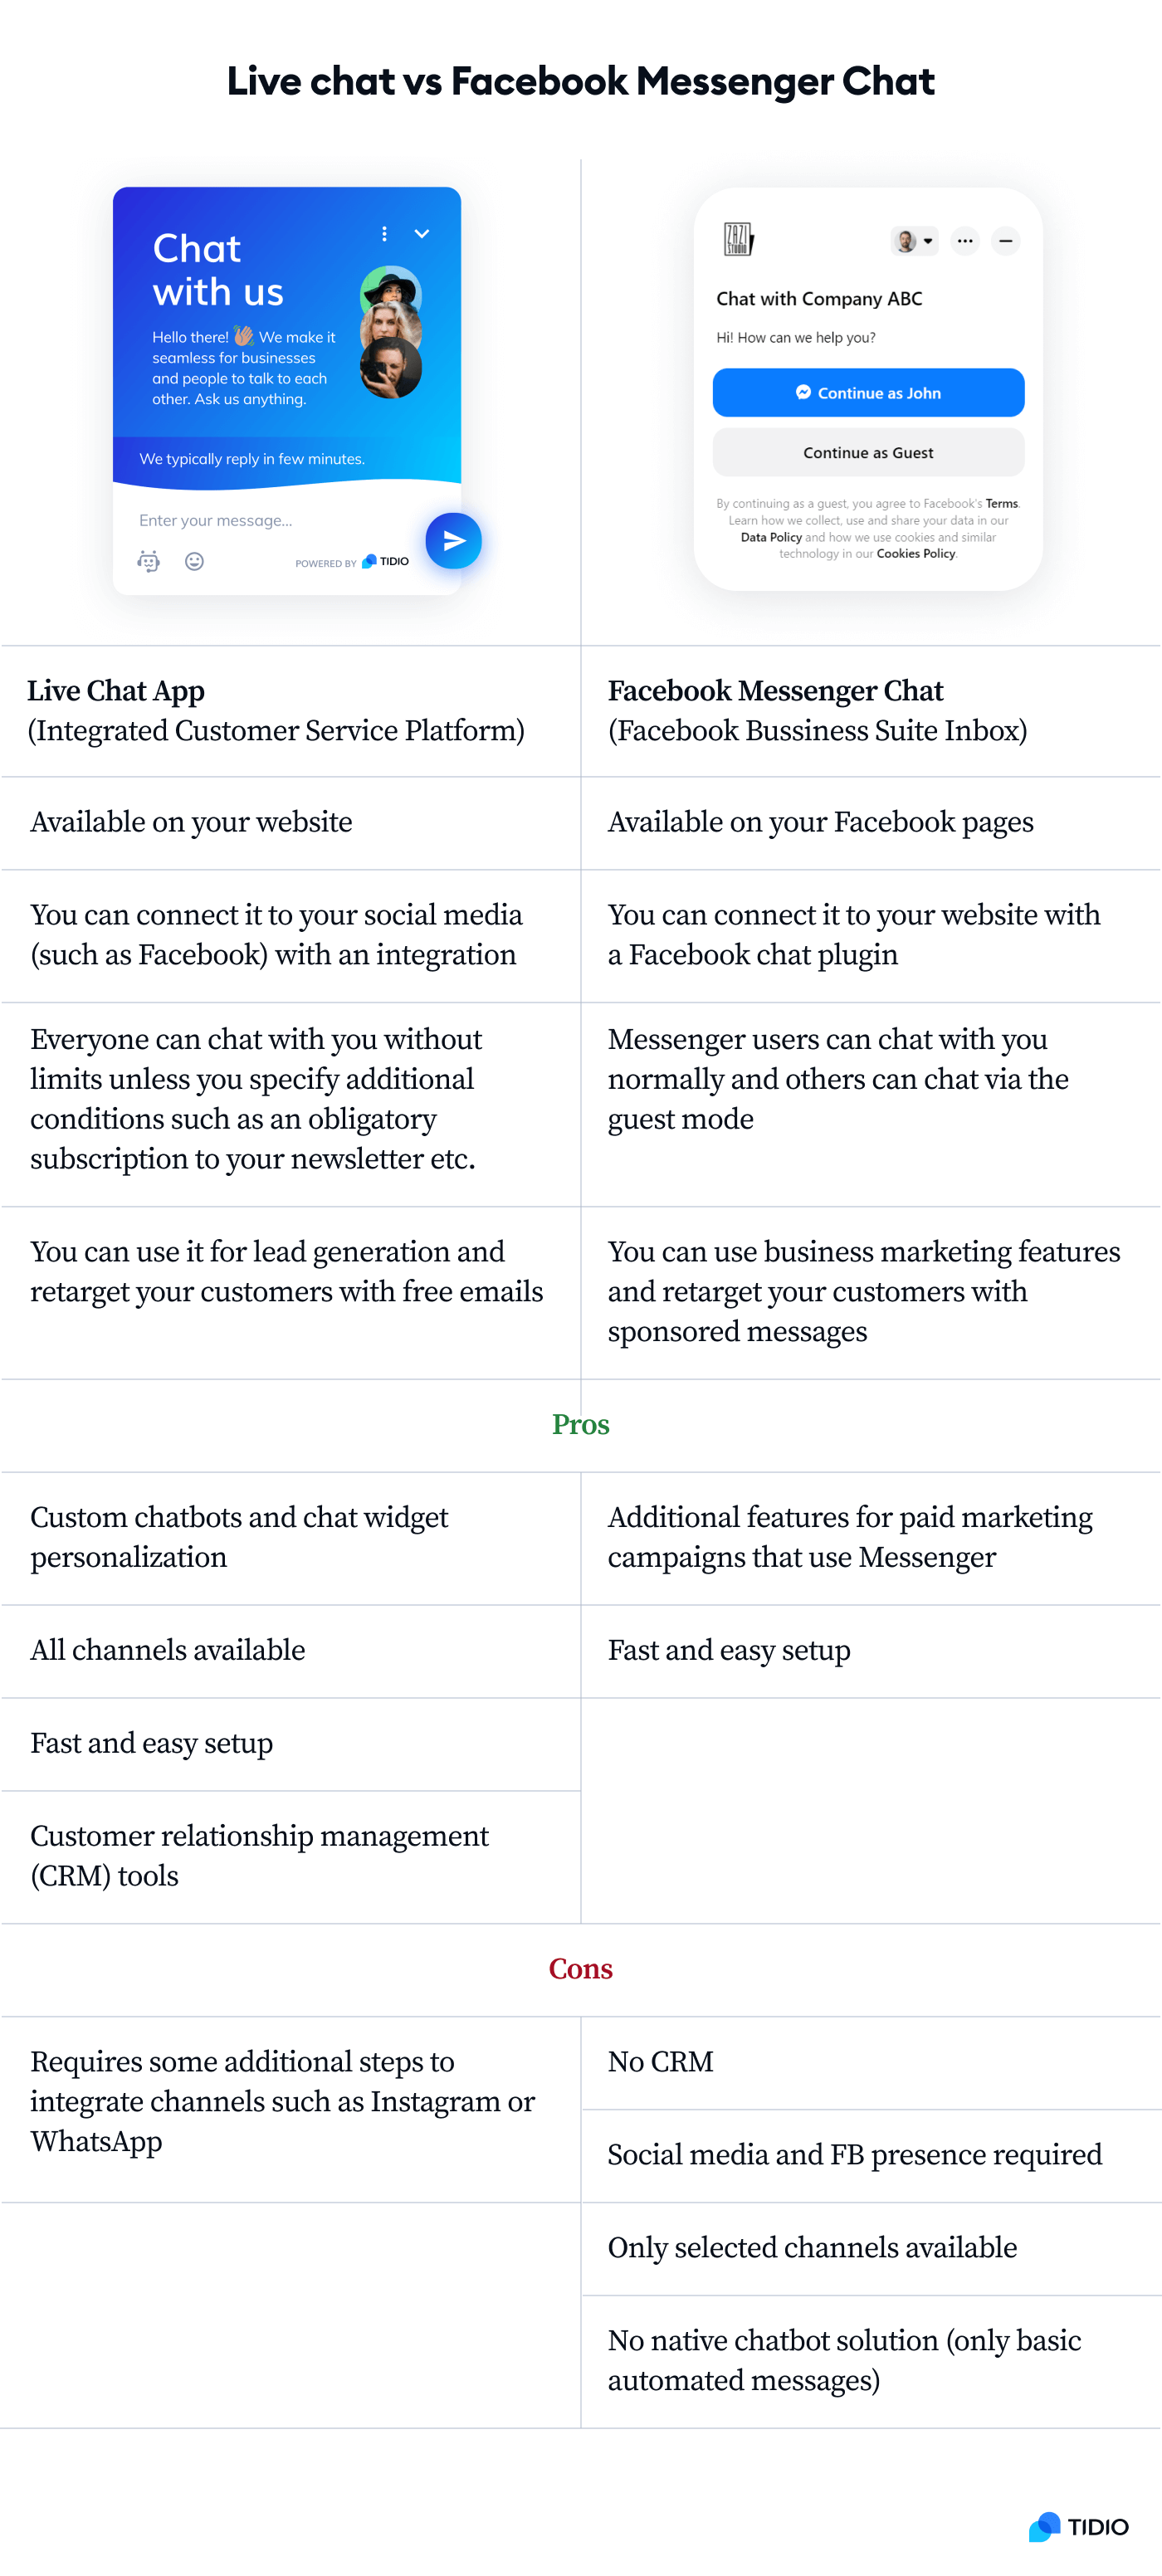
So—
If you are a business owner, you have two basic options to chat with your customers:
- Facebook Bussiness Suite Inbox. Allows you to manage your Instagram and Facebook comments and direct messages, as well as incoming messages from your website Messenger chat plugin. It can be your main customer communication dashboard, with the main focus on your social media.
- Integrated customer service platform. Facebook Messenger live chat integration powered by a third-party platform gives you more control. It allows you to manage your conversations on social media, customer service chatbots, your live chat, emails, and other communication channels. It can be your primary customer communication tool if you want to control all channels and build an independent contact list in your own customer database software.
The second option is used by the majority of successful businesses. There are many reasons for using a live chat connected to Facebook Messenger on a website. Let’s take a closer look at some of them.
Benefits of Facebook Messenger chat integration
Facebook has almost 3 billion active monthly users. Every third person in the world has an account, visits Facebook, or uses it for instant messaging. And even though the usage of Facebook by Gen Z in the US had declined by 13% since 2019 it is still the most popular social media platform in the world.
Not surprisingly, businesses want to be where their customers are.
The main benefits of connecting Facebook Messenger with a live chat platform are:
- Reaching more customers. There are over 20 billion messages exchanged between Facebook business pages and customers every month.
- Building trust. About 69% of US customers trust businesses more if they can write to them via Messenger.
- Increasing customer satisfaction. Troubleshooting the issues of your website visitors in real-time is essential for every modern business. But you can use an advanced Messenger platform to monitor customer success metrics and collect customer feedback too.
- Using conversational marketing techniques. You can use many live chat scripts, message templates, and formats such as product recommendations for online stores. They are much more effective than popups. This is especially useful for ecommerce businesses.
- Automating your support with chatbots. About 48% of consumers expect a response to their questions asked via social media within 24 hours. Facebook chatbots can send automatic replies to frequent questions instantly or send custom notifications to your chat agents via a mobile app. They can give you a huge competitive advantage.
So, to summarize—you can use Facebook to build customer relationships, increase your conversion rates, and gain trust.
Plus, integrating Messenger with your live chat support also allows you to create advanced automation and use chatbots.
But—
Developing Messenger bots on your own is not that easy. Just have a look at the video below:
Don’t panic, though.
There are many third-party chatbot solutions. You can use them to add and integrate chatbots with your Facebook page instantly.
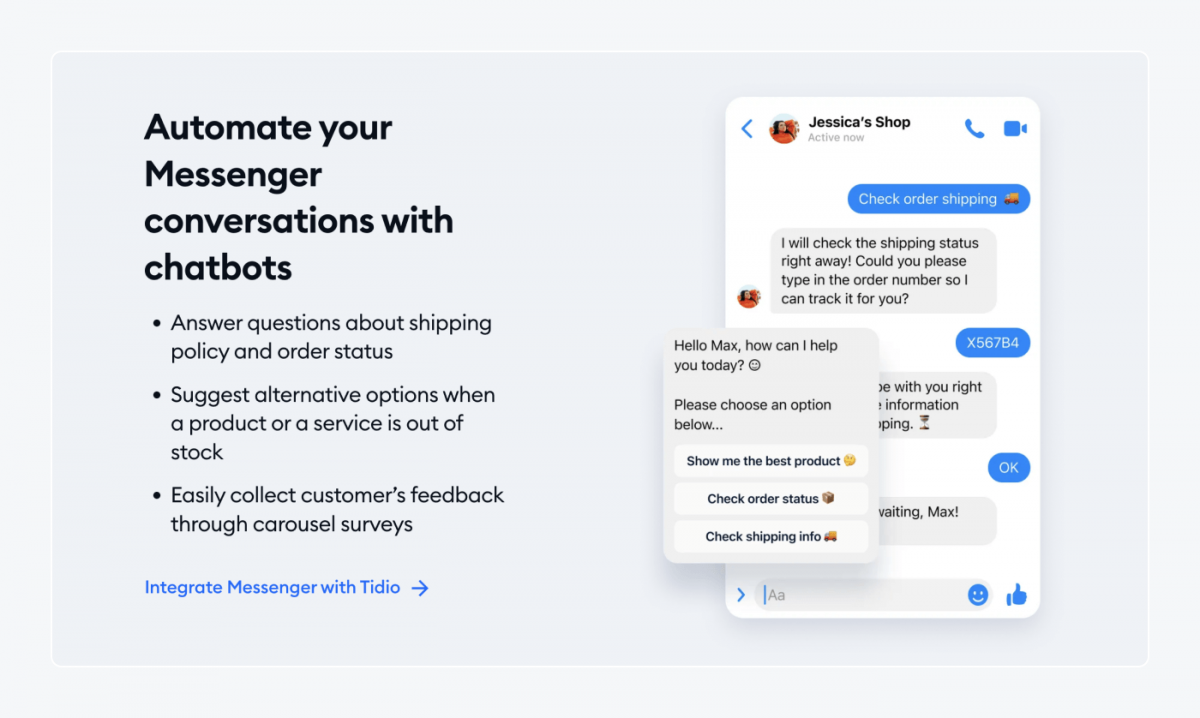
For example, you can read our case study about Phare Circus, a business that uses Messenger chatbots powered by a third-party chatbot platform for giving discounts to customers. The integration was seamless and easy to set up.
Read more: Best Chatbot Examples & Projects
How to add Messenger live chat to your website
When it comes to Facebook customer support solutions, you can use one of two installation options. Or you can resign from a customer chat plugin on your website altogether and just use the default Facebook page.
| Default | Option 1 (Better) | Option 2 (Best) | |
|---|---|---|---|
| Setup | Facebook Page + no widget | Facebook Page + Messenger plugin for websites | Facebook Page + live chat + Facebook Chat integration |
| Business type | Makeshift solution for businesses that don’t mind the limitations | Small businesses which don’t mind that their support runs on Facebook tools | All types of businesses that want to have control |
| Benefits for customers | Customers can chat with you only when they visit your Facebook page | Customers can write messages through your Facebook Page or the Messenger widget on your website | Customers can write messages through your Facebook Page, a live chat widget on your website, or other channels |
| Technology powered by: | Facebook + 3rd party app (e.g. Tidio) | ||
| Channels | Facebook/Instagram messages | Facebook/Instagram messages Website chat widget | Facebook/Instagram messages Website chat widget Email inbox |
OK—
Knowing your options is one thing, but to actually be able to use them you must know how to install them. And this is what you’re about to see.
Facebook Page with no live chat widget (default)
The default setup, obviously, requires no steps—it’s what you get when you create a business page on Facebook.
It is definitely the solution that takes the least amount of effort. Unfortunately, this will limit the number of people who contact your business. Only those who explicitly and deliberately visit your FB page, navigate through the menu, and choose to send you a message will be able to get in touch.
Now—
If you do want to use a live chat widget integrated with Messenger, you have two options.
| Option 1 | Option 2 |
|---|---|
| All conversations, including the live chat widget on your website, are powered by Messenger and need to be handled via Facebook Inbox | All conversations, including your Messenger chats, can be handled via the Tidio live chat panel |
| 1. Go to your Facebook business page 2. Click the Facebook/Meta Business Suite panel on the left 3. Go to the Inbox/Chat Plugin section 4. Set language and domain name 5. Generate a code snippet or install a WordPress/Shopify chat plugin | 1. Create a free Tidio account 2. Follow the steps of the tour and provide your website address 3. Go to Settings/Channels and connect your Facebook account |
Here are step-by-step guides for both ways:
How to add Facebook Messenger to your website (option 1)
If you are interested in the first option (Facebook Page + Messenger plugin for websites), the installation is very simple.
To add the Messenger chat plugin on a website:
1. Go to your Facebook business page

2. Click the Facebook/Meta Business Suite panel on the left
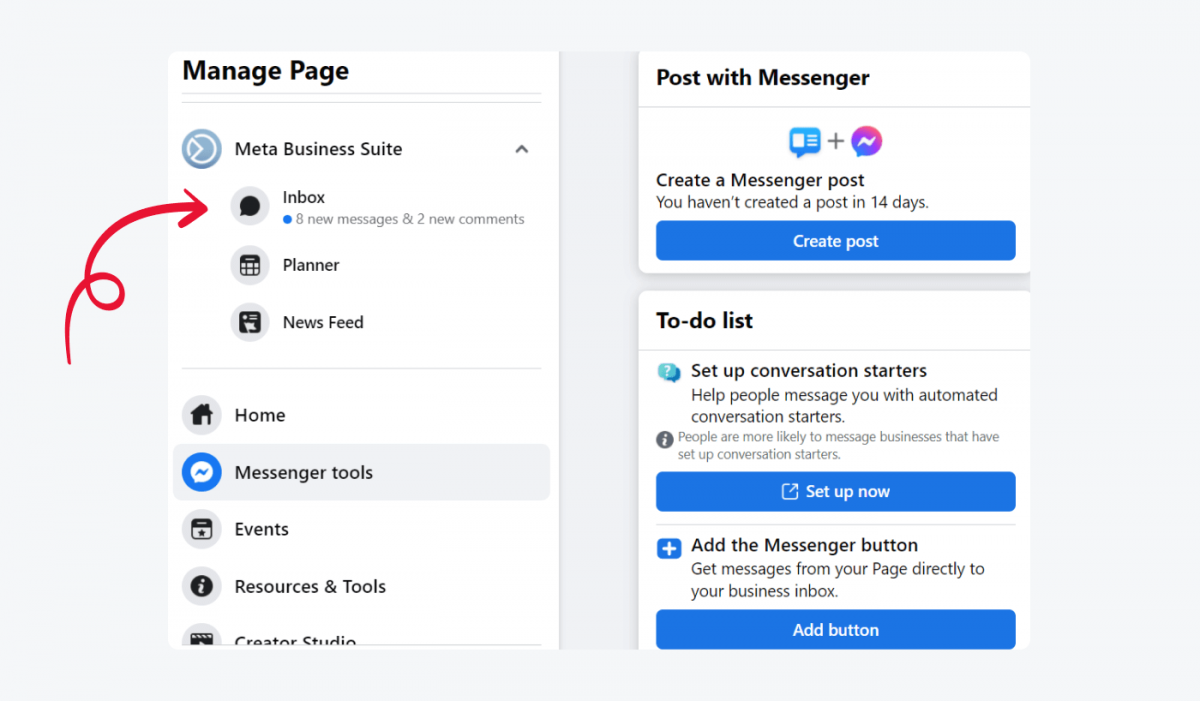
3. Go to the Inbox/Chat Plugin section
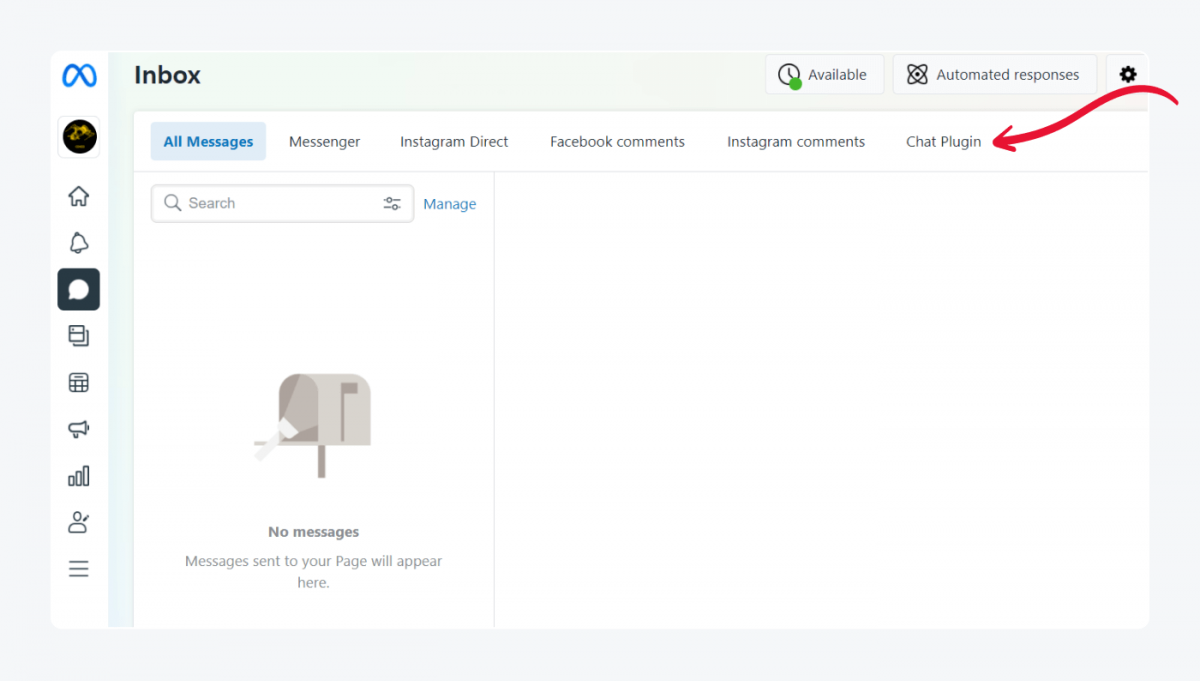
4. Set language and domain name
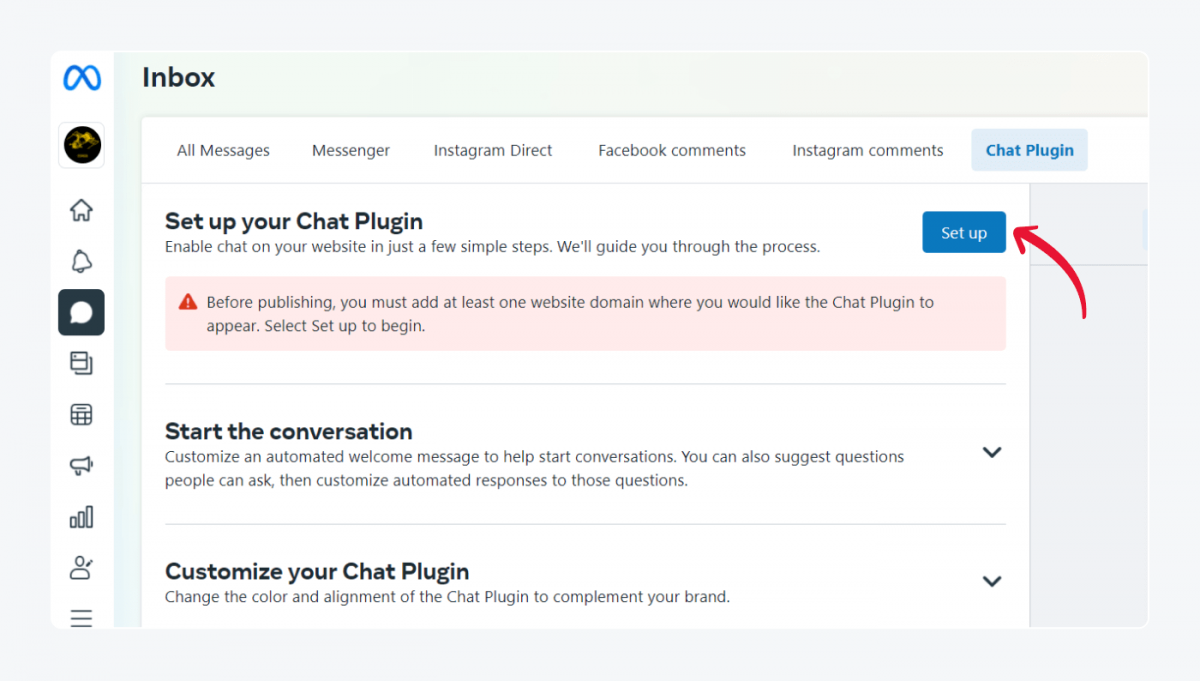
5. Generate a code snippet or install a WordPress/Shopify chat plugin
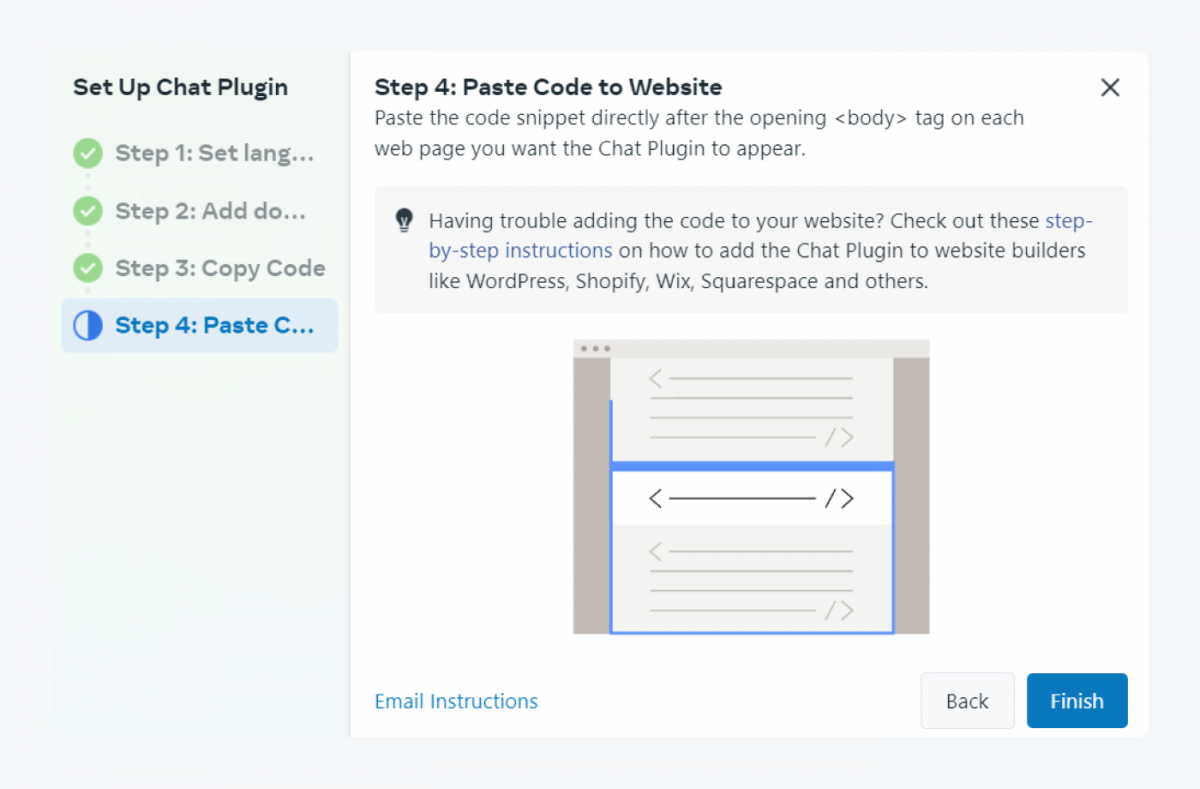
6. Paste the code to your website
You can download the official Messenger Customer Chat plugin for websites from the WordPress plugin repository.
Here is the official guide to adding Facebook Messenger chat on a website.
Live chat platform connected to your Facebook page (option 2)
If you are interested in the second option (Messenger live chat integration), the one that gives you more control over all customer support channels, it is even simpler.
To connect live chat with Facebook Messenger:
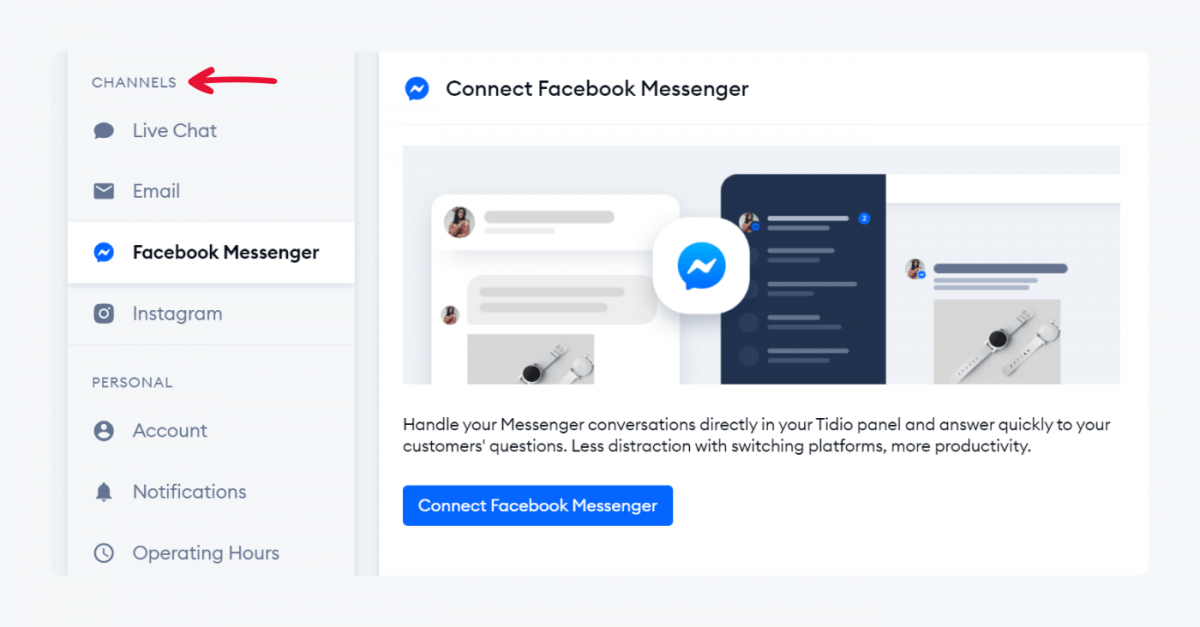
1. Create a free Tidio account
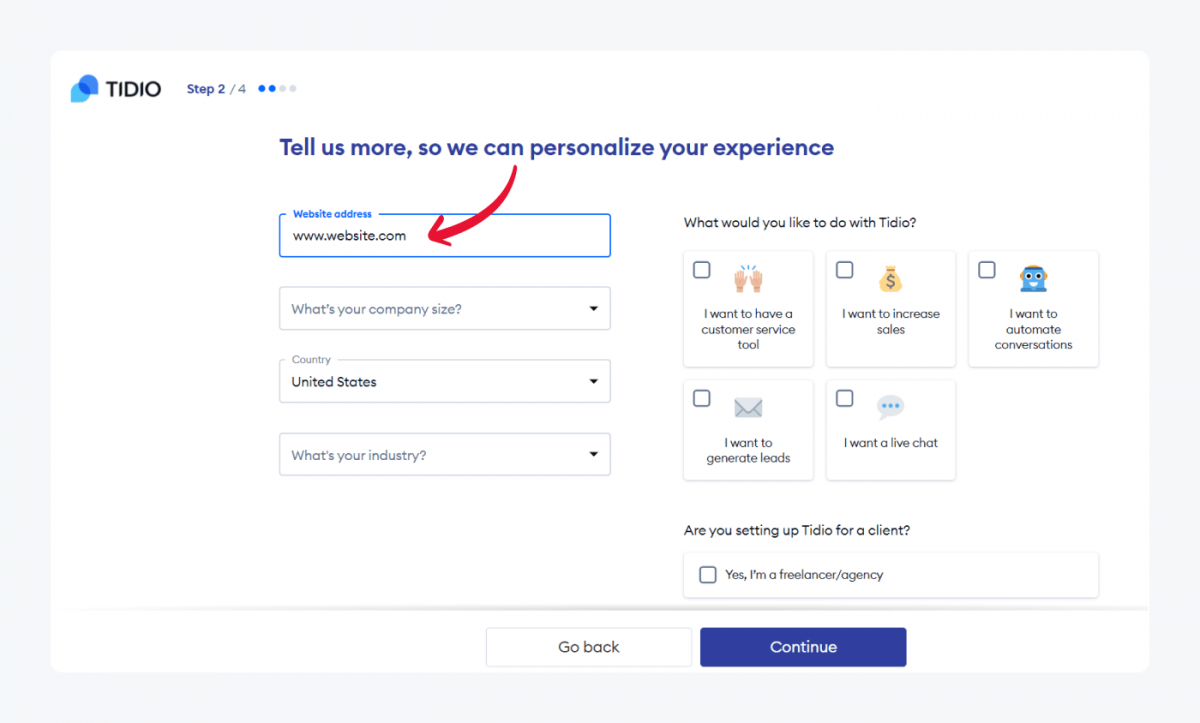
2. Follow the steps of the tour and provide your website address
3. Go to Settings/Channels and connect your Facebook account
Visit our Knowledge Base to learn more about Tidio Messenger integration. You can also find out more about the best Messenger-compatible live chat options for WordPress and Shopify stores here:
Key takeaway
Businesses that engage with customers on social media and provide help via Messenger are in a much better position than those that don’t.
Starting a conversation with your store or website visitor gives you an opportunity to make a great impression, greet new customers, and show them that you care about them. Customers see that immediately and are more likely to give you 5 stars and make another purchase sooner.
There are three ways to connect with your social media users:
- Use the default chat functionality available to all FB pages
- Add a chat widget powered by Facebook on your website
- Try one omnichannel customer service platform on your website, social media, and other channels to streamline your processes
You can get one of the most advanced tools for chatting with visitors right now.
Turn Facebook Messenger into your next sales channel with live chat integration
Facebook Messenger Live Chat FAQ
If you still want to learn more about Messenger, we encourage you to check out official resources such as the Meta Blueprint course: Introduction to Messenger. For basic information, you can also read our list of frequently asked questions about Facebook live chat.
Messenger is primarily a mobile app for instant messaging whereas Facebook Chat could be treated as one of Facebook’s functionalities. For example, when one person uses the desktop version of Facebook Chat and the other has only the Messenger app on their phone, they can still exchange messages. It is the same communication channel that can be accessed through different apps, technologies, and devices.
You can add a widget on your website and chat with your customers via Facebook Business Suite Inbox. Your website visitors will be able to start conversations after signing into their Facebook account or joining conversations as guests. Alternatively, you can use a third-party live chat service that will allow you to chat with every visitor of your website. This solution will still let you use Messenger, but it will be one of multiple channels.
Apart from the official plugin from Facebook, which gets very mixed reviews, the most popular solution is Tidio. You can visit the official website with WordPress plugins, search for live chat and compare reviews. Currently, Tidio Live Chat for WordPress has the highest number of installations and positive reviews. It also has a built-in Messenger integration.
Messenger live chat is familiar and easy to use, but it’s limited to users with Facebook accounts and doesn’t support full omnichannel communication. Tools like Tidio offer more flexibility by combining Messenger with website chat, email, automation, and AI features—all from one dashboard.
You can install the official Messenger plugin directly from Meta Business Suite, or use a platform like Tidio that integrates Messenger with your store’s chat widget. Tidio also supports Shopify, WordPress, and WooCommerce, making it easy to manage support across all channels.
Respond quickly, personalize conversations, and use automation to handle FAQs. Make sure customers can contact you both on Facebook and through your website. Always confirm that the customer’s issue has been resolved before ending the chat.
Using Messenger itself is free. However, if you use a third-party platform to integrate Messenger with other channels or automation, you may need to subscribe to a paid plan depending on usage volume and features.
Customization is limited with the default Facebook widget. If you use a third-party solution like Tidio, you can change the widget’s design, placement, colors, and behavior to better match your brand and website.
Tidio is an all-in-one customer communication platform that combines live chat, automation, and integrations with tools like Facebook Messenger, all in one place.
Yes. Tidio offers a fully customizable live chat widget with features like real-time messaging, chat routing, pre-chat surveys, and more. It also seamlessly integrates with Facebook Messenger, Instagram, and more.
Tidio helps streamline support by managing all conversations across channels in a single dashboard. It also includes automation tools like chatbots and an AI agent (Lyro) that can resolve up to 67% of common inquiries without human input.